Converse agora com nosso suporte
Chat com o suporte

Active Roles 8.1.4 - Synchronization Service Administration Guide

Synchronization Service overview Deploying Synchronization Service Deploying Synchronization Service for use with AWS Managed Microsoft AD Getting started Connections to external data systems
External data systems supported with built-in connectors
Working with Active Directory Working with an AD LDS (ADAM) instance Working with Skype for Business Server Working with Oracle Database Working with Oracle Database user accounts Working with Exchange Server Working with Active Roles Working with One Identity Manager Working with a delimited text file Working with Microsoft SQL Server Working with Micro Focus NetIQ Directory Working with Salesforce Working with ServiceNow Working with Oracle Unified Directory Working with an LDAP directory service Working with an OpenLDAP directory service Working with IBM DB2 Working with IBM AS/400 Working with IBM RACF Working with MySQL database Working with an OLE DB-compliant relational database Working with SharePoint Working with Microsoft 365 Working with Microsoft Azure Active Directory Configuring data synchronization with the SCIM Connector Configuring data synchronization with the Generic SCIM Connector
Using connectors installed remotely Creating a connection Renaming a connection Deleting a connection Modifying synchronization scope for a connection Using connection handlers Specifying password synchronization settings for a connection
Synchronizing identity data Mapping objects Automated password synchronization Synchronization history Scenarios of use Developing PowerShell scripts for attribute synchronization rules Using PowerShell script to transform passwords

Synchronizing identity data

To synchronize identity data between connected data systems, you can use sync workflows and synchronization steps. A sync workflow is a set of data synchronization operations called synchronization steps. A sync workflow can include one or more steps. Each synchronization step defines a synchronization operation to be run between the source and target connected data systems. To manage sync workflows and their steps, you can use the Sync Workflows in the Synchronization Service Console.

You can configure a synchronization step to perform one of the following operations:

  • Creation: Creates objects in the target data system based on the changes made to specific objects in the source data system. When creating a new object in the target data system, Synchronization Service generates initial values for the object attributes using the attribute population rules you have configured.

  • Update: Modifies object attributes in the target data system based on the changes made to specific objects in the source data system. To specify the objects that will participate in the update operation you can use object mapping rules. For more information, see Mapping objects.

  • Deprovision: Modifies or removes objects in the target data system after their counterparts have been disconnected from the source data system. Synchronization Service can be configured to remove target objects permanently or change them to a specific state. To specify the objects that will participate in the deprovision operation you can use object mapping rules. For more information, see Mapping objects.

When configuring a synchronization step you can specify the following:

  • Containers to which you want to create or move objects.

  • Settings to generate names for objects being created or modified.

  • Settings to synchronize group memberships.

  • Settings to synchronize attribute values.

To synchronize identity data between two data systems, you need to create a sync workflow, populate the workflow with synchronization steps, and then run the sync workflow manually or schedule the sync workflow run. The following figure illustrates how Synchronization Service synchronizes identity data in connected data systems:

Figure 8: Identity Data Synchronization

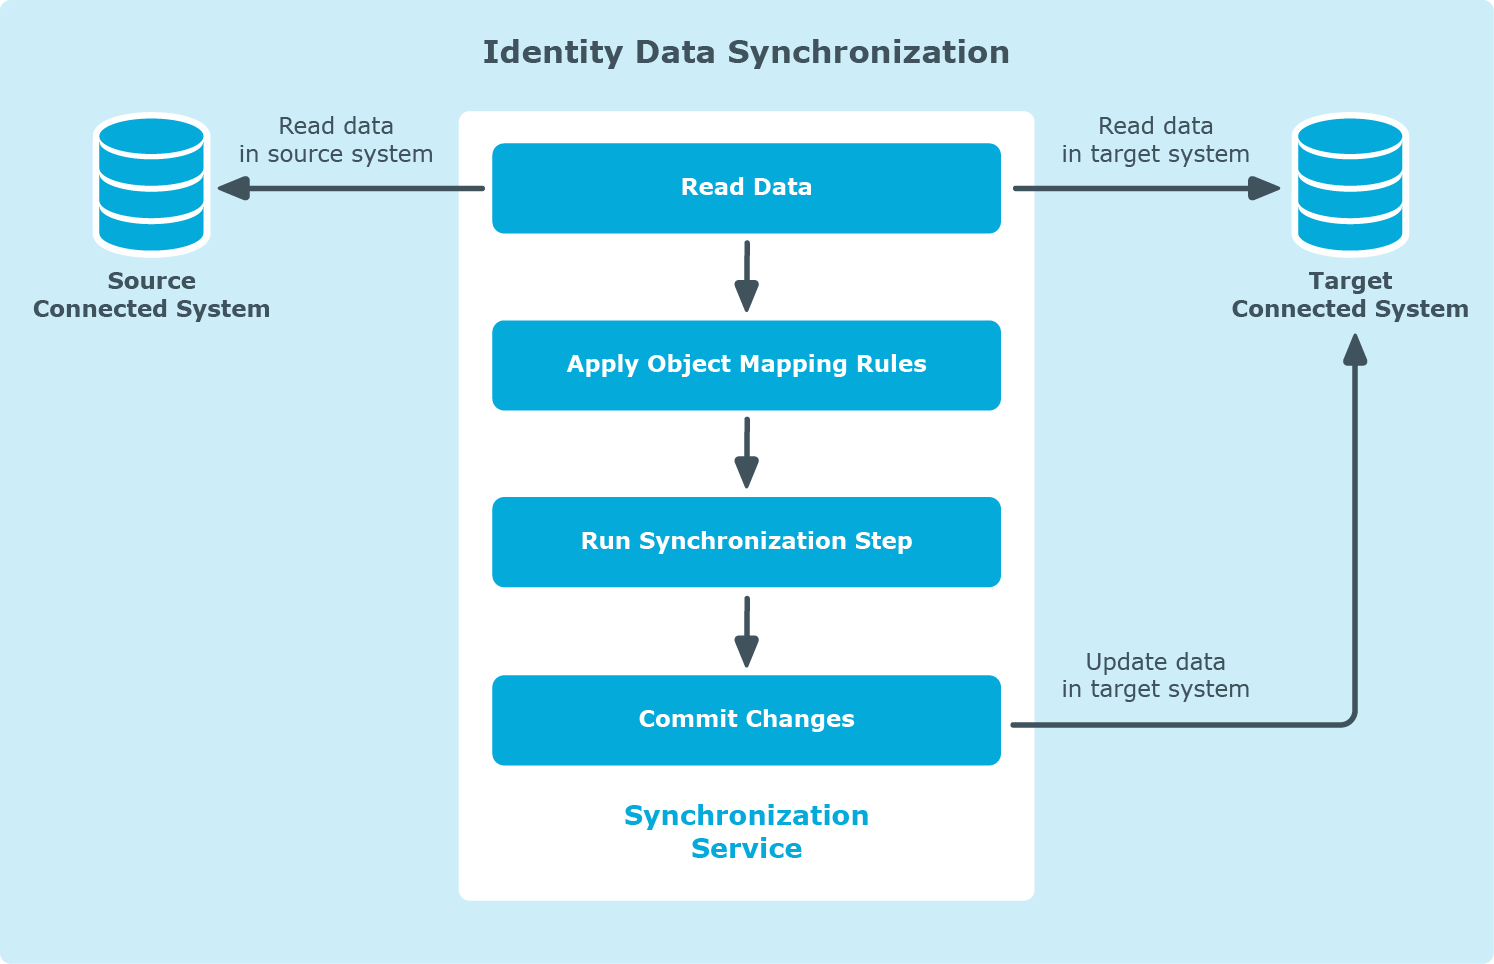
Running a sync workflow causes Synchronization Service to read data in the source and target data systems according to the settings in the sync workflow steps and prepare a list of changes to be made in the target system. Then, you can commit these changes to the target data system.

Running a sync workflow manually allows you to review a list of changes before committing them to the target data system. A scheduled sync workflow run always commits changes to the target data system automatically.

You can configure as many sync workflows as needed, each performing its own set of synchronization steps.

Creating a sync workflow

To create a sync workflow

  1. In the Synchronization Service Console, open the Sync Workflows tab.

  2. Click Add sync workflow.

  3. In the Sync workflow name text box, type a name for the sync workflow being created.

  4. Click OK.

    The new workflow appears on the Sync Workflows tab.

    NOTE: After you created a sync workflow, you must populate it with one or more synchronization steps. For more information, see Synchronizing identity data.

Running a sync workflow

After you created a sync workflow and populated it with one or more steps, you can run the sync workflow. Before running a sync workflow, you can select the workflow steps you want to run. You can run a sync workflow either manually, or automatically on a recurring schedule.

Running a sync workflow manually

This method allows you to select specific steps in a sync workflow and run them. You can also specify how you want to commit the changes to the target data system: automatically or manually. With the manual method you can review a list of changes before committing them to decide whether or not you want these changes in the target system.

To run a sync workflow manually

  1. In the Synchronization Service Console, open the Sync Workflows tab.

  2. Click the name of the sync workflow you want to run.

  3. Click Run now.

  4. Select the check boxes next to the sync workflow steps you want to run.

  5. If you want to automatically commit the changes made by the sync workflow run, select the Automatically commit changes check box. If you want to review the changes before committing them, leave this check box cleared.

  6. Click one of the following to run the sync workflow:

    • Full Run: With this option, Synchronization Service retrieves the data required to run the sync workflow from the connected data systems.

    • Quick Run: With this option, Synchronization Service first tries to run the sync workflow by using the data that is available in the local cache. If the local cache is missing or cannot be used to run the sync workflow, then Synchronization Service retrieves the required data from the connected data systems.

Documentos relacionados

The document was helpful.

Selecione a classificação

I easily found the information I needed.

Selecione a classificação