
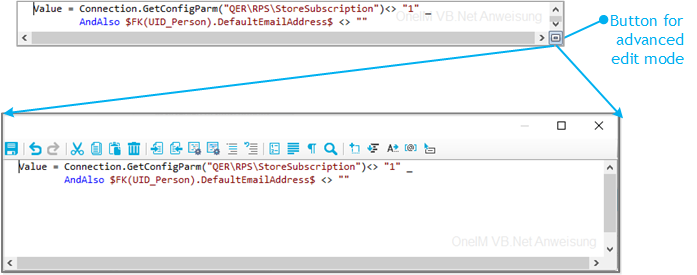
To switch to advanced mode
-
Press Ctrl + Alt + Enter or click the button at the bottom right.
Figure 30: Directly entering a database query
| Icon | Meaning |
|---|---|
|
|
Quits advanced edit mode. |
|
|
Undoes last change. |
|
|
Redoes last change. |
|
|
Cuts selected code. |
|
|
Copies selected code into clipboard. |
|
|
Inserts code from clipboard. |
|
|
Deletes selected code. |
|
|
Decreases insert. |
|
|
Increases insert. |
|
|
Automatic text formatting. |
|
|
Formats text selection automatically. |
|
|
Shows/hides line numbers. |
|
|
Inserts comments. |
|
|
Removes comments. |
|
|
Inserts or removes line numbers. |
|
|
Inserts or removes automatic line breaks. |
|
|
Enable or disable automatic completion of words when they are entered. |
|
|
Shows or hides spaces and tabs. |
|
|
Searches within code. |
|
|
Inserts code snippet. |
|
|
Shows list of objects properties. |
|
|
Shows auto completion list. |
|
|
Shows list with parameter information. |
|
|
Shows additional information. |


|
Shortcut |
Description |
|---|---|
|
Ctrl + C |
Copy to clipboard. |
|
Ctl + Ins |
Copy to clipboard. |
|
Ctrl + X |
Cut and copy to clipboard. |
|
Shift + Del |
Cut and copy to clipboard. |
|
Ctrl + L |
Cut row and copy to clipboard. |
|
Ctrl + V |
Paste from clipboard. |
|
Shift + Ins |
Paste from clipboard. |
|
Ctrl + Y |
Redo action. |
|
Ctrl + Shift + Z |
Redo action. |
|
Ctrl + Z |
Undo action. |
|
Backspace |
Remove character behind cursor. |
|
Shift + Backspace |
Remove character behind cursor. |
|
Ctrl + Backspace |
Remove word behind cursor. |
|
Del |
Delete character in front of cursor. |
|
Ctrl + Shift + L |
Delete row. |
|
Ctrl + Del |
Delete to end of next word. |
|
Data |
Insert line break. |
|
Shift + Return. |
Insert soft line break. |
|
Ctrl + Return |
Insert row above. |
|
Ctrl + Shift + Return |
Insert row below. |
|
Ctrl + Space |
Auto-complete. |
|
Ctrl + Space + Space |
Show list with parameter information. |
|
Tab |
Insert indent/tab. |
|
Shift + Tab |
Remove indent/tab. |
|
Ctrl + U |
Change marked characters to lowercase. |
|
Ctrl + Shift + U |
Change marked characters to uppercase. |
|
Ins |
Toggle insert mode. |
|
Ctrl + T |
Swap characters in front and behind cursor. |
|
Ctrl + Shift + T |
Swap words in front and behind cursor. |
|
Shift + Alt + T |
Swap row with previous row. |
|
Alt + PgUp |
Move row up. |
|
Alt + PgDn |
Move row down. |
|
PgUp |
Move up |
|
PgDn |
Move down. |
|
Left arrow |
Move left. |
|
Right arrow |
Move right. |
|
Ctrl + Left arrow |
Move to previous word. |
|
Ctrl + Right arrow |
Move to next word. |
|
Home |
Move to start of line. |
|
End |
Move to end of line. |
|
Ctrl + Home |
Move to start of script. |
|
Ctrl + End |
Move to end of script. |
|
PgDn |
Move up a page. |
|
PgUp |
Move down a page. |
|
Ctrl + PgUp |
Move to visible start. |
|
Ctrl + PgDn |
Move to visible end. |
|
Ctrl + ] |
Move to next bracket. (not possible on German keyboard) |
|
Ctrl + Down arrow |
Scroll down. |
|
Ctrl + Up arrow |
Scroll up |
|
Ctrl + F |
Open search dialog. |
|
F3 |
Search next. |
|
Ctrl + F3 |
Search forward. |
|
Shift + F3 |
Search backward. |
|
Ctrl + Shift + F3 |
Find previous. |
|
Ctrl + H |
Replace. |
|
Ctrl + I |
Search forward incrementally. |
|
Ctrl + Shift + I |
Search backward incrementally. |
|
Ctrl + Shift + Num- |
Reduce code block selection. |
|
Ctrl + Shift + Num+ |
Extend code block selection. |
|
Esc |
Remove selection. |
|
Shift + Down arrow |
Extend selection down. |
|
Shift + Up arrow |
Extend selection up. |
|
Shift + Left arrow |
Extend selection left. |
|
Shift + Right arrow |
Extend selection right. |
|
Ctrl + Shift + Left arrow |
Extend selection to previous word. |
|
Ctrl + Shift + Right arrow |
Extend selection to next word. |
|
Shift + Home |
Extend selection to start of line. |
|
Shift + End |
Extend selection to end of line. |
|
Shift + Alt + Home |
Extend selection to start of script. |
|
Ctrl + Shift + End |
Extend selection to end of script. |
|
Shift + PgUp |
Extend selection by one page up. |
|
Shift + PgDn |
Extend selection by one page down. |
|
Ctrl + Shift + PgUp |
Extend selection to visible start. |
|
Ctrl + Shift + PgDn |
Extend selection to visible end. |
|
Ctrl + A |
Select all. |
|
Ctrl + Shift + W |
Select word. |
|
Ctrl + Shift + ] |
Select up to the next bracket. (not possible on German keyboard) |
|
Shift + Alt + Down arrow |
Extend selected block down. |
|
Shift + Alt + Up arrow |
Extend selected block up. |
|
Shift + Alt + Left arrow |
Extend selected block left. |
|
Shift + Alt + Right arrow |
Extend selected block right. |
|
Ctrl + Shift + Alt + Left arrow |
Extend selected block by one word to the left. |
|
Ctrl + Shift + Alt + Right arrow |
Extend selected block by one word to the right. |
|
Ctrl + mouse wheel |
Adjust text size. |
There is additional help provided for creating script code.
Syntax highlighting
The input fields support syntax highlighting depending on the syntax type.
Auto-completion
You can use auto-completion when you write script code. You can enable automatic completion in the input fields with the 
The amount of scripted code to enter is reduced by displaying the names of properties or functions that can be used. The contents of the list is determined by the key words in the code.
Entering code snippets
You can insert code snippets using the following options:
- Using the
icon
-
Select the
-
Select the Object Layer, SQL Formatter, or Visual Basic category.
-
Select the code snippet.
-
- Using a shortcut
-
Press F2.
-
Select the Object Layer, SQL Formatter, or Visual Basic category.
-
Select the code snippet.
-
-
Using an aliases
- Enter an alias.
-
Use Tab to insert the code snippet.
NOTE: Be aware of case sensitivity when you enter the alias.
NOTE: If you select a code snippet directly using a shortcut or the
Custom code snippets
You can use custom code snippets. To do this, create a CustomSnippets directory in the One Identity Manager installation directory to store the code snippets. Use Visual Studio documentation to develop your own code snippets.
To sort custom code snippets, use the following syntax to enter a sort order in the code snippet header in the code snippet file. When the code snippet is entered, the numbering is hidden.
<Title>(1) Your title for the code snippet</Title>
<Title>(2) Your title for the code snippet</Title>
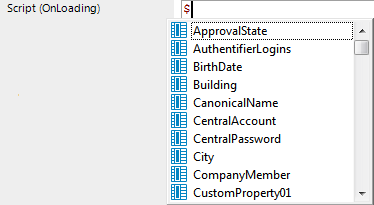
Inputting values using dollar ($) notation
In input fields where a VB.NET term is expected, a help list opens when you enter $. All properties of the current object are displayed. You can also see a tooltip with a detailed description of the property. When you select a foreign key (FK) column, you can navigate to the columns in the relevant table using the arrow keys. To end the selection in the target column, press Enter or double-click. The complete $ notation for your selection should now be shown in the input column. To close the help list without copying any data, press Esc or leave the input field.
Figure 31: Help list for dollar notation
| Icon | Meaning |
|---|---|
|
|
Property of current object. |
|
|
Primary key (PK). |
|
|
Foreign key (FK). |
|
|
Dynamic foreign key |
|
|
Table |
|
|
Special properties |
|
|
Script |


| Shortcut | Action |
|---|---|
|
Arrow down key |
Opens the help list. |
|
Arrow up key, arrow down key |
Navigate to previous or next entry. |
|
Arrow left key, arrow right key |
Navigate to the object above or below over the foreign key. |
|
Data |
Accepts the value in dollar notation. |