You can view or modify the email settings of a shared mailbox with the Email Settings option of the Active Roles Web Interface.
To view or modify the email settings of a shared mailbox
-
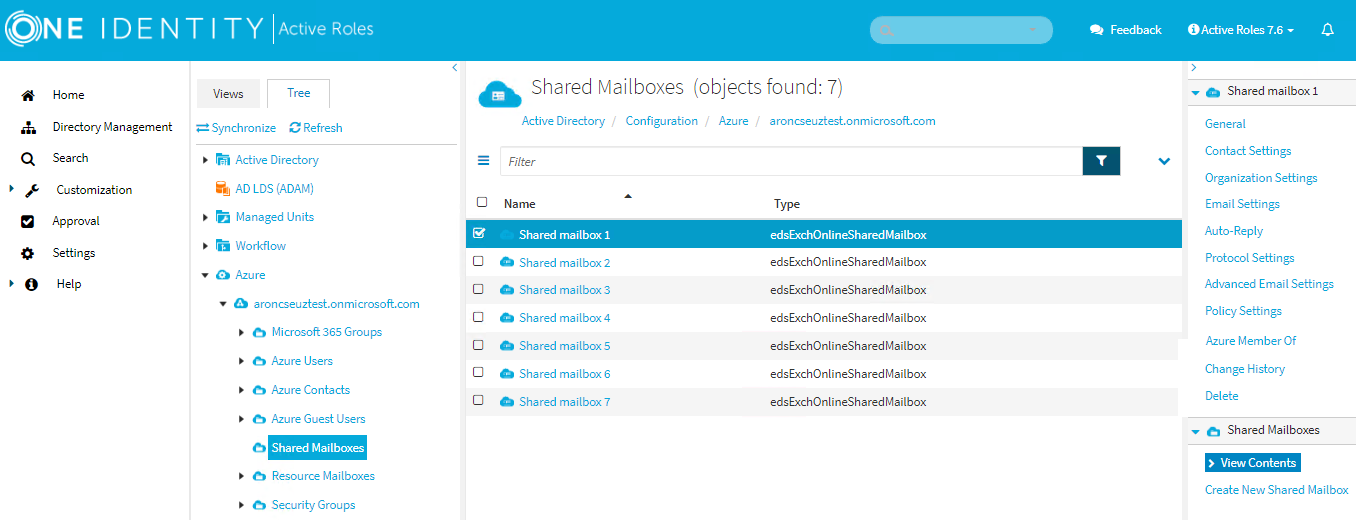
Navigate to Directory Management > Tree > Azure > <azure-tenant-name> > Shared Mailboxes.
Figure 252: Shared Mailboxes — Listing the shared mailboxes in the Azure tenant
-
Select the shared mailbox whose email settings you want to view or modify.
-
In Email Settings, set the following email settings of the shared mailbox:
-
Primary SMTP address: The primary Simple Mail Transfer Protocol (SMTP) address of a user account to be used for server-to-server authorization or access delegation. You cannot modify this value because it is filled automatically.
-
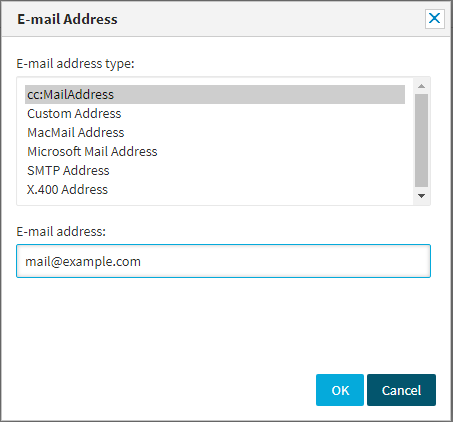
Email addresses:
-
To add additional email addresses (also called proxy addresses) for the shared mailbox, click Add, select the E-mail address type, enter the E-mail address, and click OK.
NOTE: The first SMTP address that you add will be the primary SMTP address (also called the primary email address or the default reply address).
-
To modify an email address that is already added to the list of email addresses, select it and click Edit, modify the E-mail address, and click OK.
NOTE: You cannot modify the E-mail address type of an existing email account. You can only modify the existing address. -
To remove an email address that is already added to the list email addresses, select it and click Remove.
-
-
Accept messages from all senders (default: selected)
-
To only accept messages from selected senders, clear the check box and click Add. Select the users you want to accept messages from, and click OK.
-
To remove senders from the list of users you want to accept messages from, select the users and click Remove.
-
-
Block messages from none (default: selected)
-
To block messages from selected senders, clear the check box and click Add. Select the users you do not want to accept messages from, and click OK.
-
To remove senders from the list of users you do not want to accept messages from, select the users and click Remove.
-
-
Send message maximum size (0-150 000 KB): Set the maximum size of messages in KB. The default value is 35840 KB.
-
Received message maximum size (0-150 000 KB): Set the maximum size of received messages in KB. The default value is 36864 KB.
-
Maximum recipients (0-1000): Set the maximum number of recipients. The default value is 500.
-
Forwarding address: Specify whether to forward received messages from the shared mailbox to another email address.
-
To disable message forwarding, select None (default: selected).
-
To enable message forwarding, select Forward to, and enter the email address you want the shared mailbox to forward received messages to.
-
To modify the forwarding address, click Modify.
-
-
Deliver messages to both forwarding address and mailbox (default: not selected)
To forward messages that the shared mailbox receives to the forwarding address you set, select this check box.
-
-
To apply your changes, click Save.