Chat now with support
Chat with Support

Active Roles 8.1.3 - Administration Guide

Introduction Getting started with Active Roles Configuring rule-based administrative views Configuring role-based administration Rule-based autoprovisioning and deprovisioning
Provisioning Policy Objects Deprovisioning Policy Objects How Policy Objects work Policy Object management tasks Policy configuration tasks
Property Generation and Validation User Logon Name Generation Group Membership AutoProvisioning Exchange Mailbox AutoProvisioning AutoProvisioning in SaaS products OneDrive Provisioning Home Folder AutoProvisioning Script Execution Microsoft 365 and Azure Tenant Selection E-mail Alias Generation User Account Deprovisioning Office 365 Licenses Retention Group Membership Removal Exchange Mailbox Deprovisioning Home Folder Deprovisioning User Account Relocation User Account Permanent Deletion Group Object Deprovisioning Group Object Relocation Group Object Permanent Deletion Notification Distribution Report Distribution
Deployment considerations Checking for policy compliance Deprovisioning users or groups Restoring deprovisioned users or groups Container Deletion Prevention policy Picture management rules Policy extensions
Using rule-based and role-based tools for granular administration Workflows
Key workflow features and definitions About workflow processes Workflow processing overview Workflow activities overview Configuring a workflow
Creating a workflow definition for a workflow Configuring workflow start conditions Configuring workflow parameters Adding activities to a workflow Configuring an Approval activity Configuring a Notification activity Configuring a Script activity Configuring an If-Else activity Configuring a Stop/Break activity Configuring an Add Report Section activity Configuring a Search activity Configuring CRUD activities Configuring a Save Object Properties activity Configuring a Modify Requested Changes activity Enabling or disabling an activity Enabling or disabling a workflow Using the initialization script
Approval workflow Email-based approval Automation workflow Activity extensions
Temporal Group Memberships Group Family Dynamic groups Active Roles Reporting Management History Entitlement profile Recycle Bin AD LDS data management One Identity Starling Join and configuration through Active Roles Managing One Identity Starling Connect Configuring linked mailboxes with Exchange Resource Forest Management Configuring remote mailboxes for on-premises users Migrating Active Roles configuration with the Configuration Transfer Wizard Managing Skype for Business Server with Active Roles
About Skype for Business Server User Management Active Directory topologies supported by Skype for Business Server User Management User Management policy for Skype for Business Server User Management Master Account Management policy for Skype for Business Server User Management Access Templates for Skype for Business Server Configuring the Skype for Business Server User Management feature Managing Skype for Business Server users
Exchanging provisioning information with Active Roles SPML Provider Monitoring Active Roles with Management Pack for SCOM Configuring Active Roles for AWS Managed Microsoft AD Azure AD, Microsoft 365, and Exchange Online Management
Configuring Active Roles to manage Hybrid AD objects Unified provisioning policy for Azure M365 Tenant Selection, Microsoft 365 License Selection, Microsoft 365 Roles Selection, and OneDrive provisioning Changes to Active Roles policies for cloud-only Azure objects
Managing the configuration of Active Roles
Connecting to the Administration Service Managed domains Using unmanaged domains Evaluating product usage Creating and using virtual attributes Examining client sessions Monitoring performance Customizing the Console Using Configuration Center Changing the Active Roles Admin account Enabling or disabling diagnostic logs Active Roles Log Viewer
SQL Server replication Using regular expressions Administrative Template Configuring federated authentication Communication ports Active Roles and supported Azure environments Integrating Active Roles with other products and services Active Roles Language Pack Active Roles Diagnostic Tools Active Roles Add-on Manager

Verifying that a remote mailbox is assigned to an on-premises user

Once you assigned an Exchange Online mailbox to an on-premises user, you can check if Active Roles completed the remote mailbox assignment by any of the following methods.

NOTE: Assigning a remote mailbox to an on-premises user may take up to 15 minutes to complete, with Active Roles attempting to establish connection up to 9 times. If the procedure fails (for example, because Active Roles cannot find the specified email address), Active Roles will log an error in the Windows Event Viewer under the Applications and Services Logs > Active Roles Admin Service category.

NOTE: If your environment has a large number of Microsoft Exchange mailboxes (or a complex Microsoft Exchange deployment), Active Roles may retrieve the properties of users with Exchange mailboxes slower than for users without Exchange mailboxes.

To solve this problem, enable a performance fix by creating a new registry key as described in Knowledge Base Article 4336544:

  1. On the machine(s) running the Administration Service and the Web Interface, launch the Windows Registry Editor.

  2. In the Registry Editor, navigate to the following registry path:

    HKEY_LOCAL_ MACHINE\SOFTWARE\One Identity\Active Roles\Configuration

  3. Create a new DWORD (32-bit) Value named PerformanceFlag.

  4. Double-click the new PerformanceFlag DWORD, and set its Value data to 1.

  5. To apply the fix, restart the Active Roles Administration Service and IIS. If the fix is enabled successfully, the following Active Roles event log with Event ID 2508 will appear in the Event Viewer:

    Performance flag value set to 1.
  6. (Optional) To deactivate the fix later, set the Value data of the PerformanceFlag DWORD to 0.

The PerformanceFlag registry key accepts only a value of 1 (to activate the fix) or 0 (to deactivate it).

To verify with the msExchRemoteRecipientType property whether Active Roles assigned the remote mailbox

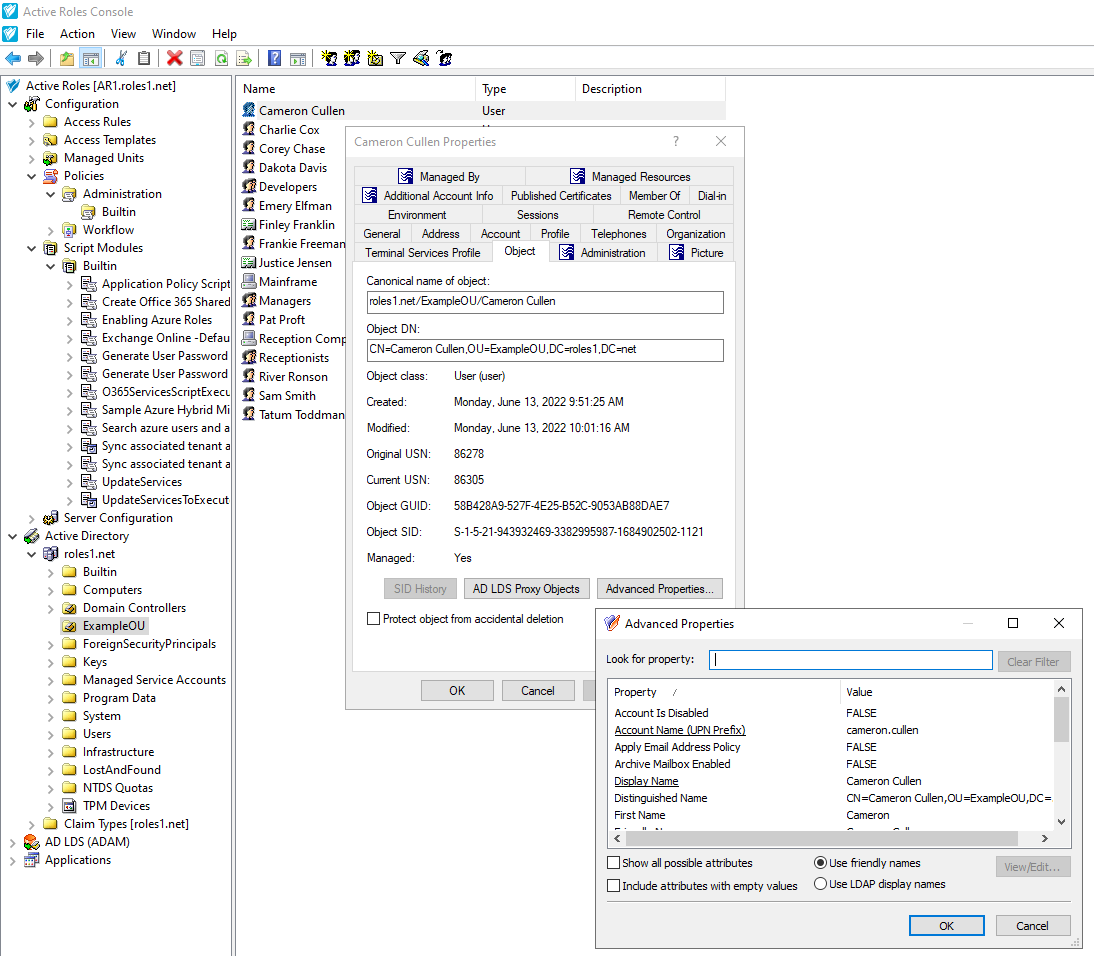
  1. Open the Advanced Properties of the on-premises user to which you assigned the remote mailbox. In the Active Roles Console, in the Active Directory (AD) tree, navigate to the Organizational Unit (OU) where the user is located, double-click the user, then in the Properties window, click Object > Advanced Properties.

    Figure 160: Active Roles Console – Opening the Advanced Properties of a user

  2. Search for the msExchRemoteRecipientType property.

    TIP: To find the property faster, enter its name (or part of its name) in the Look for property field. If you cannot find the property, select Show all possible attributes and Include attributes with empty values, too.

  3. Check the value of the msExchRemoteRecipientType property. For users with no mailboxes, the value of this property is empty. Once Active Roles finished assigning the remote Exchange Online mailbox to the user, the value of the property changes to 1.

To verify with the Exchange mailbox GUID whether Active Roles assigned the remote mailbox

  1. Open Windows PowerShell, and connect to Exchange Online with the following command:

    Connect-ExchangeOnline
  2. In the Microsoft login popup that appears, log in with the Azure AD administrator account associated with the Azure tenant that stores the remote mailbox.

  3. After logging in, in Windows PowerShell, fetch the identity information of the remote mailbox with the following command:

    Get-Mailbox -Identity '<email-address>' | Format-List ExchangeGUID

    <email-address> is the Microsoft Exchange alias of the mailbox.

  4. Note down the value of the ExchangeGUID parameter.

  5. In the Active Roles Console, open the Advanced Properties of the on-premises user to which you assigned the remote mailbox. In the Active Roles Console, in the Active Directory (AD) tree, navigate to the Organizational Unit (OU) where the user is located, double-click the user, then in the Properties window, click Object > Advanced Properties.

  6. Search for the msExchMailboxGuid property.

    TIP: To find the property faster, enter its name (or part of its name) in the Look for property field. If you cannot find the property, select Show all possible attributes and Include attributes with empty values, too.

  7. Compare the value of the msExchMailboxGuid property with the Exchange GUID returned by the Get-Mailbox PowerShell command. If the two values match, Active Roles successfully assigned the remote mailbox to the on-premises user.

To verify with the RecipientType attribute of the user whether Active Roles assigned the remote mailbox

  1. On the on-premises Microsoft Exchange server that stores the mailbox data of the user, open Windows PowerShell and run the following command:

    Get-User '<user-name>'

    <user-name> is the fully qualified user name of the on-premises user.

  2. Check the value of the RecipientType property:

    • If the value is MailUser, Active Roles assigned the remote mailbox to the user.

    • If the value is User, the on-premises user does not have any mailboxes assigned to them.

TIP: If Active Roles could not assign the remote mailbox to the on-premises user within the expected time frame, perform the following troubleshooting steps:

  • Check network connectivity.

  • Check the status of the on-premises Exchange server and the Exchange Online service.

  • Verify that the specified remote mailbox email address is correct.

Migrating Active Roles configuration with the Configuration Transfer Wizard

For large enterprises which implement a complex administrative structure using Active Roles, one of the greatest challenges becomes exporting Active Roles configuration from a test environment to a production environment.

With Active Roles Configuration Transfer Wizard, you can export Active Roles configuration objects (such as Access Templates, Managed Units, Policy Objects, Policy Type objects, and so on) to an XML file, then import them from that file to populate another instance of Active Roles. The export and import operations provide a way to move configuration objects from a test environment to a production environment.

Configuration Transfer Wizard components

Configuration Transfer Wizard includes the following components, all installed during the setup process of Configuration Transfer Wizard:

Configuration Collection wizard

Configuration Collection Wizard is intended to collect the Active Roles configuration data in a source environment. During the collection process, the selected Active Roles configuration objects are packed into an XML file, called "configuration package".

Related Documents

The document was helpful.

Select Rating

I easily found the information I needed.

Select Rating