Notification Distribution
Notification Distribution policies automatically generate and send email notifications about deprovisioning requests. As such, these policies are meant to notify designated persons about object deprovisioning requests, so that they can take additional deprovisioning-related actions on that object, if necessary.
When configuring a Notification Distribution policy, you can:
For a detailed description of this policy, see Concept: Notification Distribution in the Active Roles Feature Guide.
Configuring email settings
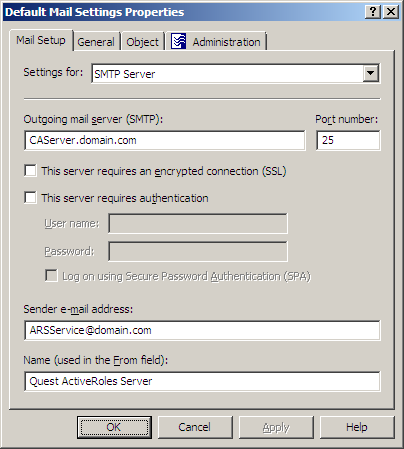
When you click Settings, the Console displays the Properties dialog for the selected email configuration, with the Mail Setup tab that looks like the following figure.
Figure 59: Mail Setup

On this tab, you can configure the following email settings:
-
Outgoing mail server (SMTP): Specify the fully qualified address of the SMTP server to use, such as smtp.mycompany.com.
-
Port number: Specify the port number to connect to on the SMTP server. Normally, the SMTP server has this port number set to 25.
-
This server requires an encrypted connection (SSL): Select this check box if the SMTP server requires that its clients use Secure Sockets Layer (SSL) when posting messages over the network.
-
This server requires authentication: Select this check box if the SMTP server is configured to use Basic Authentication or Integrated Windows Authentication. Then, type the user name and password in the boxes beneath this option. By default, the Outgoing mail server (SMTP) list includes a single entry. You can add more entries to the list using the Active Roles Console. In the Console tree, expand Configuration/Server Configuration, right-click Mail Configuration, select New > Mail Configuration, and then follow the instructions in the wizard. passes these credentials to the SMTP server when establishing a connection.
-
Log on using Secure Password Authentication (SPA): Select this check box if the SMTP server is configured to use Integrated Windows Authentication, in order not to transmit the actual user password across the network.
-
Sender email address: The default email address of the message sender. A valid email address must be specified. Normally, this is the email address of the service account used by the Administration Service.
-
Name (used in the From field): Specify the default name of the message sender, to be displayed in the From field of messages sent by using this email configuration.
When you are done configuring the email server-related settings, click OK to close the Properties dialog box the email configuration. Then, click Next and follow the instructions in the wizard to create the Policy Object.
Configuring a Notification Distribution policy
You can configure a new Notification Distribution policy with the Active Roles Console.
To configure a Notification Distribution policy
-
On the Policy to Configure page, select Notification Distribution Policy, then click Next.
-
On the Notification Recipients and Message page, do the following, then click Next:
-
Click the button next to Notification recipients, and select one or more email recipients.
-
In Message Subject, type the subject of the message that the specified recipients will receive upon a request to perform a deprovisioning operation.
-
Under Message Body, type any information regarding the deprovisioning operation.
Macros have the same syntax and semantics as values for policy conditions in Property Generation and Validation policies: An attribute’s LDAP display name enclosed in angle brackets (<>) and prefixed with the percent character (%) represents the value of that attribute. For example, before sending a message, Active Roles replaces %<name> with the name of the object to deprovision.
-
On the Outgoing Mail Server page, select the email configuration you want the policy to use. In the Outgoing mail server (SMTP) list, click the appropriate mail settings.
NOTE: By default, the Outgoing mail server (SMTP) list includes a single entry. You can add more entries to the list using the Active Roles Console. In the Console tree, expand Configuration > Configuration, right-click Mail Configuration, select New > Mail Configuration, then follow the instructions in the wizard.
-
If you want to view or modify the selected mail settings, click Settings, and use the Mail Setup tab. For more information, see Configuring email settings.
-
Click Next.
-
On the Enforce Policy page, you can specify objects to which this Policy Object is to be applied:
-
Click Next, then click Finish.
NOTE: Each email configuration specifies an SMTP server and provides information required to connect to that server. You can view and modify configuration parameters by clicking Settings.
Scenario: Sending deprovisioning notification
This scenario describes how to configure a policy so that the administrator is notified of deprovisioning objects in any domain registered with Active Roles (managed domain).
To implement this scenario, you must perform the following actions:
- Create the appropriate e-mail configuration.
- Create, configure, and apply the Policy Object that defines the appropriate policy.
As a result, upon a request to deprovision an object such as a user or group in any managed domain, the administrator receives an e-mail message informing of the deprovisioning request. The message includes the name of the object to deprovision.
The following two sections elaborate on the steps to implement this scenario.

