
Further considerations
When you have added an application to Cloud Access Manager, you may want to ensure users only access the application using Cloud Access Manager. This may be required if you use Cloud Access Manager to enforce strong authentication for the application, or want to use Cloud Access Manager’s auditing features to monitor application usage. For further information on how to ensure that users access the application using Cloud Access Manager, please refer to Preventing direct access to applications protected by Cloud Access Manager in the One Identity Cloud Access Manager Security and Best Practices Guide.
Form fill authentication
This example will guide you through the steps required to configure single sign-on for Microsoft Outlook Web App using the form fill authentication method.
Log in to the Administration Console using the desktop shortcut Cloud Access Manager Application Portal and select Add New from the Applications section on the home page.
Cloud Access Manager provides a set of application templates to automatically configure common applications. This example describes how to configure an application manually, rather than using a template.
To configure single sign-on for Microsoft OutlookWeb App using form fill authentication
- Click Configure Manually.
- Select Form Fill, then click Next.
- If you have not already done so while adding a previous Form Fill application, save the Inspect Login Form bookmarklet to your browser's favorites. To do this, right-click the Inspect Login Form link, then click Add to favorites.
- Enter the URL of the application into the box provided and click Go. For example, for Microsoft Outlook Web App (OWA) enter https://webmail.prod.local/owa, where webmail.prod.local is the hostname of the host running OWA. This will take you to the application's login page. If you are taken directly to the application, check that you are not already signed in and if necessary, sign out.
-
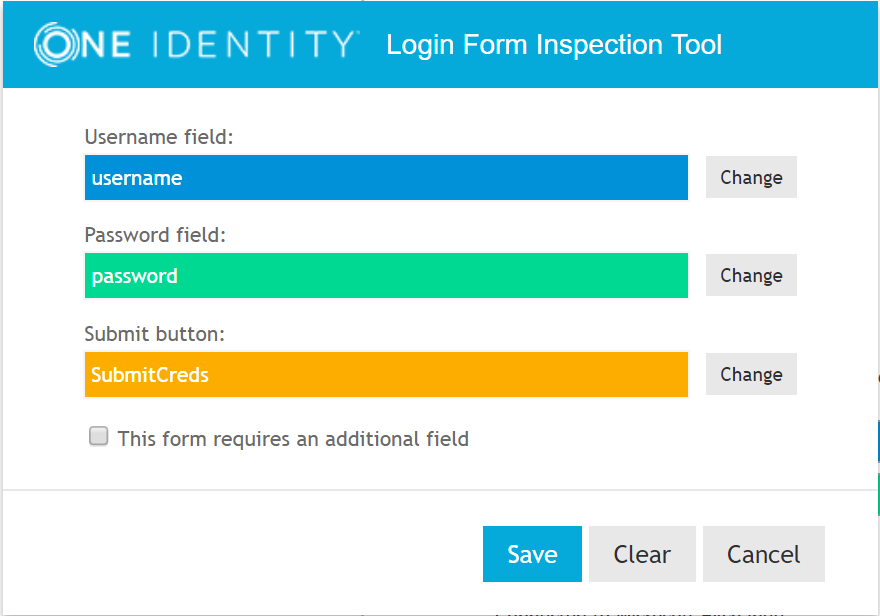
With the application’s login page displayed, click the browser's Favorites icon and click Inspect Login Form. The Cloud Access Manager Login Form Inspection Tool will now appear in the bottom-right corner of the browser window.
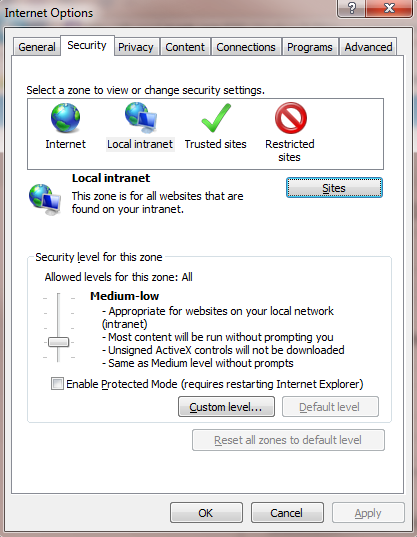
NOTE: If you are using the Cloud Access Manager Login Form Inspection Tool in Internet Explorer, your Cloud Access Manager website will need to be in the Local intranet zone. This can be selected by going to the Internet Options | Security tab in Internet Explorer while viewing your site. If Local Intranet is not highlighted as shown, click Local intranet |Sites | Advanced then add your Cloud Access Manager site.
-
Use the tool to obtain the field IDs for the login form. For example, click in the Username field, then click in the Passwordfield, then finally click the Submit button.
- Click Save to save the form IDs and return to the Cloud Access Manager configuration wizard.
- After using the Login Form Inspection Tool to identify the username and password fields and action URL, you are presented with the Form Fill Method page. This is where you choose whether or not to proxy the application with Cloud Access Manager, if you choose not to proxy the application Step 11 and Step 12 will not apply. Click Next.
-
Review the detected Form Fill Details.
NOTE: If the application displays the password field on a separate page to the username field, check the box titled The password field is located on a separate page. You will then be able to manually enter the field identifiers for the password field and submit button.
-
For OWA, leave the Form Fill URLs with their detected values. Click Next.
NOTE: Some applications use URLs where only the query string portion of the URL changes when navigating between pages. For example, pages in an Oracle application may only differ by a function id in the query string. The home page might have the ID of 150, for example https://server/OA_HTML/RF.jsp?functionId=150 and the login page an ID of 200, for example https://server/OA_HTML/RF.jsp?functionId=200.
To configure this type of application you need to select the box labelled Information in the query string is required to identify the login page of the application. Cloud Access Manager will then allow you to select the query string parameter that identifies the login page, for example the functionId=200 parameter used in the previous Oracle example. If an application uses multiple query string parameters, only check the parameters that identify the login page. For example, some applications use additional parameters to store information unique to a particular user or access attempt. These parameters should not be selected as they would prevent the login page being detected for all users/requests.
NOTE: If the password field is located on a separate page, you will need to manually specify the URL of the password page. Cloud Access Manager requires the application to use a different URL for the password page to that of the login page containing the username field.
-
Verify the detected application URL is correct. The URL should contain the correct protocol for the application, for example https followed by the Fully Qualified Domain Name (FQDN) used by the application and optionally a port number if the application uses a non standard port. The URL should not contain a path, for example /OWA. Simple hostnames and IP addresses can also be used, but if the application has been configured to use a particular FQDN/alias then this must also be used in Cloud Access Manager, click Next.
NOTE: The protocol and FQDN and port can be obtained from the URL used to access the application. For example, if the application is normally accessed through https://webmail.prod.local:8443/OWA the protocol would be HTTPS and the FQDN would be webmail.prod.local and the port would be 8443.
-
In this step, Cloud Access Manager needs to know how to proxy the application. Typically this involves configuring Cloud Access Manager to proxy the entire web server used by the application through a new FQDN. This is the preferred method and the method compatible with the most applications. To configure Cloud Access Manager in this way, simply enter the new public FQDN to proxy the application into the field provided on the Proxy URL page.
The new FQDN should be within the wildcard DNS subdomain created during the installation, which will resolve to the Public IP address used by the proxy. For example, if you created the wildcard DNS subdomain *.webapps.democorp.com during the installation you could use the FQDN owa.webapps.democorp.com to proxy Microsoft Outlook Web App. If you did not create a wildcard DNS subdomain for Cloud Access Manager during the installation you will need to add this new FQDN into your public DNS manually. The new FQDN should be covered by the wildcard SSL certificate you are using.
Alternatively, some applications are installed entirely within their own virtual directory on the web server where they reside. One example of such an application is One Identity Active Roles which installs into the virtual directory /ARServerAdmin, in this case you may be able to configure Cloud Access Manager to proxy the application's virtual directory only, rather than the whole web server, and reuse the FQDN of the proxy. To configure this option, select the proxy's FQDN from the list, then enter the virtual directory where the application is installed into the field below. When your configuration is complete, click Next.
NOTE: Take care to ensure that the path entered is unaltered, even down to subtle changes such as character case. In the example for Active Roles Server, the path must be ARServerAdmin.
- You will now see the Permissions page, which enables you to control which users can access the application. By default, all Cloud Access Manager users have access to the application. You can restrict access to the application to users who belong to a specific role, but for this example simply click Next to allow all users to access the application.
- Enter a name for the application.
- Select Use primary credentials to log into this application. This will ensure that OWA uses the user's Active Directory domain credentials rather than a different username or password unique to the application, for example the same credentials that the user used to authenticate to Cloud Access Manager. For applications that require different credentials make sure this option is left clear. Click Next.
-
You can now configure how the application is displayed on the Cloud Access Manager Portal. Enter the Title and Description you want to display on the Cloud Access Manager Portal. Many applications will require you to configure a particular entry point, for example with Microsoft Outlook Web App you may need to append the URL with OWA if Outlook is not configured to automatically redirect to /OWA when no path is specified in the URL.
NOTE: Take care to ensure that the URL entered is unaltered, even down to subtle changes such as character case. In the example Microsoft Outlook Web App, the URL must be appended with OWA. The Add application to application portal home and Allow user to remove application from application portal home options allow you to specify whether the application should appear automatically on each user’s portal page, and how the user can manage the application from the application portal. The options are shown in the table below.
Table 3: Application portal options Add application to application portal home Allow users to remove application from application portal home Functionality application is added to the portal and it cannot be removed by the user through the Application Catalog.
application is added to the portal and it can be removed by the user through the Application Catalog.
application is not automatically added to the portal. The user can add or remove the application to/from the portal through the Application Catalog.
To access the application catalog from the application portal, the user simply needs to click their username, then select Application Catalog. Depending on the settings in the Add application to application portal home and Allow user to remove application from application portal options, the user can add or remove applications to/from the application portal.
- Configuration of the application is now complete. Click Finish.


To verify that the application is configured correctly
- Close Internet Explorer to end your Cloud Access Manager session.
- Open the Cloud Access Manager Portal by using the desktop shortcut Cloud Access Manager Application Portal.
-
Log in to the Cloud Access Manager Portal and click the OWA application.
NOTE: The first time an application using form fill authentication is accessed by each user, they are presented with the application’s login page as normal. The user must enter their credentials for the application as they normally would to log in. Their credentials are then captured and securely stored within Cloud Access Manager so that they can be automatically entered the next time they access the application from the Cloud Access Manager application portal.
Assuming a user's application credentials, the user's primary credentials in this case, have not yet been stored in Cloud Access Manager, they will be prompted to enter them.
- Enter your credentials into the OWA login page as normal and click Sign In.
- From OWA, click Sign Out and close Internet Explorer.
- Re-open the Cloud Access Manager Portal and log in as the same user.
- Click the OWA application and you are signed in automatically.
Configuration of Microsoft Outlook Web App for SSO is now complete.
|
|
NOTE: While the majority of applications can be configured automatically, some applications will require manual configuration. For further information on advanced form fill configurations, please refer to One Identity Cloud Access Manager How To Configure Advanced Form Fill Authentication. |
To configure single sign-on for the form fill application change password page (optional)
If a web application supports change password or expired password pages, you can configure Cloud Access Manager to fill and capture these pages.
- Log in to the Cloud Access Manager administrator console using the desktop shortcut Cloud Access Manager Application Portal.
- Enter the URL of the application into another tab in the browser. For example, for OWA enter https://webmail.prod.local/owa, where webmail.prod.local is the hostname of the host running the Microsoft Outlook Web App.
- Navigate to the change password page.
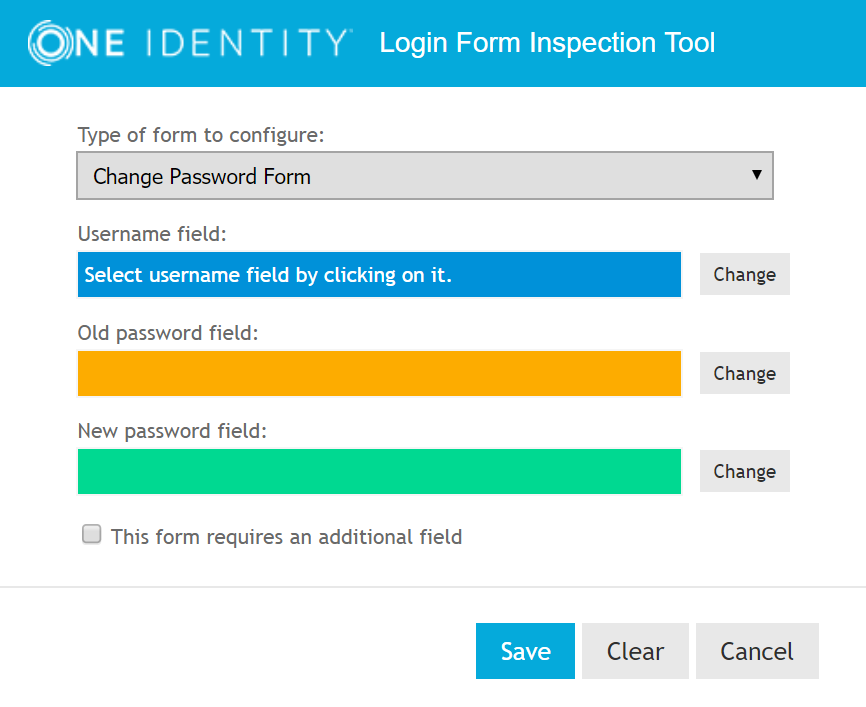
- With the application’s change password page displayed, click the browser's favorites icon and click Inspect Login Form. The Cloud Access Manager Login Form Inspection Tool is now displayed in the bottom-right corner of the browser window. The tool will detect that the application is already known to Cloud Access Manager and display a Change Password Form/Expired Password Form list. Select the type of form you want to configure.
-
Use the tool to obtain the field IDs for the login form. For example, if required click in the Username field for the field where a username needs to be entered, then if required click in the Old password field for where to enter the old password, and finally click in the New password field for where to capture the new password from.
- Click Save to return to the Cloud Access Manager configuration wizard with your additional configuration.
- Review the detected field IDs and click Save.
Further considerations
When you have added an application to Cloud Access Manager, you may want to ensure users only access the application using Cloud Access Manager. This may be required if you use Cloud Access Manager to enforce strong authentication for the application, or want to use Cloud Access Manager’s auditing features to monitor application usage. For further information on how to ensure that users access the application using Cloud Access Manager, please refer to Preventing direct access to applications protected by Cloud Access Manager in the One Identity Cloud Access Manager Security and Best Practices Guide.
Configuring Single Log Out (SLO) for proxied applications
You may need to configure Single Log Out for some proxied applications, for example, Outlook Web App in a Cloud Access Manager for Defender deployment.
A user may unknowingly leave their Cloud Access Manager user session active, which a subsequent user could access using the same client and browser. This can occur when a user has connected directly to the proxied application URL rather than accessing it via the Application Portal; the user is redirected to Cloud Access Manager for login and then redirected back to the application where Single Sign-On (SSO) occurs. The Cloud Access Manager user session is not closed automatically when a proxied application session is logged out.
Cloud Access Manager includes proxy parameters that you can set for any proxied application. The parameters cause the browser to redirect to the Cloud Access Manager /EndWebSession URL when a target URL is seen by the proxy.
Depending on the logout routine of the application, you may need to apply the cam.endSessionURLs only, or cam.endSessionURLs and cam.allowEndSessionURLToBeProxied may be required. Please refer to the following steps and examples.
To configure SLO for a proxied application
- Login to the Admin UI as the Fallback Administrator.
- On the Cloud Access Manager Proxy page, select Settings, then Tune.
- If used, set both parameters to apply to All Applications.
Example 1
For Outlook Web App 2010 which redirects to the standard “You have successfully signed out…close all browser windows” page, use the following configuration:
cam.endSessionURLs = /owa/auth/logoff.aspx?Cmd=logoff&src=exch
Example 2
For Outlook Web App 2010 when it is configured to redirect to the login page or other SSO location, or is protected by the Microsoft Threat Management Gateway (TMG), you cannot use the end URL as the SLO trigger or Cloud Access Manager could log out users when attempting SSO. Instead, you should use the OWA logout start URL. To ensure that the OWA logout routine is completed before the Cloud Access Manager redirect occurs, send this URL to the client browser using the following configuration:
cam.endSessionURLs = /owa/logoff.owa
cam.allowEndSessionURLToBeProxied = True