
Dell™ One Identity Cloud Access Manager 8.1 - How to Configure Microsoft SharePoint
Cloud Access Manager configuration prerequisites
Adding Microsoft® SharePoint™ to Cloud Access Manager using WS-Federation
Configuring a SharePoint™ 2010 or 2013 WS-Federation Trust using the Cloud Access Manager for Microsoft® SharePoint™ utility
Protecting your SharePoint™ website with Cloud Access Manager
Enabling SharePoint™ People Picker functionality
Using the SharePoint™ People Picker
Adding Microsoft® SharePoint™ to Cloud Access Manager using the reverse proxy
Troubleshooting
Legal notices
Installing Cloud Access Manager for SharePoint
Establishing a trust between Cloud Access Manager and SharePoint™
Manual configuration of a SharePoint™ 2013 Server WS-Federation Trust
Manual configuration of a SharePoint™ 2010 Server WS-Federation Trust
Protecting your SharePoint™ website with Cloud Access Manager
|
1 |
|
2 |
|
3 |
Select the required Zone. |
|
4 |
Scroll down to the Trusted Identity provider section and ensure that Trusted Identity provider is selected. |
|
5 |
Select the Cloud Access Manager authenticator you created previously. Note: If you created the authenticator using the utility, it will be called CAM. Note: Clear the Enable Windows Authentication check box. If more than one authenticator is specified, the user will be prompted to select which authenticator to use when SharePoint opens. |
|
6 |
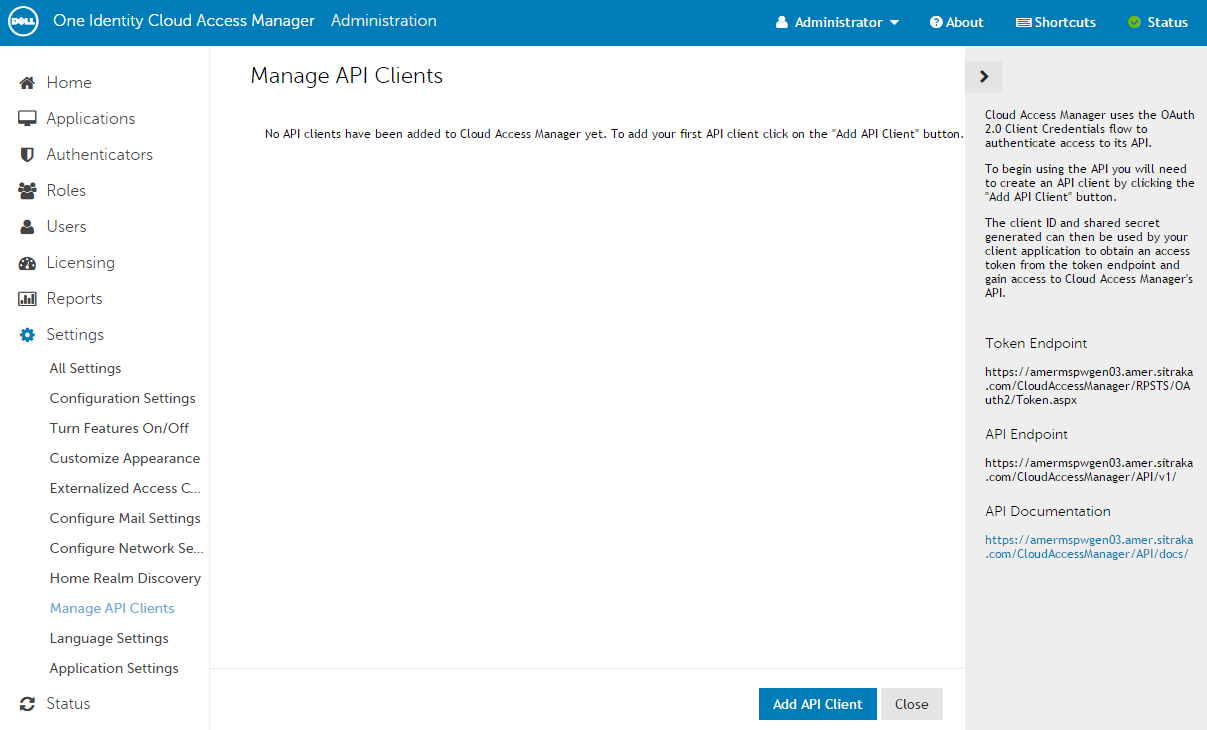
Enabling SharePoint™ People Picker functionality
To enable SharePoint™ People Picker functionality with Dell™ One Identity Cloud Access Manager for Microsoft® SharePoint™
|
1 |

|
2 |
In the API Hostname field, enter the Cloud Access Manager Server hostname. |
|
3 |
|
4 |
Click Add API Client. |
|
5 |
|
6 |
Copy and paste the Client ID and Shared Secret into the appropriate fields in the Cloud Access Manager for SharePoint application and then click Save. |
|
7 |
In the Cloud Access Manager for SharePoint application click Save Configuration, and then click Install. |
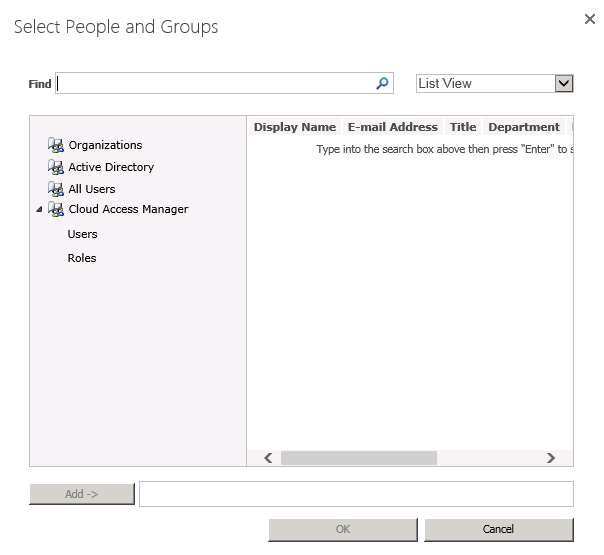
Using the SharePoint™ People Picker
Before you use the Cloud Access Manager SharePoint people picker solution you need to ensure that Ambiguous Name Resolution (ANR) is enabled for all Active Directory® attributes that you are using to map your Cloud Access Manager users to SharePoint user accounts. By default this is the mail attribute. For details on how to configure ANR in Active Directory, please refer to Microsoft TechNet:
|
1 |
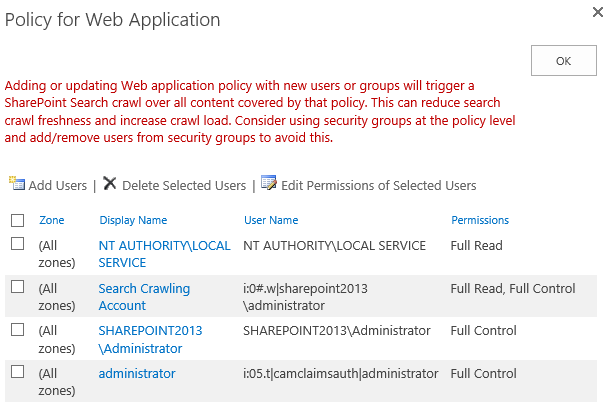
To allow user access through your authenticator use the User Policy editor in the SharePoint application ribbon for your SharePoint web application. |
|
2 |
|
3 |
Select Add Users. |
|
4 |
To open the SharePoint People Picker, select the address book icon below the Users field. If you have installed the Cloud Access Manager for People Picker, you will see Cloud Access Manager in the tree with two sub-categories of Users and Roles. |
|
5 |
If you do not enter any search criteria in the Find field to search the Cloud Access Manager address book, all available Cloud Access Manager roles will be found. |
|
6 |
If you enter search criteria in the Find field to search the Cloud Access Manager address book, any users or roles that match the criteria you specified will be found. |
Note: If you add users manually from the Active Directory address book, they must be added by their email address to the new authentication provider — not by their sAMAccountName or other identifier. Remember to check that test users have the mail attribute populated in Active Directory® as it is not populated by default.
Adding Microsoft® SharePoint™ to Cloud Access Manager using the reverse proxy
In addition you need to configure SharePoint Server for forms based authentication to allow a Dell™ One Identity Cloud Access Manager form-fill application to operate. For further information, please refer to Microsoft® TechNet for SharePoint Server 2010 and SharePoint Server 2013 configuration steps.
Note: Integrated Windows Authentication (IWA) and HTTP basic authentication are also valid authentication configuration options when using the reverse proxy. For further information, please refer to the Dell™ One Identity Cloud Access Manager Configuration Guide.
Note: Microsoft® Office rich client applications, for example desktop Microsoft® Office 2007 and Microsoft® Office 2013, are not supported when Cloud Access Manager is used to proxy SharePoint 2013; you should use WS-Federation if rich client support is required.
|
1 |
Manually configure a SharePoint application using the form-fill authentication method as described in the Dell™ One Identity Cloud Access Manager Configuration Guide. |
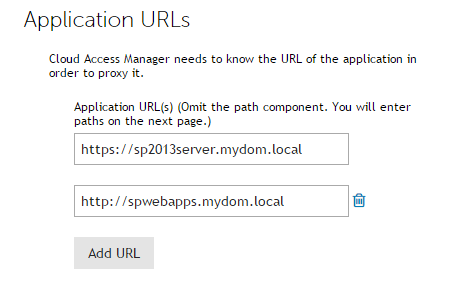
Note: For SharePoint Server 2013, configure the Application URLs to use two proxy aliases for the root-to-root mapping of your SharePoint Server and Office Web Apps Server.
The application URLs you add for the Office Web Apps farm may differ in format depending on the authentication type used. For example, you may need to add the simple server name for the Office Web Apps farm as an alias for proxying SharePoint 2013. This is due to the way SharePoint constructs its URLs.
The application URLs you add for the Office Web Apps farm may differ in format depending on the authentication type used. For example, you may need to add the simple server name for the Office Web Apps farm as an alias for proxying SharePoint 2013. This is due to the way SharePoint constructs its URLs.
Note: The SharePoint Office Web Apps server farm cannot be accessed using the proxy server until a valid Secure Sockets Layer (SSL) certificate is in place on the Cloud Access Manager Proxy.
A signed wildcard SSL certificate is required to cover the proxy server and the two previously created aliases. However, you do not need to create a new Secure Sockets Layer (SSL) certificate specific to the SharePoint configuration. For further details, please refer to Managing your SSL certificate in the Dell™ One Identity Cloud Access Manager Configuration Guide.
|
2 |
|
3 |
Click Show Advanced Settings. |
|
4 |
Click Tune the Cloud Access Manager Proxy. |
|
5 |
In Proxy Filters, edit the Class listed as RewriteHTMLFilter, appending the Mime Type with text/plain* as the value. 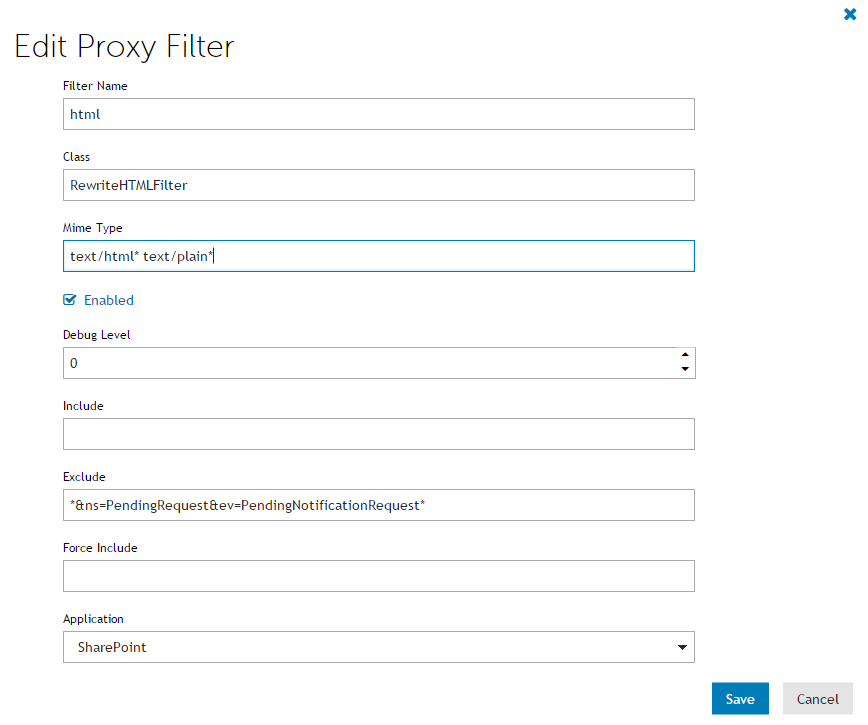 |
|
6 |
Click Save. |
|
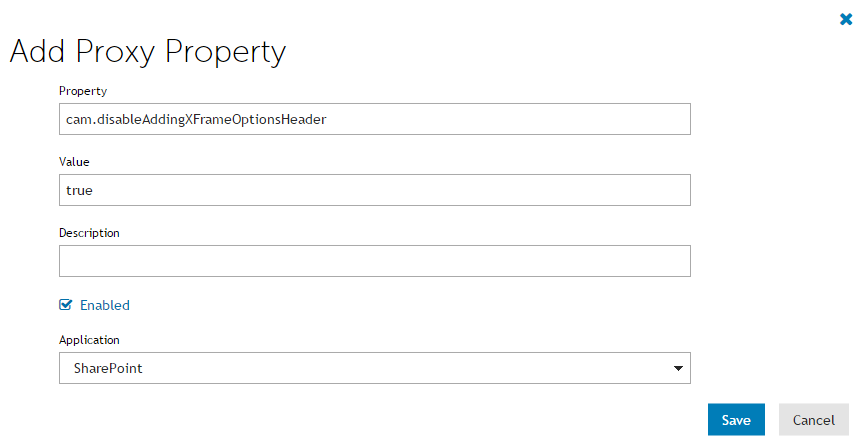
7 |
On the Add Proxy Property page add a new property. In the Property field, enter the string cam.disableAddingXFrameOptionsHeader. |
|
8 |
In the Value field, enter true. Ensure the Enabled check box is selected, this will allow Office Web Apps to load in an iFrame embedded in the SharePoint page. |
|
9 |
Click Save to save your settings. When you have completed these steps all links using Office Web Apps will function as expected, this includes opening and editing documents. |