
General tab
This tab allows you to view or edit the Access Node configuration. The tab has the following elements:
- Description View or edit the Access Node description.
- IP Address or DNS Name View or edit the IP address or DNS name of the NAS device.
Examples:
192.168.70.9 Allows connections from this IP address only.
192.168.70.0 Allows connections from any IP address on the 192.168.70.0 subnet (subnet mask 255.255.255.0 would also be required).
- Subnet Mask View or edit subnet mask for the Access Nodes that connect to the Defender Security Server.
- Authentication Port View or edit the number of the port on which the Access Node accepts RADIUS requests.
The default ports are:
1812 RADIUS agent, RADIUS proxy.
2626 Defender agent.
- Accounting Port View or edit the port number on which the Access Node accepts RADIUS accounting packets. Upon receipt of an accounting packet, its contents are written to an accounting log. The default port number is 1813.
- Node Type View or change the current node type. For available node types and their descriptions, see New Object - Defender Access Node Wizard reference.
- Shared Secret View or edit the shared secret that this Access Node uses when attempting to establish a connection with the Defender Security Server. To view a hidden shared secret, click the Reveal button next to this text box. To conceal a visible shared secret, click the Hide button next to this text box.
- User ID View or change the type of user ID by which the Defender Security Server searches for users in Active Directory. Possible values are Defender ID, User Principle Name, SAM Account Name, Proper Name, and E-mail Address.
Servers tab
This tab allows you to view or change a list of the Defender Security Servers to which the Access Node is assigned. To add a new Defender Security Server to the list, click Assign. To remove a Defender Security Server from the list, select that server, and then click Unassign.
Members tab
This tab allows you to set up a list of users who can authenticate via this Access Node. To add users or groups to the list, click Add. To remove an entry from the list, select that entry, and then click Remove.
Policy tab
This tab allows you to view the current or assign a new Defender Security Policy to the Access Node. The tab has the following elements:
- Assigned Policy Shows the Defender Security Policy that is currently assigned to the Access Node. When there is no Defender Security Policy assigned to the Access Node, this option displays <undefined>.
- Select Allows you to select a Defender Security Policy to assign to the Access Node.
- Clear Unassigns the current Defender Security Policy from the Access Node.
- Effective Click this button to view the Defender Security Policy settings that will apply to a specific user for a particular Defender Security Server/Access Node combination. The window that opens looks similar to the following:
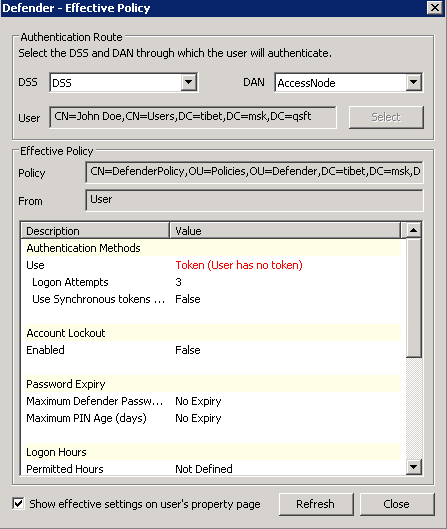
- Click the Select button to select the user for whom you want to view the Defender Security Policy that will apply.
- The DSS list shows the Defender Security Server that is currently selected for the user. If necessary, select any other Defender Security Server.
- The DAN list shows the Access Node that is currently selected for the user. If necessary, select any other Access Node.
- The Effective Policy area displays the Defender Security Policy details and authentication settings that will be effective when the user authenticates via Defender.