Chat now with support
Chat with Support

Defender 6.1 - Administration Guide

Getting started Managing Defender objects in Active Directory Configuring security tokens Securing VPN access Securing Web sites Securing Windows-based computers Defender Management Portal (Web interface) Securing PAM-enabled services Delegating Defender roles, tasks, and functions Automating administrative tasks Administrative templates Integration with Active Roles Appendices
Appendix A: Enabling diagnostic logging Appendix B: Troubleshooting common authentication issues Appendix C: Troubleshooting DIGIPASS token issues Appendix D: Defender classes and attributes in Active Directory Appendix E: Defender Event Log messages Appendix F: Defender Client SDK Appendix G: Defender Web Service API

RADIUS Payload tab

This tab allows you to view the current and assign a new RADIUS payload to the Access Node. The tab has the following elements:

  • Assigned Payload  Shows the RADIUS payload that is currently assigned to the Access Node. When there is no RADIUS payload assigned to the Access Node, this option displays <undefined>.
  • Select  Allows you to select a RADIUS payload to assign to the Access Node.
  • Clear  Unassigns the current RADIUS payload from the Access Node.
  • Inherit payload entries from parent. Include these with entries explicitly defined here.  When selected, causes the Access Node to inherit RADIUS payload from the Defender Security Servers to which the Access Node is assigned.
  • Effective  Click this button to view the RADIUS payload that will apply to a specific user for a particular Defender Security Server/Access Node combination. The windows that opens looks similar to the following:


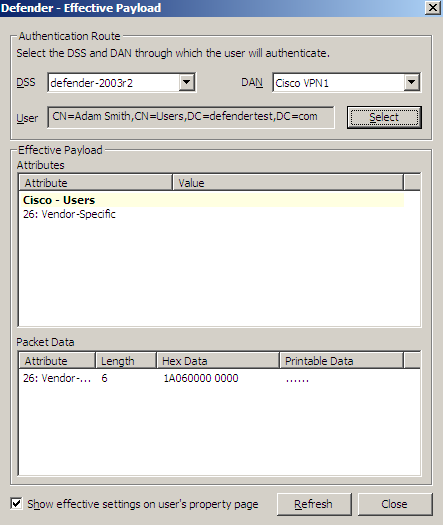
Click the Select button to select the user for whom you want to view the RADIUS payload that will apply.

The DSS list shows the Defender Security Server that is currently selected for the user. If necessary, select any other Defender Security Server.

The DAN list shows the Access Node that is currently selected for the user. If necessary, select any other Access Node.

The Effective Payload area displays the details of the RADIUS payload that will be effective when the selected user authenticates via Defender.

Managing Defender Security Servers

Defender Security Server is the point in your network where user authentication is performed. If authentication is successful, the user is allowed access to the network.

Creating a Defender Security Server object

To create a Defender Security Server object

  1. On the computer where the Defender Administration Console is installed, open the Active Directory Users and Computers tool (dsa.msc).
  2. In the left pane (console tree), expand the appropriate domain node, and then expand the Defender container.
  3. Right-click the Security Servers container, point to New, and then click Defender Security Server.

    A wizard starts.

  4. In the Enter a name, IP address and description for the Security Server step, use the following options:
    • Name  Type a name for the Defender Security Server object to be created in Active Directory. This name can be different from the name of the computer on which the Defender Security Server component is installed.
    • IP Address  Type the IP address of the computer on which you have installed the Defender Security Server component.
    • Description  Type a friendly Defender Security Server description to be displayed in Active Directory.
  5. Complete the wizard to create the Defender Security Server object in Active Directory.

After creating a Defender Security Server object, you need to modify its properties to assign a Defender Security Policy, Access Node, and RADIUS payload to that object. For more information, see Modify Defender Security Server object properties.

Modify Defender Security Server object properties

To modify Defender Security Server object properties

  1. On the computer where the Defender Administration Console is installed, open the Active Directory Users and Computers tool (dsa.msc).
  2. In the left pane (console tree), expand the appropriate domain node, and then expand the Defender container.
  3. Click to select the Security Servers container.
  4. In the right pane, double-click the Defender Security Server whose properties you want to modify.
  5. Use the dialog box that opens to modify the Defender Security Server properties as necessary.

    The dialog box has the following tabs:

    • Security Server tab  Allows you to specify a computer on which the Defender Security Server component is installed by IP address, change description provided for the Defender Security Server object in Active Directory, and assign or unassign Access Nodes for the Defender Security Server object.
    • Prompts tab  Allows you to view and modify the messages and prompts that may be displayed to the user during the authentication process.
    • Policy tab  Allows you to assign a Defender Security Policy to the Defender Security Server object.
    • RADIUS Payload tab  Allows you to assign a RADIUS payload to the Defender Security Server object.
  6. When you are finished, click OK to apply your changes.
Related Documents

The document was helpful.

Select Rating

I easily found the information I needed.

Select Rating