
Creating a backup policy using SMB/CIFS
The Copy data to a remote server using SMB/CIFS backup method connects to a share on the target server with Server Message Block protocol. SMB/CIFS is mainly used on Microsoft Windows Networks.
When deployed from the Azure Marketplace, you can use Azure File storage shares in your for Backup and Archive Policies. This is very useful as the quota for the files storage can be changed dynamically, so the cumulative size of the audit trails is not limited to the OS disk size. You can set up this share as a normal SMB shares in your Backup and Archive policies. The parameters for the policy can be obtained from the Azure portal.
|
|
NOTE:
Backup and archive policies only work with existing shares and subdirectories. If a server has a share at, for example, archive and that directory is empty, when the user configures archive/scb1 (or similar) as a backup/archive share, it will fail. |


|
|
Caution:
When using the CIFS protocol to backup or archive files to a target server running Windows 2008 R2 that uses NTLMv2 authentication, the operation may fail with a similar error message: CIFS VFS: Unexpected SMB signature Status code returned 0xc000000d NT_STATUS_INVALID_PARAMETER CIFS VFS: Send error in SessSetup = -22 CIFS VFS: cifs_mount failed w/return code = -22 CIFS VFS: Server requires packet signing to be enabled in /proc/fs/cifs/SecurityFlags. CIFS VFS: cifs_mount failed w/return code = -95 CIFS VFS: Server requires packet signing to be enabled in /proc/fs/cifs/SecurityFlags. CIFS VFS: cifs_mount failed w/return code = -95 To overcome this problem, either:
|
-
Navigate to Policies > Backup & Archive/Cleanup and click in the Backup policies section to create a new backup policy.
-
Enter a name for the backup policy (for example, config-backup).
-
Enter the time when the backup process should start into the Start time field in HH:MM format (for example, 23:00).
You can add the start time for additional backup processes.
Caution: When specifying an additional start time, ensure that the previous backup process finishes before the new backup process starts.
-
Enter the IP address or the hostname of the remote server into the Target server field (for example, backup.example.com).
Use an IPv4 address.
-
Select Copy data to a remote server using SMB/CIFS from the Copy data from PSM radio buttons.
Figure 58: Policies > Backup & Archive/Cleanup > Backup policies — Configuring backups through SMB/CIFS
-
Enter the username used to log on to the remote server into the Username field, or select the Anonymous login option.
Usernames can contain space.
-
Enter the password corresponding to the username into the Password field.
NOTE: One Identity Safeguard for Privileged Sessions (SPS) accepts passwords that are not longer than 150 characters. The following special characters can be used: !"#$%&'()*+,-./:;<=>?@[\]^-`{|}
-
Enter the name and directory path of the share into the Share field. Use the following format:
share_name/path/to/directory
You can use backslashes and forward slashes as well.
SPS saves all data into this directory, automatically creating the subdirectories. Backups of audit-trails are stored in the data, configuration backups in the config subdirectory.
-
Enter the domain name of the target server into the Domain field.

-
Select which SMB protocol to use when SPS connects to the server in the Protocol version field. Servers are usually backwards compatible with earlier protocol versions (for example, a server that supports version 2.1 supports versions 2.0 and 1.0 as well).
-
When your SPS instance is a node in a cluster, select Include the Cluster Node ID in the path. This ensures that the ID of the node is included in the path of the relevant directory, which is required to prevent cluster nodes from backing up data to the same location, and so overwriting each other's data and resulting in data loss. In addition, having the node's ID in the directory name also enables easy identification.
Caution: Hazard of data loss
Unchecking Include the Cluster Node ID in the path when your SPS is a node in a cluster can result in data loss if you have configured configuration synchronization across your cluster nodes.
-
To receive e-mail notification of the backup, select the Send notification on errors only or the Send notification on all events option. Notifications are sent to the administrator e-mail address set on the Management tab.
To include the list of files in the e-mail, select Send notification on all events and enable the Include file list option. However, note that if the list is very long
NOTE: This e-mail notification is different from the one set on the Alerting & Monitoring tab. This notification is sent to the administrator's e-mail address, while the alerts are sent to the alert e-mail address (see Configuring system monitoring on SPS).
-
Click .
-
To assign the backup policy to a connection, see Creating data backups.
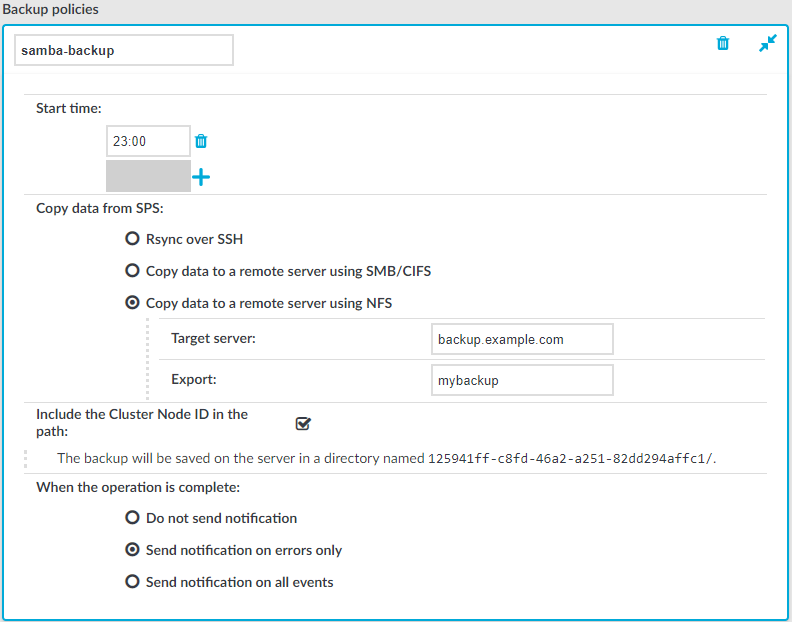
Creating a backup policy using NFS
The Copy data to a remote server using NFS backup method connects to a shared directory of the target server with the Network File Share protocol.
|
|
NOTE:
Backup and archive policies only work with existing shares and subdirectories. If a server has a share at, for example, archive and that directory is empty, when the user configures archive/scb1 (or similar) as a backup/archive share, it will fail. |
The version of NFS used is automatically detected. All versions of NFS, up to and including NFS version 4 protocol, are supported.
-
Navigate to Policies > Backup & Archive/Cleanup and click in the Backup policies section to create a new backup policy.
-
Enter a name for the backup policy (for example, config-backup).
-
Enter the time when the backup process should start into the Start time field in HH:MM format (for example, 23:00).
You can add the start time for additional backup processes.
Caution: When specifying an additional start time, ensure that the previous backup process finishes before the new backup process starts.
-
Enter the IP address or the hostname of the remote server into the Target server field (for example, backup.example.com).
Use an IPv4 address.
-
Select Copy data to a remote server using NFS from the Copy data from PSM radio buttons.
Figure 59: Policies > Backup & Archive/Cleanup > Backup policies — Configuring NFS backups
-
Enter the domain name of the remote server into the Target server field.
-
Enter the name of the NFS export into the Export field.
SPS saves all data into this directory, automatically creating the subdirectories.
-
The remote server must also be configured to accept backups from SPS.
Add a line that corresponds to the settings of SPS to the /etc/exports file of the backup server. This line should contain the following parameters:
-
The path to the backup directory as set in the Export field of the SPS backup policy.
-
The IP address of the SPS interface that is used to access the remote server. For more information on the network interfaces of SPS, see Network settings.
Use an IPv4 address.
-
The following parameters: (rw,no_root_squash,sync).
Example: Configuring NFS on the remote server
For example, if SPS connects the remote server from the 192.168.1.15 IP address and the data is saved into the /var/backups/SPS directory, add the following line to the /etc/exports file:
/var/backups/SPS 192.168.1.15(rw,no_root_squash,sync)
-
-
On the remote server, execute the following command:
exportfs -a
Verify that the rpc portmapper and rpc.statd applications are running.
-
When your SPS instance is a node in a cluster, select Include the Cluster Node ID in the path. This ensures that the ID of the node is included in the path of the relevant directory, which is required to prevent cluster nodes from backing up data to the same location, and so overwriting each other's data and resulting in data loss. In addition, having the node's ID in the directory name also enables easy identification.
Caution: Hazard of data loss
Unchecking Include the Cluster Node ID in the path when your SPS is a node in a cluster can result in data loss if you have configured configuration synchronization across your cluster nodes.
-
To receive e-mail notification of the backup, select the Send notification on errors only or the Send notification on all events option. Notifications are sent to the administrator e-mail address set on the Management tab.
To include the list of files in the e-mail, select Send notification on all events and enable the Include file list option. However, note that if the list is very long
NOTE: This e-mail notification is different from the one set on the Alerting & Monitoring tab. This notification is sent to the administrator's e-mail address, while the alerts are sent to the alert e-mail address (see Configuring system monitoring on SPS).
-
Click .
-
To assign the backup policy to a connection, see Creating data backups.
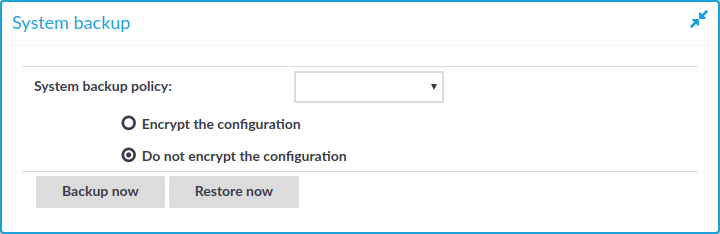
Creating configuration backups
To create a configuration backup, assign a backup policy as the System backup policy of SPS.
|
|
TIP:
To create an immediate backup of SPS's configuration to your machine (not to the backup server), select Basic Settings > System > Export configuration. Note that the configuration export contains only the system settings and configuration files (including changelogs). System backups includes additional information like reports and alerts When exporting the configuration of SPS, or creating configuration backups, always use encryption. Handle the exported data with care, as it contains sensitive information, including credentials. For details on encrypting the configuration, see "Encrypting configuration backups with GPG" in the Administration Guide. To encrypt your configuration backups, see Encrypting configuration backups with GPG. |
Prerequisites:
You have to configure a backup policy before starting this procedure. For details, see Data and configuration backups.
To create a configuration backup
-
Navigate to Basic Settings > Management > System backup.
Figure 60: Basic Settings > Management > System backup — Configuring system backups
-
Select the backup policy you want to use for backing up the configuration of SPS in the System backup policy field.
-
Click
.
-
Optional: To start the backup process immediately, click Backup now. The Backup now functionality works only after a backup policy has been selected and committed.
Creating data backups
To configure data backups, assign a backup policy to the connection.
|
|
NOTE:
When exporting the configuration of SPS, or creating configuration backups, always use encryption. Handle the exported data with care, as it contains sensitive information, including credentials. For details on encrypting the configuration, see "Encrypting configuration backups with GPG" in the Administration Guide. |
Prerequisites:
-
Configure the system backup. Restoring a data backup works only if a matching system configuration and metadata is available, that is, if a system backup is restored first. For details, see Creating configuration backups.
-
Configure a backup policy before starting this procedure. For details, see Data and configuration backups.
To configure data backups
-
Navigate to [Your chosen protocol] Control > Connections.
-
Select the connection you want to back up.
-
Select a backup policy in the Backup policy field.
-
Click
-
Optional: To start the backup process immediately, click Backup or Backup ALL. The Backup and Backup ALL functionalities work only after a backup policy has been selected and committed.