
System related traps
SPS can send the following system related alerts in e-mail or as SNMP trap. To configure these alerts, see Configuring e-mail alerts and Configuring SNMP alerts.
|
|
NOTE:
Configure Disk space fill-up prevention, and configure SPS to send an alert if the free space on the disks of SPS is low. For details, see "Preventing disk space fill-up" in the Administration Guide. Configure SPS to send an alert if a user fails to login to SPS. For details, see the Login failed alert in "System related traps" in the Administration Guide. |

Figure 54: Basic Settings > Alerting & Monitoring — health monitoring

| Name | SNMP alert ID | Description |
|---|---|---|
| Login failed | xcbLoginFailure | Failed login attempts from SPS web interface. |
| Successful login | xcbLogin | Successful login attempts into SPS web interface. |
| Logout from the management interface | xcbLogout | Logouts from SPS web interface. |
| Configuration changed | xcbConfigChange | Any modification of SPS's configuration. |
| General alert | xcbAlert |
General alerts and error messages occurring on SPS. Note that alerts on general alerts and errors are sent whenever there is an alert or error level message in the SPS system log. These messages are very verbose and mainly useful only for debugging purposes. Enabling these alerts may result in multiple e-mails or SNMP traps sent about the same event.
|
| General error | xcbError | |
| Data and configuration backup failed | xcbBackupFailed | Alerts if the backup procedure is unsuccessful. |
| Data archiving failed | xcbArchiveFailed | Alerts if the archiving procedure is unsuccessful. |
| Database error occurred | xcbDBError | An error occurred in the database where SPS stores the connection metadata. For assistance, contact our Support Team. |
| License limit reached | xcbLimitReached | The number of protected servers (or concurrent sessions) reached the limit set in the SPS license. Clients cannot connect to new servers using SPS. |
| HA node state changed | xcbHaNodeChanged | A node of the SPS cluster changed its state (for example, a takeover occurred). |
| Timestamping error occurred | xcbTimestampError | An error occurred during the timestaming process (for example, the timestamping server did not respond). |
| Time sync lost | xcbTimeSyncLost | The system time became out of sync. |
| Raid status changed | xcbRaidStatus | The status of the node's RAID device changed its state. |
| Hardware error occurred | xcbHWError | SPS detected a hardware error. |
| Firmware is tainted | xcbFirmwareTainted | A user has locally modified a file from the console. |
| Too many login attempts | xcbBruteforceAttempt | SPS has detected a possible brute-force attack. |
| License expires soon | xcbLicenseAlmostExpired | Your SPS license will expire within 60 days. |
| A system service failed | xcbInitSystemUnitFailed |
A system service has failed. Note that one alert is sent for each failed service. |
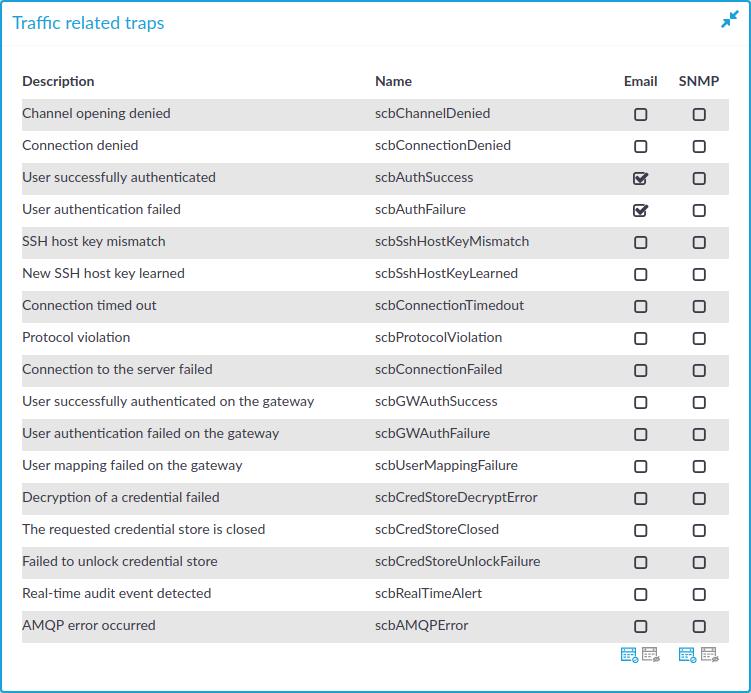
Traffic related traps
SPS can send the following traffic related alerts in e-mail or as SNMP trap. To configure these alerts, see Configuring e-mail alerts and Configuring SNMP alerts.
Figure 55: Basic Settings > Alerting & Monitoring — health monitoring
| Name | SNMP alert ID | Description |
|---|---|---|
| Channel opening denied | scbChannelDenied | A user attempted to open a channel not permitted by the channel policy. |
| Connection denied | scbConnectionDenied | A user attempted to connect a server not permitted in the connection policies. |
| User successfully authenticated | scbAuthSuccess | A user successfully authenticated on a protected server. |
| User authentication failed | scbAuthFailure | A user failed to complete the authentication on a protected server. |
| SSH host key mismatch | scbSshHostKeyMismatch | The SSH host key of a server did not match the key stored on SPS. |
| New SSH host key learned | scbHostKeyLearned | SPS learned a new SSH host key. |
| Connection timed out | scbConnectionTimedout | A connection to a protected server timed out. |
| Protocol violation | scbProtocolViolation | A connection violated the protocol as specified in the RFC or protocol documentation. This may have been caused by an incompatible application or a deliberate attack. |
| Connection to the server failed | scbConnectionFailed | A connection to a protected server failed. |
| User successfully authenticated on the gateway | scbGWAuthSuccess | A user has successfully authenticated a connection on SPS as part of a gateway-authentication process. |
| User authentication failed on the gateway | scbGWAuthFailure | The gateway-authentication of a connection has failed. |
| User mapping failed on the gateway | scbUserMappingFailure | A usermapping policy did not find a suitable mapping for the connection. |
| Decryption of a credential store failed | scbCredStoreDecrpytError | SPS could not unlock a password-protected Credential Store. Navigate to Unlock Credential Store and enter the password(s) to open the Credential Store. |
| The requested credential store is closed | scbCredStoreClosed | A user attempted to access a connection policy that uses a password-protected Credential Store, and the Credential Store has not been unlocked. Navigate to Unlock Credential Store and enter the password(s) to open the Credential Store. |
| Failed to unlock credential store | scbCredStoreUnlockFailure | A user attempted to unlock a password-protected Credential Store with an incorrect password. Navigate to Unlock Credential Store and enter the correct password(s) to open the Credential Store. |
| Real time audit event detected | scbRealTimeAlert | A real-time audit event has occurred. |
| AMQP error occurred | scbAMQPError | An error occurred in the event queue where SPS forwards session data. contact our Support Team. |
Data and configuration backups
Backups create a snapshot of the configuration of One Identity Safeguard for Privileged Sessions (SPS) or the data which can be used for recovery in case of errors. SPS can create automatic backups of its configuration and the stored audit-trails to a remote server.
Configuring backups is a two-step process:
-
Create a backup policy.
-
Assign that policy to the system or a connection — depending on what it is that you wish to back up, SPS's configuration or a connection.
Creating a backup policy:
Backup policies define the address of the backup server, which protocol to use to access it, and other parameters. SPS can be configured to use the Rsync, SMB/CIFS, and NFS protocols to access the backup server:
-
To configure backups using Rsync over SSH, see Creating a backup policy using Rsync over SSH.
-
To configure backups using SMB/CIFS, see Creating a backup policy using SMB/CIFS.
-
To configure backups using NFS, see Creating a backup policy using NFS.
The different backup protocols assign different file ownerships to the files saved on the backup server. The owners of the backup files created using the different protocols are the following:
-
Rsync: The user provided on the web interface.
-
SMB/CIFS: The user provided on the web interface.
-
NFS: root with no-root-squash, nobody otherwise.
|
|
Caution:
SPS cannot modify the ownership of a file that already exists on the remote server. If you change the backup protocol but you use the same directory of the remote server to store the backups, make sure to adjust the ownership of the existing files according to the new protocol. Otherwise SPS cannot overwrite the files and the backup procedure fails. |

Assigning a backup policy:
Once you have configured a backup policy, set it as a system backup policy (for configuration backups) or data backup policy (for connections backups):
-
To configure a system backup policy, see Creating configuration backups.
-
To configure a data backup policy, see Creating data backups.
|
|
NOTE:
Backup deletes all other data from the target directory. Restoring a backup deletes all other data from SPS. For details on restoring configuration and data from backup, see Restoring One Identity Safeguard for Privileged Sessions (SPS) configuration and data. |
Creating a backup policy using Rsync over SSH
The Rsync over SSH backup method connects the target server with SSH and executes the rsync UNIX command to copy the data to the remote server. SPS authenticates itself with a public key — password-based authentication is not supported.
|
|
Caution:
The backup server must run rsync version 3.0 or newer. |
To create a backup policy using Rsync over SSH
-
Navigate to Policies > Backup & Archive/Cleanup and click in the Backup policies section to create a new backup policy.
-
Enter a name for the backup policy (for example, config-backup).
-
Enter the time when the backup process should start into the Start time field in HH:MM format (for example, 23:00).
You can add the start time for additional backup processes.
Caution: When specifying an additional start time, ensure that the previous backup process finishes before the new backup process starts.
-
Enter the IP address or the hostname of the remote server into the Target server field (for example, backup.example.com).
Use an IPv4 address.
-
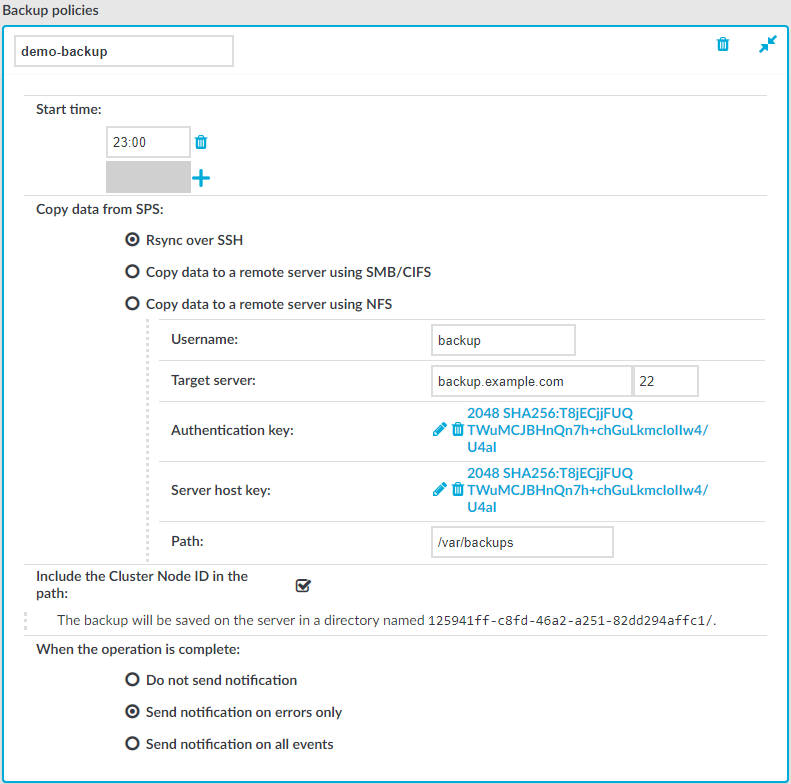
Select Rsync over SSH from the Copy data from PSM radio buttons.
Figure 56: Policies > Backup & Archive/Cleanup > Backup policies — Configuring backups using rsync
-
Enter the username used to log on to the remote server into the Username field.
-
Click
in the Authentication key field. A popup window is displayed.
-
Generate a new keypair by clicking Generate or upload or paste an existing one. This key will be used to authenticate SPS on the remote server. The public key of this keypair must be imported to the remote server.
-
Click
-
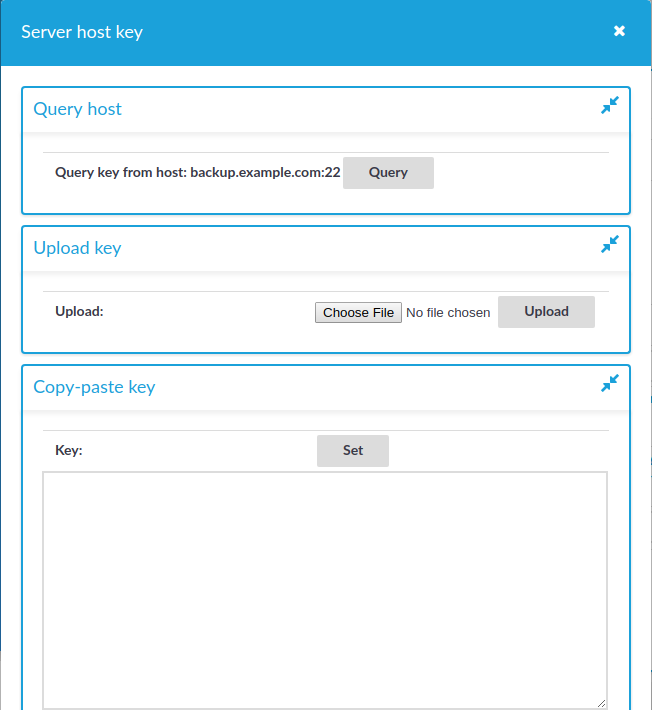
Click Query to download the host key of the server, or upload or paste the host key manually. SPS will compare the host key shown by the server to this key, and connect only if the two keys are identical.
Figure 57: Policies > Backup & Archive/Cleanup > Backup policies — Configuring SSH keys
-
Enter the port number of the SSH server running on the remote machine into the Port field.
-
Enter the path to the backup directory on the target server into the Path field (for example /backups).
SPS saves all data into this directory, automatically creating the subdirectories. Backups of audit-trails are stored in the data, configuration backups in the config subdirectory.
-
When your SPS instance is a node in a cluster, select Include the Cluster Node ID in the path. This ensures that the ID of the node is included in the path of the relevant directory, which is required to prevent cluster nodes from backing up data to the same location, and so overwriting each other's data and resulting in data loss. In addition, having the node's ID in the directory name also enables easy identification.
Caution: Hazard of data loss
Unchecking Include the Cluster Node ID in the path when your SPS is a node in a cluster can result in data loss if you have configured configuration synchronization across your cluster nodes.
-
To receive e-mail notification of the backup, select the Send notification on errors only or the Send notification on all events option. Notifications are sent to the administrator e-mail address set on the Management tab.
To include the list of files in the e-mail, select Send notification on all events and enable the Include file list option. However, note that if the list is very long
NOTE: This e-mail notification is different from the one set on the Alerting & Monitoring tab. This notification is sent to the administrator's e-mail address, while the alerts are sent to the alert e-mail address (see Configuring system monitoring on SPS).
-
Click .
-
To assign the backup policy to a connection, see Creating data backups.