
Setting up HTTP connections
This section focuses on describing the HTTP-specific details of connection configuration. For a detailed description on configuring connections, see General connection settings.
Setting up a transparent HTTP connection
Enabling One Identity Safeguard for Privileged Sessions (SPS) to act as a HTTP proxy
Setting up a transparent HTTP connection
The following describes how to set up a transparent HTTP connection. To audit HTTP connections in non-transparent mode, see Enabling One Identity Safeguard for Privileged Sessions (SPS) to act as a HTTP proxy.
Figure 165: HTTP Control > Connections — Transparent HTTP connection
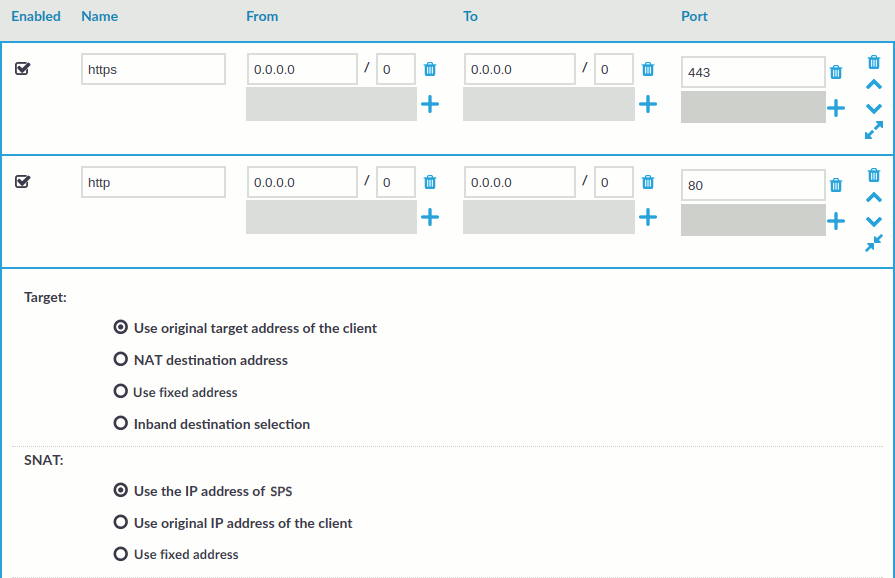
To set up a transparent HTTP connection
-
In the Name field, enter the name of the connection that will identify the connection policy.
-
In the From field, enter the IP address and prefix of the client that will be permitted to access the server.
You can use an IPv4 or an IPv6 address. To limit the IP range to the specified address, set the prefix to 32 (IPv4) or 128 (IPv6).
-
In the To field, enter the IP address and prefix that the clients will target.
You can use an IPv4 or an IPv6 address. To limit the IP range to the specified address, set the prefix to 32 (IPv4) or 128 (IPv6).
-
In the Target section, select Use original target address of the client.
-
In the SNAT section, select Use the original IP address of One Identity Safeguard for Privileged Sessions (SPS).
-
Since SPS cannot automatically decide whether the incoming sessions are encrypted or not, it is required to setup another identical connection policy for the same sessions, for HTTPS. As a result, HTTP and HTTPS sessions will be saved into separate trails.
-
Setup a new connection policy with the same settings as above.
-
Set the Port to 443.
-
Enable TLS encryption. For details, see Enabling TLS encryption in HTTP.
-
Enabling One Identity Safeguard for Privileged Sessions (SPS) to act as a HTTP proxy
The following describes how to enable One Identity Safeguard for Privileged Sessions (SPS) to act as a HTTP proxy.
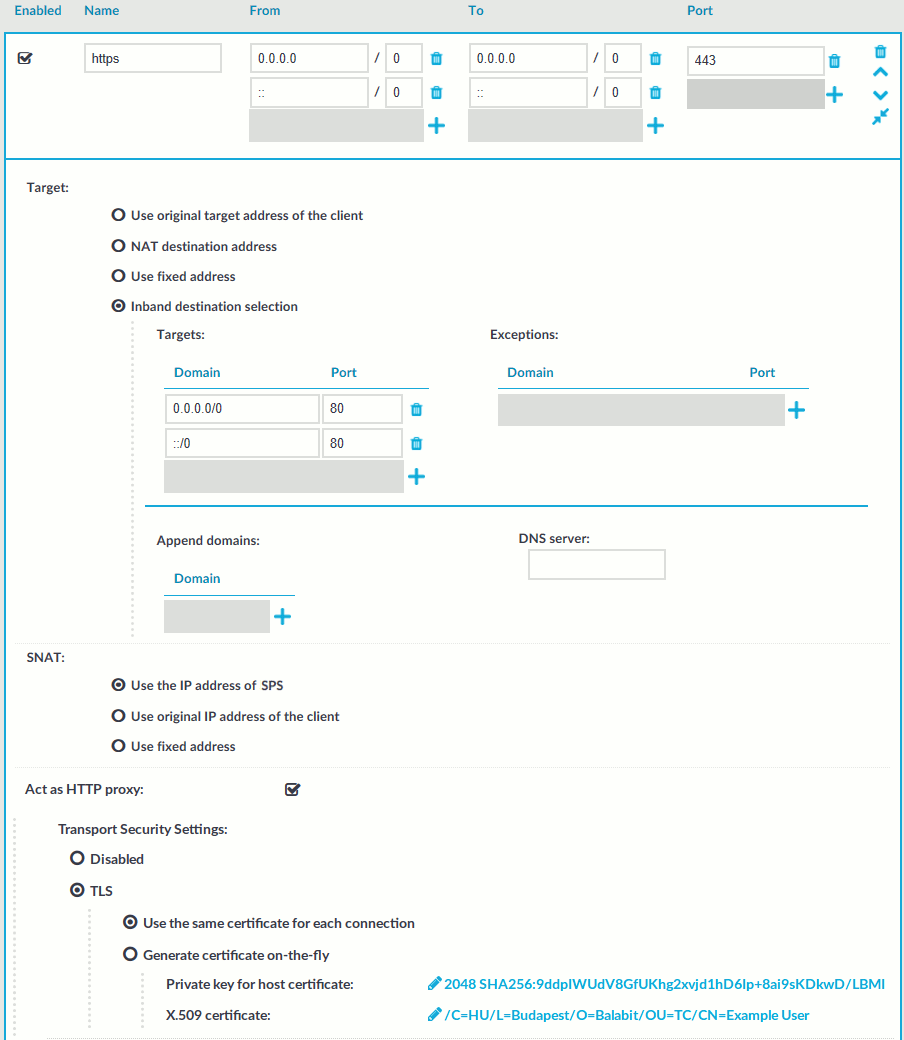
Figure 166: HTTP Control > Connections — Act as HTTP proxy
To enable SPS to act as a HTTP proxy
-
Enable Act as HTTP proxy to configure the client to use SPS as a HTTP proxy.
You can use SPS as a HTTP proxy through TLS. All traffic between the browser and SPS is tunneled through TLS.
To use this feature, ensure that the client software can establish secure web proxy connections and supports client software configuration, such as, proxy auto-configuration files.
For information about making browser specific settings for Chromium, see Secure Web Proxy.
-
Select whether you want encrypted web proxy connection between the HTTP client and SPS.
Since there is now a secure channel between the web browser and SPS, you can also enable proxy authentication. This makes it possible for the web browser to do an inband gateway authentication to SPS before being able to issue HTTP requests through SPS.
- To disable encryption between the HTTP client and SPS, select Disabled.
NOTE: Since the forwarded data may contain sensitive information, One Identity recommends using encryption between the HTTP client and SPS.
- To use encryption between the HTTP client and SPS, select one of the following options:
- To use a fix certificate, select Use the same certificate for each connection and copy or upload the certificate.
-
To generate a certificate on-the-fly, signed by a provided Signing CA, select Generate certificate on-the-fly. It uses the parameters of the signing CA, excluding the CN field, which is filled with the name of the target host name.
NOTE: When Generate certificate on-the-fly is selected and the connection is in transparent setup, the CN field is filled in using Server Name Indication (SNI). If the client does not support SNI, the CN field will contain the target IP, which may cause certificate verification warning on the client browser.
- To disable encryption between the HTTP client and SPS, select Disabled.
-
Select Inband destination selection as Target.
-
To permit access to any HTTP servers, enter 0.0.0.0/0 into the Domain field. Alternatively, enter the IP address or subnet of the HTTP address you want permit access to. For IPv6 addresses, add ::/0 as well.
-
To permit HTTP access to the destination servers on any port, leave the Domain > Port field empty. Otherwise, clients will be permitted only to access the specified port.
-
Enter the port where SPS should accept HTTP connections into the To > Port field. The default port number when using the Act as HTTP proxy setting is 3128. This value should be the same as the proxy port setting on your clients.
-
Ensure that you have set SPS as proxy on the clients.
Caution: To perform gateway authentication on SPS, the client browsers must be configured to use a Proxy Auto-Configuration (PAC) script.
To perform gateway authentication in a TLS-encrypted channel, the script must return an HTTPS address. Note that currently the Safari browsers do not support TLS-encryption in gateway authentication. For example:
if (dnsDomainIs(host, "example-domain.com") || dnsDomainIs(host, "www.example-domain.com"))
return "HTTPS 192.168.11.121:3128";
The client browsers might require the certificate of SPS to contain the Subject Alternate Name field. Certificates generated on SPS using the Generate certificate on-the-fly option automatically contain this field. If you Use the same certificate for each connection, make sure this field is present and properly set.


Enabling TLS encryption in HTTP
This setting either enforces TLS encryption or accepts both HTTP and HTTPS requests.
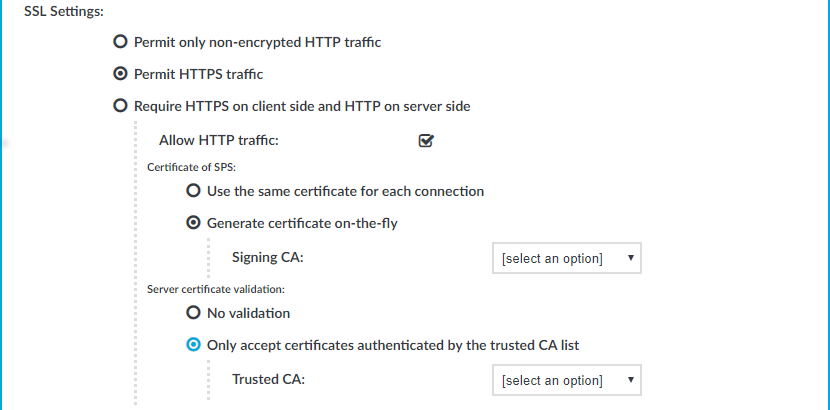
Figure 167: HTTP Control > Connections> SSL Settings — Enabling SSL encryption in HTTP
To enable SSL encryption
-
In SSL Settings, select Permit HTTPS traffic. To control plain HTTP traffic with the same connection policy, enable Allow HTTP traffic.
-
Select the certificate to show to the clients.
-
To use the same certificate for every peer, complete the following steps.
-
Generate and sign a certificate for One Identity Safeguard for Privileged Sessions (SPS) in your PKI system, then export the certificate and its private key.
-
Select Use the same certificate for each connection.
-
Select Private key for host certificate, click
and upload the private key.
-
Select X.509 host certificate, click
-
NOTE: When using the Use the same certificate for each connection option and the connection policy that allows access to multiple servers using HTTPS, the client browsers will display a warning because the certificate used in the connection will be invalid (namely, the Common Name of the certificate will not match the hostname or IP address of the server).
-
To use a separate certificate for every connection, complete the following steps.
-
Create a certificate authority that will be used to sign the certificates that SPS shows to the peer. For details, see Signing certificates on-the-fly.
-
Select Generate certificate on-the-fly.
-
Select the certificate authority to use in the Signing CA field.
-
Limitations
NOTE: When Generate certificate on-the-fly is selected and the connection is in transparent setup, the CN field is filled in using Server Name Indication (SNI). If the client does not support SNI, the CN field will contain the target IP, which may cause certificate verification warning on the client browser.
NOTE: Import the certificate of the signing Certificate Authority to your clients. Otherwise, the client browsers will display a warning due to the unknown Certificate Authority.
-
-
Select how SPS should authenticate the server.
-
To permit connections to servers without requesting a certificate, select No validation.
-
To permit connections only to servers with a valid certificate that was signed by a specific CA, complete the following steps.
-
Create a list of trusted Certificate Authorities that will be used to validate the certificates of the servers. For details on creating a trusted CA list, see Verifying certificates with Certificate Authorities.
-
Select Only accept certificates authenticated by the trusted CA list.
-
In the Trusted CA field, select the certificate authority list to use.
-
-