
General tab
This tab allows you to specify the IP address of the computer on which the Defender Security Server component is installed and change the description provided for the Defender Security Server object in Active Directory.
On this tab, you can use the following options:
- Description View or edit the Defender Security Server description that is displayed in Active Directory.
- Address View or edit the IP address of the computer on which you have installed the Defender Security Server component.
- Version Displays the version number of the Defender Security Server component.
- Status Displays the current status of the Defender Security Server.
Security Server tab
This tab allows you to assign or unassign Access Nodes for the Defender Security Server object.
Use the Assigned Access Nodes list to view or edit the list of Access Nodes whose users authenticate through this Defender Security Server. To add a new Access Node to the list, click the Assign button. To remove an Access Node from the list, select that Access Node, and then click the Unassign button.
Prompts tab
This tab allows you to view and modify the messages displayed to the user during the authentication process. If you have modified a message in the list, you can always return to the default version of the message that existed before your modifications.
To edit a message
- In the list, click the message you want to edit.
- Edit the message as necessary in the text box below the list.
- Click the Update button to apply your changes.
To roll back to the default version of a message
- In the list, click the message you have modified earlier.
- Click the Default button, and then click the Update button.
Policy tab
This tab allows you to view the current and assign a new Defender Security Policy to the Defender Security Server object.
On this tab, you can use the following elements:
- Policy Shows the Defender Security Policy that is currently assigned to the Defender Security Server object. When there is no Defender Security Policy assigned to the Defender Security Server object, this option displays <undefined>.
- Select Allows you to select a Defender Security Policy to assign to the Defender Security Server object.
- Clear Unassigns the current Defender Security Policy from the Defender Security Server object.
- Effective Click this button to view the Defender Security Policy settings that will apply to a specific user for a particular Defender Security Server/Access Node combination. The window that opens looks similar to the following:
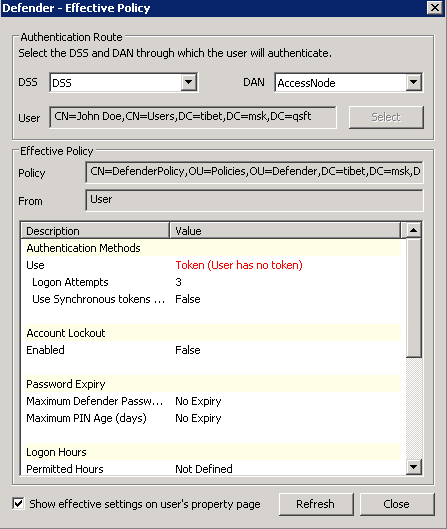
Click the Select button to select the user for whom you want to view the Defender Security Policy that will apply.
The DSS list shows the Defender Security Server that is currently selected for the user. If necessary, select any other Defender Security Server.
The DAN list shows the Access Node that is currently selected for the user. If necessary, select any other Access Node.
The Effective Policy area displays the Defender Security Policy details and authentication settings that will be effective when the user authenticates via Defender.