
Configuring SMS token
SMS token allows users in your organization to receive SMS messages containing one-time passwords on their SMS-capable devices. Before configuring and assigning the SMS token, you need to enable the use of the SMS token in the Defender Security Policy properties. After enabling the SMS token, make sure you assign the Defender Security Policy to the users you want. For more information, see Managing Defender Security Policies.
Ensure you provide the following information to each SMS token user:
- User ID
- Initial PIN (if the SMS token is configured to use a PIN)
To configure the SMS token for a user
- On the computer where the Defender Administration Console is installed, open the Active Directory Users and Computers tool (dsa.msc).
- In the left pane (console tree), expand the appropriate nodes to select the container where the user object is located.
- In the right pane, double-click the user object, and then click the Defender tab in the dialog box that opens.
- Below the Tokens list, click the Program button.
- In the Select Token Type step, click to select the Software token option. Click Next.
- In the Select Software Token step, click to select the SMS token option.
- Complete the wizard to configure the SMS token for the user.
For more information about the wizard steps and options, see Defender Token Programming Wizard reference
Configuring e-mail token
Enabling the e-mail token allows users in your organization to receive e-mail messages containing one-time passwords. To enable the e-mail token, use the properties of a Defender Security Policy. After enabling the e-mail token, make sure you assign the Defender Security Policy to the users you want. For more information, see Managing Defender Security Policies.
To enable and configure the e-mail token
- On the computer where the Defender Administration Console is installed, open the Active Directory Users and Computers tool (dsa.msc).
- In the left pane (console tree), expand the appropriate nodes to select the container where the user object is located.
- In the right pane, double-click the user object, and then click the Defender tab in the dialog box that opens.
- Below the Tokens list, click the Program button.
- In the Select Token Type step, click to select the Software token option. Click Next.
- In the Select Software Token step, click to select the E-mail token option.
- Complete the wizard to configure the e-mail token for the user.
For more information about the wizard steps and options, see Defender Token Programming Wizard reference
Configuring VIP credentials
You can configure Defender to use Symantec Validation & ID Protection (VIP) credentials for two-factor authentication of users within your organization. VIP credentials are security tokens allowing you to generate one-time passwords. VIP credentials can be implemented as security cards, hardware tokens, and software tokens for mobile phones and Windows-based computers.
When working with VIP credentials, Defender acts as a proxy server, redirecting authentication requests to the Symantec VIP Service, a cloud-based authentication solution.
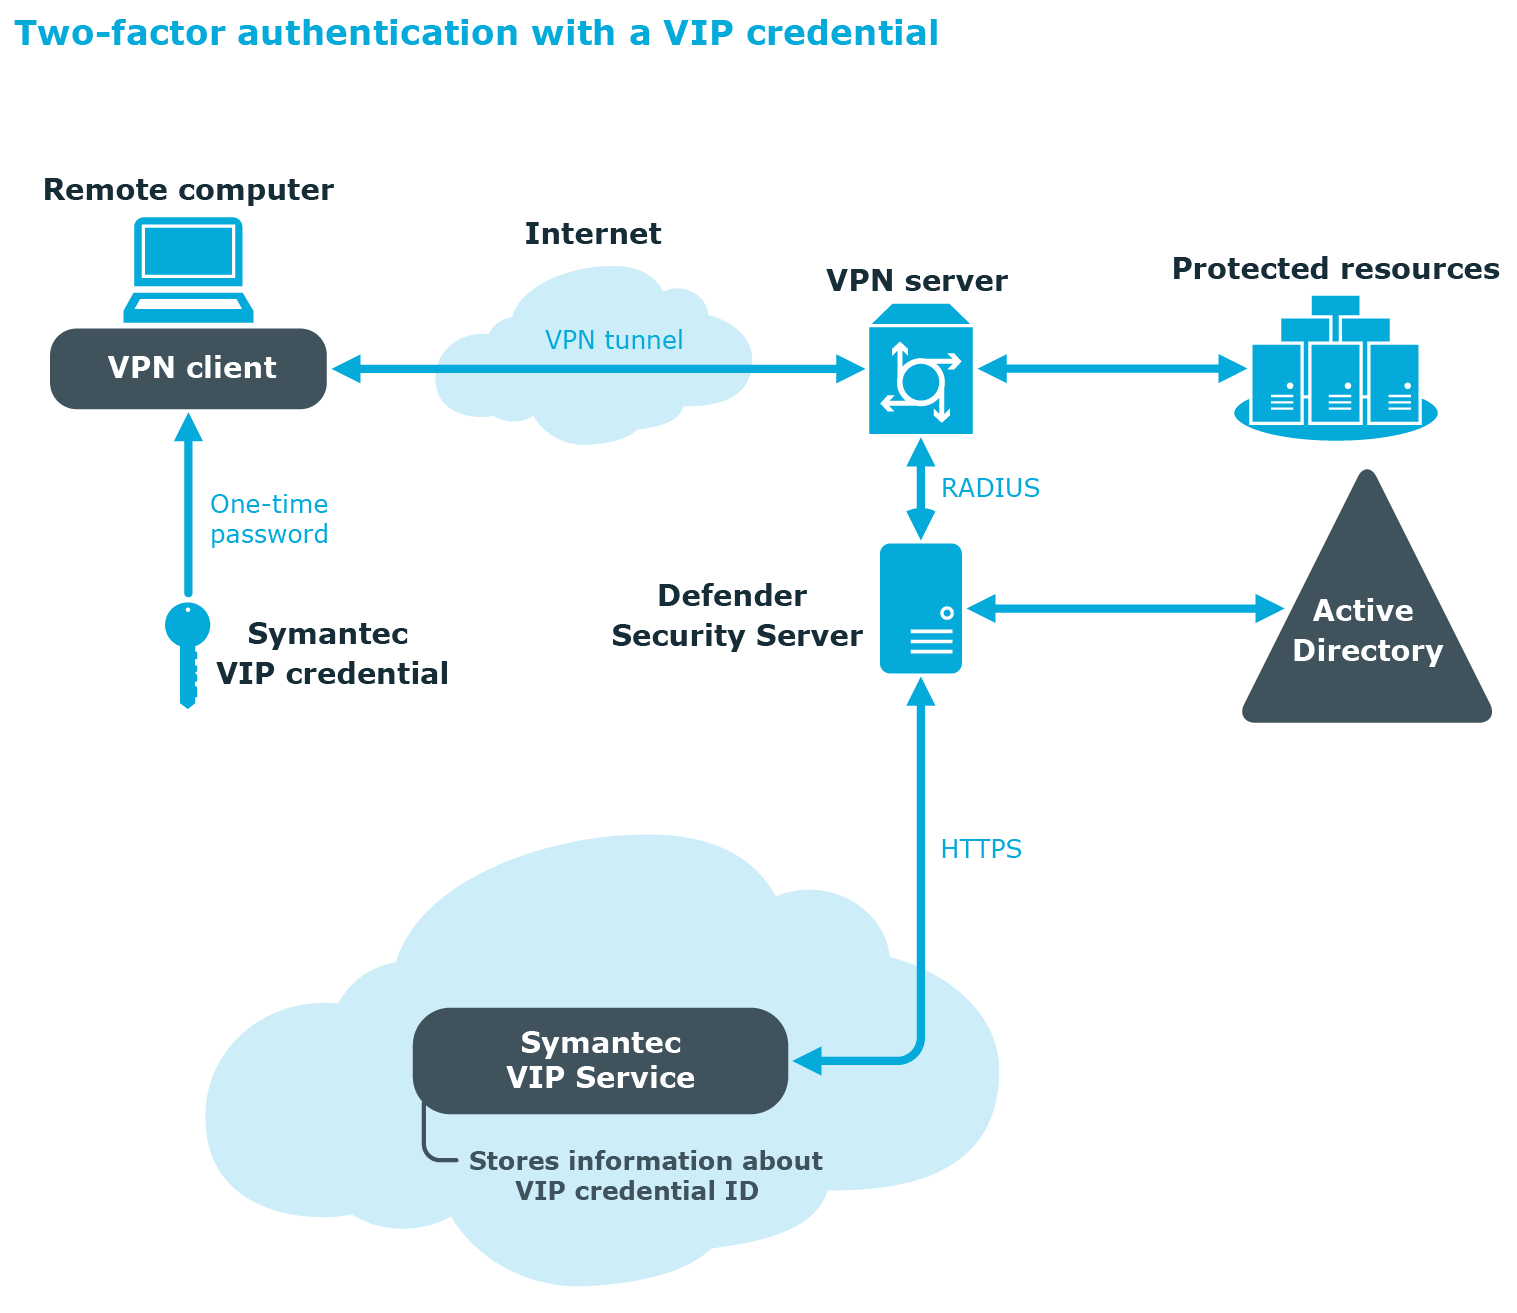
Upon receiving an authentication request from a user who has a VIP credential assigned, Defender redirects the request to the Symantec VIP Service via HTTPS. The Symantec VIP Service validates the authentication request—for that, the user’s VIP credential must be properly registered with the Symantec VIP Service—and provides a response to Defender. If the user has been successfully authenticated by the Symantec VIP Service, Defender allows that user to access the protected resource.
To configure Defender for working with VIP credentials, you need to install a VIP certificate issued by Symantec, configure the correct URL to the Symantec VIP Service, and program VIP credentials for users in your organization.
Enabling the use of VIP credentials
To enable the use of VIP credentials
- Install a VIP certificate:
- On the computer where the Defender Administration Console is installed, start the Active Directory Users and Computers (ADUC) tool (dsa.msc).
- In the left pane (console tree), expand the appropriate domain node, and click to select the Defender container.
- On the menu bar, select Defender | VIP Credential Configuration.
- In the dialog box that opens, click the Install button.
- Click Browse to select the VIP certificate you want to use, and then type the certificate’s password.
- When finished, click OK.
- Configure the correct URL for communications with the Symantec VIP Service.
At the time of writing, the Symantec VIP Service URL was https://services-auth.vip.symantec.com. For the correct URL, refer to the Symantec VIP Service documentation.
- Click the Test button to ensure you have correctly specified the VIP certificate, certificate password, and URL to the Symantec VIP Service.
- When you are finished, click OK to close the dialog box.