
Restoring One Identity Safeguard for Privileged Sessions (SPS) configuration and data
The following procedure describes how to restore the configuration and data of One Identity Safeguard for Privileged Sessions (SPS) from a complete backup, for example, after a hardware replacement.
|
|
Caution:
Do not enable audited traffic to SPS restoring the system backup is complete. During the restore process, the REST-based search might not function properly, since the data to search in might still be incomplete. |

To restore the configuration and data of SPS from a complete backup
-
Connect to your backup server and locate the directory where SPS saves the backups. The configuration backups are stored in the config subdirectory in timestamped files. Find the latest configuration file (the configuration files are called PSM-timestamp.config).
-
Connect to SPS.
If you have not yet completed the Welcome Wizard, click Browse, select the configuration file, and click Import.
If you have already completed the Welcome Wizard, navigate to Basic Settings > System > Import configuration > Browse, select the configuration file, and click Import.
-
Navigate to Policies > Backup & Archive/Cleanup. Verify that the settings of the target servers and the backup protocols are correct.
-
Navigate to Basic Settings > Management > System backup, click Restore now and wait for the process to finish. Depending on the amount of data stored in the backup, and the speed of the connection to the backup server, this may take a long time.
-
Navigate to SSH Control > Connections, and click Restore ALL. Repeat this step for other traffic types. Depending on the amount of data stored in the backup, and the speed of the connection to the backup server, this may take a long time.
VNC is not working with TLS
Some vendors may use custom protocol elements and TLS-encryption that do not have available documentation. As a result, these cannot be audited by One Identity Safeguard for Privileged Sessions (SPS). Regardless of vendors, only the custom features described in the RFC 6143 are supported. As for encryptions, only those completely TLS-encapsulated streams can be processed where the TLS encryption process was started before the VNC protocol handshake.
Configuring the IPMI from the BIOS after losing IPMI password
It may happen that you inadvertently lose the IPMI password of your One Identity Safeguard for Privileged Sessions (SPS). The following procedure describes how you can re-configure your SPS if you lose your IPMI password.
Prerequisites
To apply the procedure outlined here, you will need physical access to a monitor and keyboard.
To configure the IPMI from the BIOS after losing your IPMI password
-
Shut down SPS.
-
Unplug the SPS physical appliance's power cord.
-
Wait 30 seconds.
-
Replug the power cord.
-
Restart the appliance.
-
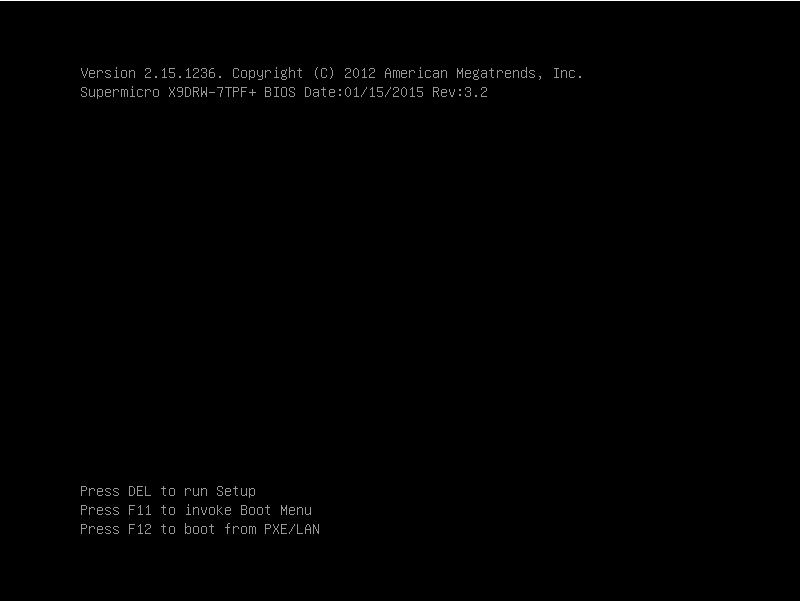
Press the DEL button when the POST screen comes up while the appliance is booting.
Figure 300: POST screen during booting
-
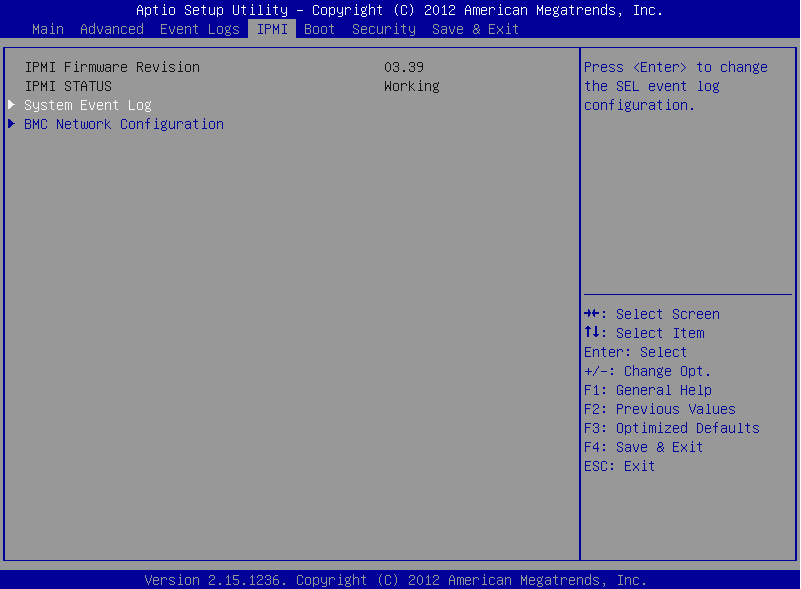
In the BIOS, navigate to the IPMI page.
-
On the IPMI page, select BMC Network Configuration, and press Enter.
Figure 301: IPMI page > BMC Network Configuration option
-
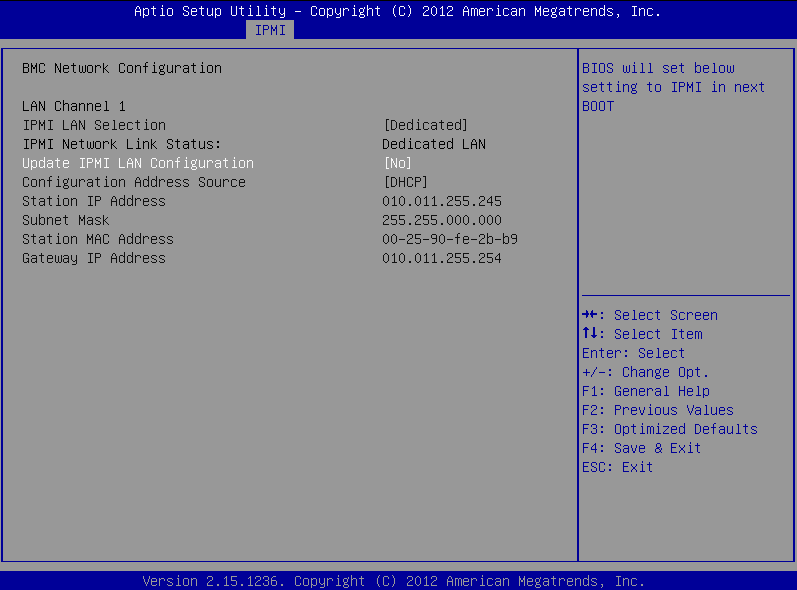
On the BMC Network Configuration page, select Update IPMI LAN Configuration, press Enter, and select Yes.
Figure 302: BMC Network Configuration page > Update IPMI LAN Configuration
-
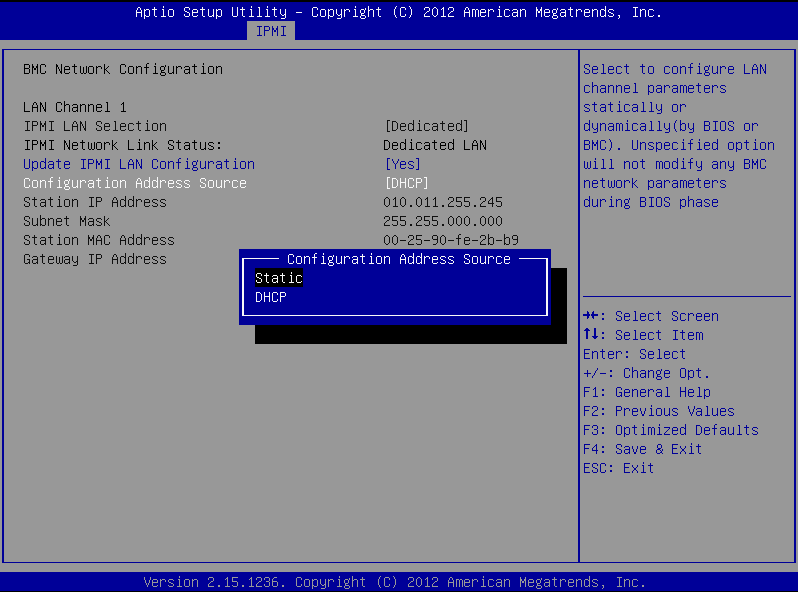
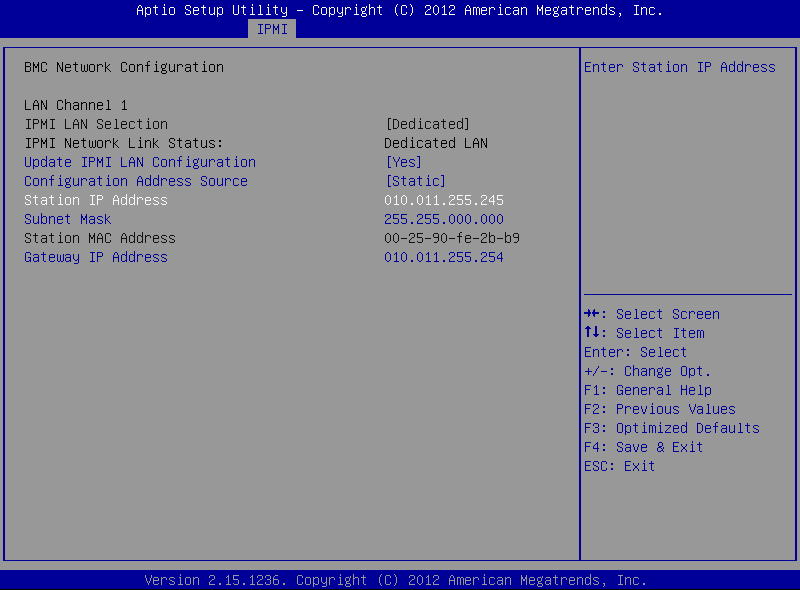
Stay on the BMC Network Configuration page, select Configuration Address Source, press Enter, and select Static.
Figure 303: BMC Network Configuration page > Configuration Address Source
-
Still on the BMC Network Configuration page, configure the Station IP Address, Subnet Mask, and Gateway IP Address individually.
Figure 304: BMC Network Configuration page > Station IP Address, Subnet Mask, Gateway IP Address
-
Press F4 to save the settings, and exit from the BIOS.
About a minute later, you will be able to log in on the IPMI web interface.
Incomplete TSA response received
When using a TSA certificate generated with Windows Certificate Authority, you might see a similar error message:
Incomplete TSA response received, TSA HTTP server may be responding slowly; errno='Success (0)', timeout_seconds='30'
When generating the certificate, make sure that you do the following:
Optional Key Usage: If Key Usage is present, it must be digitalSignature and/or nonRepudiation. Other values are not permitted. Make sure that in Encryption, Allow key exchange without key encryption (key agreement) is selected.
|
|
Caution:
In Encryption, do NOT select Allow key exchange only with key encryption (key encipherment), because it will result in errors. |
For details, see Generating TSA certificate with Windows Certificate Authority on Windows Server 2008 or Generating TSA certificate with Windows Certificate Authority on Windows Server 2012.