Connecting to a server through One Identity Safeguard for Privileged Sessions (SPS) using an RD Gateway
The following describes what happens when a client connects a server through One Identity Safeguard for Privileged Sessions (SPS) using a Remote Desktop Gateway (or RD Gateway), and how the different configuration options and policies of SPS affect this process. For details on the configuration process, see Using One Identity Safeguard for Privileged Sessions (SPS) as a Remote Desktop Gateway.
-
The client connects to port 443 of the Remote Desktop Gateway configured in the Remote Desktop software. The address of the Remote Desktop Gateway is an alias IP address of SPS. To process the connection request, SPS must have a Connection policy that is configured to handle RDP connection requests on the alias IP, and that has the Act as a Remote Desktop Gateway option enabled.
-
The client authenticates on Remote Desktop Gateway (that is, on SPS). Technically, this is an inband gateway authentication on the Domain Controller of SPS's domain (SPS must be the member of a domain, for details, see Network Level Authentication (NLA) with domain membership). The username used in this authentication step is referred to as the Gateway username and is used to determine the Gateway group memberships of the user.
-
The client tries to connect to the server. From this point on, this connection is processed as described in Connecting to a server through One Identity Safeguard for Privileged Sessions (SPS) using RDP.
Archive and backup concepts
You can export, backup and save various types of data from One Identity Safeguard for Privileged Sessions (SPS), and it also creates log files, dumps and bundles to help the Support Team in troubleshooting errors.
Figure 12: Archive and backup concepts
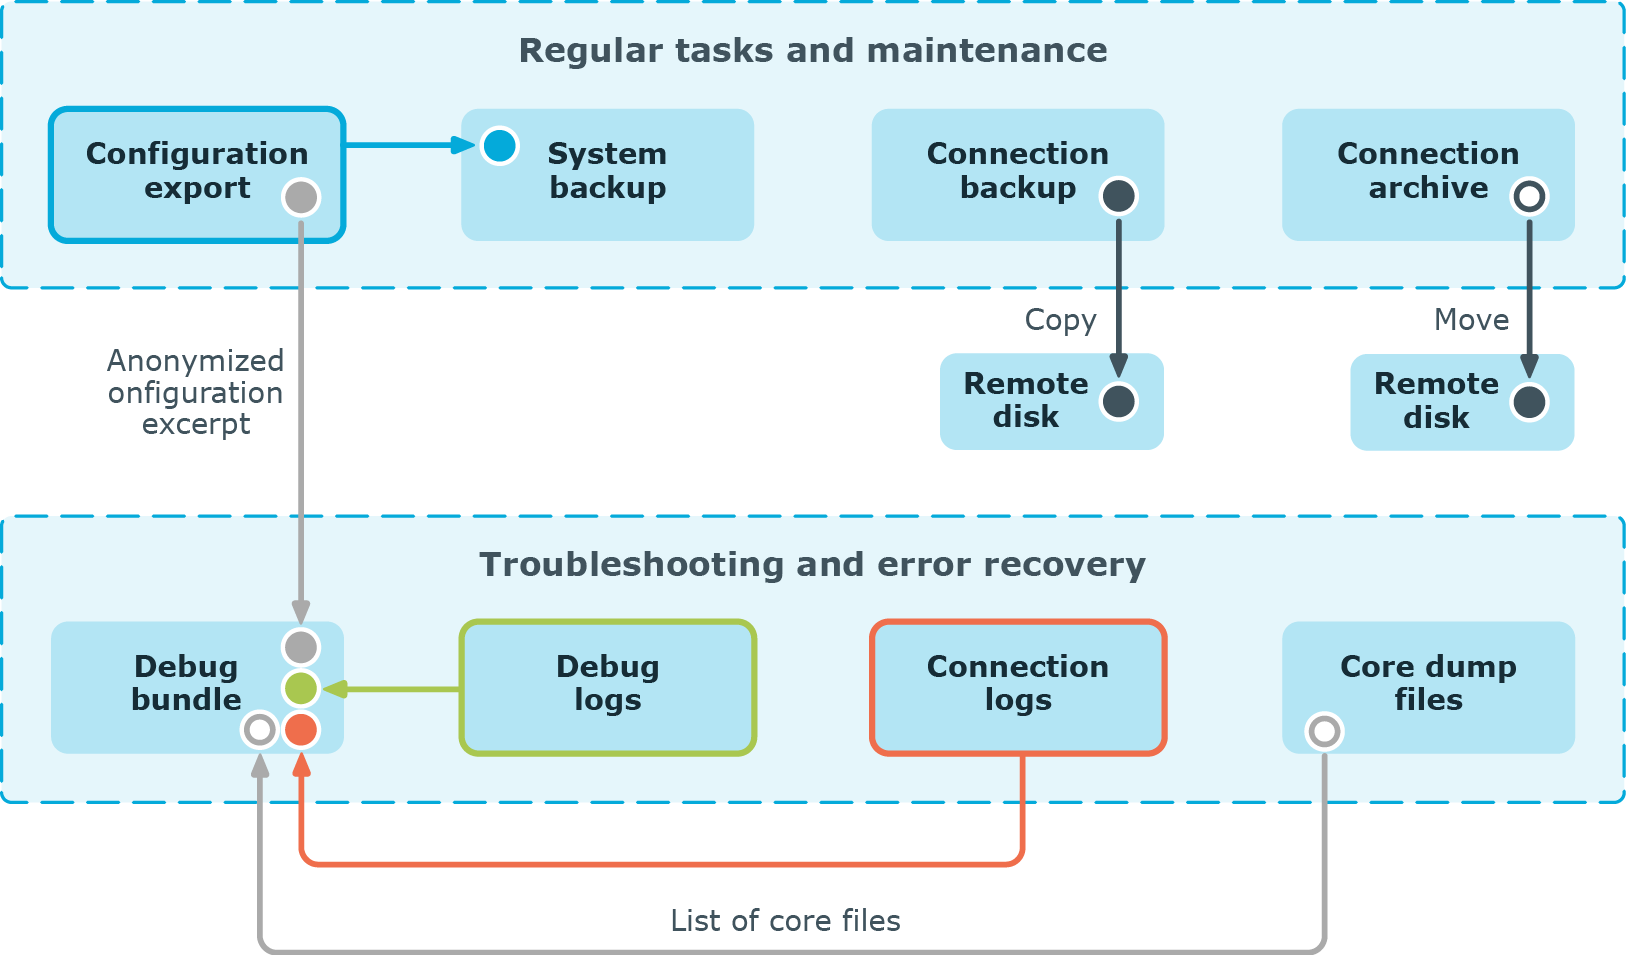
The following sections describe these in detail:
Configuration export
The configuration of One Identity Safeguard for Privileged Sessions (SPS) can be exported to your local machine from the Basic Settings > System > Export configuration page. The configuration export in itself is always a one-time action that cannot be configured in policies. However, the system backup (System backup), that contains the configuration export in addition to other items, can be configured as a scheduled policy and is saved to a backup server.
The exported file is a gzip-compressed archive. On Windows platforms, it can be decompressed with common archive managers such as the free 7-Zip tool.
The name of the exported file is <hostname_of_SPS>-YYYMMDDTHHMM.config, the -encrypted or -gpg suffix is added for password-encrypted and GPG-encrypted files, respectively. Because the configuration export contains highly sensitive information, it is strongly suggested that you use encryption when generating the export.
For details on how to export the configuration of SPS, see: Exporting the configuration of SPS.
The configuration export is used for
-
Manually archiving the configuration.
-
Reinstalling a SPS machine and restoring its configuration.
-
Migrating the configuration of an already installed SPS to a freshly installed SPS of the same version and therefore creating a machine with an identical configuration.
The configuration export contains the following
-
Configuration XML file
-
Every change of the configuration of SPS. You can also access these changes at AAA > Accounting in a search interface.
-
Certificates, for example:
-
CA certificates
-
TSA certificates
-
Signing CA
-
Stored key files, for example:
-
Trusted keys
-
User keys
-
RDP5 RSA key
-
User Preferences that are configured at User Menu > Preferences.
-
Certificates and corresponding private keys in your private keystore that are configured at User Menu > Private Keystore . Only the content of the Permanent keystore is exported.
-
Custom Report Logo configured at Reporting > Configuration.
-
Plugins and any data persisted by plugins.
-
Local Credentials Store (the SQLite database) configured at Policies > Credential Stores.
System backup
The system backup contains the configuration export in addition to other items. It can be configured as a scheduled policy and is saved to a backup server.
Because the configuration export, which is part of the system backup contains highly sensitive information, it is strongly suggested that you use encryption when generating the export. For details on encrypting the configuration export part, see: Encrypting configuration backups with GPG.
For details on how to perform a system backup of One Identity Safeguard for Privileged Sessions (SPS), see: Creating configuration backups. It is a two-step process:
-
Create a backup policy at Policies > Backup & Archive/Cleanup > Backup policies.
-
Assign that policy to the system backup at Basic Settings > Management > System backup > System backup policy.
Select Encrypt configuration.
For details on how to restore the configuration and data of SPS from a complete backup, for example, after a hardware replacement, see: Restoring SPS configuration and data.
The system backup is used for
The system backup contains the following
-
config directory:
One configuration export file per scheduled backup.
-
db directory:
A database dump from SPS's connection metadata database, one .sql file overwritten with the actual dump on a daily basis.
-
reports directory:
The scheduled daily, weekly, monthly system reports that are accessible at Reporting > Reports are saved in .pdf files.
-
rrd directory:
The output files of the internal system monitoring tool (Munin). These are the files that are used in generating graphs/charts on the Basic Settings > Dashboard page.
-
sql directory:
The internal SQLite databases, for example metadata about the reports.
