Upgrading One Identity Safeguard for Privileged Sessions (SPS) (single node)
The following describes how to upgrade One Identity Safeguard for Privileged Sessions (SPS) to a newer firmware version. To upgrade SPS without using the web interface, see Firmware update using SSH. One Identity recommends that you always use the latest maintenance release available.
|

|
Caution:
When upgrading to a new major release (that is, to a new Feature Release or a new Long-Term Supported release), always follow the instructions of the How to upgrade to One Identity Safeguard for Privileged Sessions guide for that release, as it contains more detailed instructions (available at the Safeguard for Privileged Sessions Documentation page). |
|
|
Caution:
Physical SPS appliances based on Pyramid hardware are not supported in 5 F1 and later releases. Do not upgrade to 5 F1 or later on a Pyramid-based hardware. The last supported release for this hardware is 5 LTS, which is a long-term supported release.
If you have purchased SPS before August, 2014 and have not received a replacement hardware since then, you have Pyramid hardware, so do not upgrade to SPS 5 F1 or later. If you have purchased SPS after August 2014, you can upgrade to 5 F1.
If you do not know the type of your hardware or when it was purchased, complete the following steps:
-
Login to SPS.
-
Navigate to Basic Settings > Troubleshooting > Create support bundle, click Create support bundle, and save the file.
-
Open a ticket at https://support.oneidentity.com/create-service-request/.
-
Upload the file you downloaded from SPS in Step 1.
-
We will check the type of your hardware and notify you. |
To upgrade SPS to a newer firmware version
-
Navigate to Basic Settings > System > Firmwares.
Figure 105: Basic Settings > System > Firmwares — Managing the firmwares

-
Upload the new firmware: Browse for the firmware .iso file and then click Upload.
-
To read the Upgrade Notes of the uploaded firmware, click on the  icon. The Upgrade Notes are displayed in a pop-up window.
-
Click Test for the new firmware to check if your configuration can be upgraded to version 6.0.10. If the test returns any errors, correct them before continuing the upgrade process. If you encounter any problems, contact our Support Team.
-
|
|
Caution:
Proceed only if the upgrade test is successful. |
Activate the firmware, but do not reboot SPS yet.
-
Navigate to Basic Settings > System > Traffic Control > This node, and choose Reboot.
SPS attempts to boot with the new firmware. Wait for the process to complete.
-
Login to the SPS web interface to verify that the upgrade was successful.
Navigate to Basic Settings > System > Version details, or check the system log for the version numbers SPS reports on boot. In case you encounter problems, you can find common troubleshooting steps in Troubleshooting.
Upgrading a high availability One Identity Safeguard for Privileged Sessions (SPS) cluster
The following describes how to upgrade a high availability One Identity Safeguard for Privileged Sessions (SPS) cluster to a newer firmware version. One Identity recommends that you always use the latest maintenance release available.
|
|
Caution:
When upgrading to a new major release (that is, to a new Feature Release or a new Long-Term Supported release), always follow the instructions of the How to upgrade to One Identity Safeguard for Privileged Sessions guide for that release, as it contains more detailed instructions (available at the Safeguard for Privileged Sessions Documentation page). |
|
|
Caution:
Physical SPS appliances based on Pyramid hardware are not supported in 5 F1 and later releases. Do not upgrade to 5 F1 or later on a Pyramid-based hardware. The last supported release for this hardware is 5 LTS, which is a long-term supported release.
If you have purchased SPS before August, 2014 and have not received a replacement hardware since then, you have Pyramid hardware, so do not upgrade to SPS 5 F1 or later. If you have purchased SPS after August 2014, you can upgrade to 5 F1.
If you do not know the type of your hardware or when it was purchased, complete the following steps:
-
Login to SPS.
-
Navigate to Basic Settings > Troubleshooting > Create support bundle, click Create support bundle, and save the file.
-
Open a ticket at https://support.oneidentity.com/create-service-request/.
-
Upload the file you downloaded from SPS in Step 1.
-
We will check the type of your hardware and notify you. |
To upgrade a high availability SPS cluster to a newer firmware version
-
Navigate to Basic Settings > System > Firmwares.
-
Upload the new firmware: Browse for the firmware .iso file and then click Upload.
-
To read the Upgrade Notes of the uploaded firmware, click on the icon. The Upgrade Notes are displayed in a pop-up window.
-
Click Test for the new firmware to check if your configuration can be upgraded to version 6.0.10. If the test returns any errors, correct them before continuing the upgrade process. If you encounter any problems, contact our Support Team.
-
|
|
Caution:
Proceed only if the upgrade test is successful. |
Activate the firmware, but do not reboot SPS yet.
-
Navigate to Basic Settings > High availability, and verify that the new firmware is active on the secondary node. This might take a few minutes.
-
In Basic Settings > High availability > Other node, click Shutdown.
-
Restart the primary node: click This node > Reboot.
SPS attempts to boot with the new firmware. Wait for the process to complete.
-
Login to the SPS web interface to verify that the primary node upgrade was successful.
Navigate to Basic Settings > System > Version details, or check the system log for the version numbers SPS reports on boot. In case you encounter problems, you can find common troubleshooting steps in Troubleshooting.
-
Use the IPMI to power on the secondary node.
The secondary node attempts to boot with the new firmware, and reconnects to the primary node to sync data. During the sync process, certain services (including Heartbeat) are not available. Wait for the process to finish, and the secondary node to boot fully.
-
Navigate to Basic Settings > High availability and verify that the secondary node is connected, and has the same firmware versions as the primary node.
|
|
Caution:
If you have nodes with the Search Minion role configured, the Search Minion nodes must be upgraded first during high availability cluster upgrade. If you upgrade the Search Master node first, it is possible that a Search Minion node will create a legacy Elasticsearch index before the init script on the Search Master creates a new one. In this case, the Elasticsearch index will contain invalid schema mapping data, therefore as the high availability cluster’s schema changes, the Search Minion nodes cannot push their documents into Elasticsearch, resulting in a critical error. |
To avoid the critical error mentioned above, follow the method below to upgrade a high availability SPS cluster with Search Minion nodes to a newer firmware version
- Set the Search Master node for upgrade so that it uses the newer firmware version for reboot. To do this, complete steps 1-11 of To upgrade a high availability SPS cluster to a newer firmware version.
- Click Shutdown.
- Upgrade your Search Minion nodes one after the other, using the method in steps 1-2 above.
- Reboot the Search Master node, which will now boot with the newer firmware version.
With this method you detach the Search Minion nodes from the Search Master node and upgrade them separately before any other nodes. As a result, the whole high availability cluster will use the newer firmware version after reboot.
If you have accidentally upgraded the Search Master node first and encounter this critical error, contact our Support Team.
Troubleshooting
If you experience any strange behavior of the web interface, first try to reload the page by holding the SHIFT key while clicking the Reload button of your browser to remove any cached version of the page.
In the unlikely case that One Identity Safeguard for Privileged Sessions (SPS) encounters a problem during the upgrade process and cannot revert to its original state, SPS performs the following actions:
-
Initializes the network interfaces using the already configured IP addresses.
-
Enables SSH-access to SPS, unless SPS is running in sealed mode. That way it is possible to access the logs of the upgrade process that helps the One Identity Support Team to diagnose and solve the problem. Note that SSH access will be enabled on every active interface, even if management access has not been enabled for the interface.
In case the web interface is not available within 30 minutes of rebooting SPS, check the information displayed on the local console and contact our Support Team.
Exporting the configuration of One Identity Safeguard for Privileged Sessions (SPS)
The configuration of One Identity Safeguard for Privileged Sessions (SPS) can be exported (for manual archiving, or to migrate it to another SPS unit) from the Basic Settings > System page. Use the respective action buttons to perform the desired operation.
You also have the option to export the configuration SPS into a local file using the console. For details, see Exporting and importing the configuration of One Identity Safeguard for Privileged Sessions (SPS) using the console.
Figure 106: Basic Settings > System — Exporting the SPS configuration
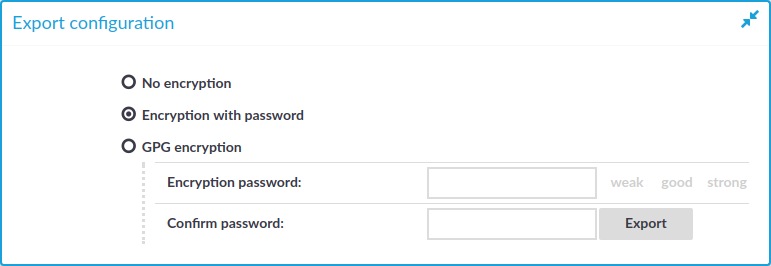
To export the configuration of SPS
-
Navigate to Basic Settings > System > Export configuration.
-
Select how to encrypt the configuration:
-
To export the configuration file without encryption, select No encryption.
|
|
Caution:
One Identity does not recommend exporting the SPS configuration without encryption, as it contains sensitive information such as password hashes and private keys. |
-
To encrypt the configuration file with a simple password, select Encrypt with password and enter the password into the Encryption password and Confirm password fields.
|

|
NOTE:
One Identity Safeguard for Privileged Sessions (SPS) accepts passwords that are not longer than 150 characters. The following special characters can be used: !"#$%&'()*+,-./:;<=>?@[\]^-`{|} |
-
To encrypt the configuration file with GPG, select GPG encryption. Note that this option uses the same GPG key that is used to encrypt automatic system backups, and is only available if you have uploaded the public part of a GPG key to SPS at Basic Settings > Management > System backup. For details, see Encrypting configuration backups with GPG.
-
Click Export.
|
|
NOTE:
The exported file is a gzip-compressed archive. On Windows platforms, it can be decompressed with common archive managers such as the free 7-Zip tool.
The name of the exported file is <hostname_of_SPS>-YYYMMDDTHHMM.config, the -encrypted or -gpg suffix is added for password-encrypted and GPG-encrypted files, respectively. |
