Managing logspaces
Logspaces are mostly managed automatically using backup and archiving policies, as described in Data and configuration backups and Archiving and cleanup. However, backup and archiving can be started manually as well. To display the details of a logspace, click  . A number of action buttons is shown in the top row.
NOTE: These options are not available for filtered and remote logspaces.
NOTE: If there are any multiple logspaces using your logspace as a member logspace, the multiple logspaces in question will be listed under Multiple logspaces using this as member. The list items are clickable links that will take you directly to the logspaces on the SSB web interface.
This list is only visible on the SSB web interface for Logspaces, Filtered Logspaces, Multiple Logspaces, and Remote Logspaces if they are member logspaces in any multiple logspaces.
Figure 129: Log > Logspaces > Get current size — Managing logspaces

Archive, backup, cleanup, restore and emptying options
TIP: The size of the logspace is displayed in the Size row of the logspace details. To refresh the data, select Get current size.
-
To start the backup process manually, click Backup.
-
To restore the log files from the backup server to syslog-ng Store Box (SSB), click Restore.
|

|
Caution:
Restoring the backup replaces every log file of the logspace with the files from the backup. Any log message saved into the logspace since the backup is irrevocably lost. |
-
To start the archiving and the cleanup process manually, click Archive/Cleanup.
|
|
Caution:
If the archiving policy selected for the logspace is set to perform only cleanup, log messages older than the Retention Time are deleted and irrevocably lost. For details, see Archiving and cleanup. |
-
To delete every log file in the logspace, click Empty. This option can be useful if you have to quickly free up space on SSB, or if you want to delete a logspace.
|
|
Caution:
This action deletes every file of the logspace. Any log message not archived or backed up is irrevocably lost. |
You can still search archived logs of the logspace.
Similar action buttons are available at the top of the Log > Logspaces page to backup, archive, or delete the contents of every logspace. These actions are performed on every logspace with their respective settings, that is, clicking Backup All creates a backup of every logspace using the backup policy settings of the individual logspace.
Disk space
Type
Managing logspaces - Archive and backup logspaces
Logspaces are mostly managed automatically using backup and archiving policies, as described in Data and configuration backups and Archiving and cleanup. However, backup and archiving can be started manually as well. To display the details of a logspace, click . A number of action buttons is shown in the top row.
NOTE: These options are not available for filtered and remote logspaces.
NOTE: If there are any multiple logspaces using your logspace as a member logspace, the multiple logspaces in question will be listed under Multiple logspaces using this as member. The list items are clickable links that will take you directly to the logspaces on the SSB web interface.
This list is only visible on the SSB web interface for Logspaces, Filtered Logspaces, Multiple Logspaces, and Remote Logspaces if they are member logspaces in any multiple logspaces.
Figure 130: Log > Logspaces — Managing logspaces

TIP: The size of the logspace is displayed in the Size row of the logspace details. To refresh the data, select Get current size.
-
To start the backup process manually, click Backup.
-
To restore the log files from the backup server to syslog-ng Store Box (SSB), click Restore.
|
|
Caution:
Restoring the backup replaces every log file of the logspace with the files from the backup. Any log message saved into the logspace since the backup is irrevocably lost. |
-
To start the archiving and the cleanup process manually, click Archive/Cleanup.
|
|
Caution:
If the archiving policy selected for the logspace is set to perform only cleanup, log messages older than the Retention Time are deleted and irrevocably lost. For details, see Archiving and cleanup. |
-
To delete every log file in the logspace, click Empty. This option can be useful if you have to quickly free up space on SSB, or if you want to delete a logspace.
|
|
Caution:
This action deletes every file of the logspace. Any log message not archived or backed up is irrevocably lost. |
You can still search archived logs of the logspace.
Similar action buttons are available at the top of the Log > Logspaces page to backup, archive, or delete the contents of every logspace. These actions are performed on every logspace with their respective settings, that is, clicking Backup All creates a backup of every logspace using the backup policy settings of the individual logspace.
Assigning the SSB logspace of your choice to a custom cloud service provider data disk
From syslog-ng Store Box (SSB) version 6.9.0, you have more options for managing data disks for your logspaces.
If you need more disk space than the disk size of your default data disk available in syslog-ng Store Box (SSB), from version 6.9.0, you can also add a custom cloud service provider data disk to your configuration. From 6.9.0, SSB supports adding a Microsoft Azure managed disk to your SSB configuration as a custom cloud service provider data disk, and assigning the SSB logspace of your choice to it.
This section describes how you can assign the SSB logspace of your choice to a custom cloud service provider data disk.
For more information about how you can add a custom cloud service provider data disk on the cloud service provider side, see Adding a new custom cloud service provider data disk on the cloud service provider side.
For more information about adding a newly added custom cloud service provider data disk to your SSB configuration, see Adding a new custom cloud service provider data disk to your SSB configuration.
For more information about the data disk information for your newly added custom cloud service provider data disks, see Data disk information for your custom cloud service provider data disks.
Prerequisites
Assigning the SSB logspace of your choice to a custom cloud service provider data disk has the following prerequisites:
Limitations
Assigning the SSB logspace of your choice to a custom cloud service provider data disk has the following limitations:
-
|
|
Caution:
HAZARD OF DATA LOSS!
One Identity does not support decreasing the size of a Microsoft Azure managed disk added to your SSB configuration as a custom cloud service provider data disk. |
-
NOTE: If you fail to assign the newly created SSB logspace of your choice to the new custom cloud service provider data disk, SSB will not automatically detect and use the new custom cloud service provider data disk to store messages on it.
-
NOTE: Resizing your custom cloud service provider data disk on the Microsoft Azure side is quick, but your SSB configuration must resize the file system on your SSB side to match the resizing on the Microsoft Azure side. As a result, depending on the original size of the custom cloud service provider data disk and on the size you will expand it to, starting the virtual machine for your SSB device after you expand the size of your custom cloud service provider data disk may take a long time.
-
In version 6.9.0, SSB supports adding Microsoft Azure managed disks of up to 32,767 GiB storage space to your SSB device. For more information about managed data disks in Microsoft Azure, see Disk type comparison in the Microsoft Azure online documentation.
-
Transporting custom cloud service provider data disks between SSB devices is not supported.
-
You can only add, remove, or resize a custom cloud service provider data disk in your configuration after shutting your SSB device down first. Hot swaps are not supported.
-
You can only add an Azure managed disk as a custom cloud service provider data disk to your SSB on the Microsoft Azure portal side.
-
SSB only accepts and detects empty disks as custom cloud service provider data disks. As a result, you can only add a newly created Azure managed disk as a custom cloud service provider data disk to your SSB configuration. Adding an already existing Azure managed disk (by clicking Attach existing disks on the Microsoft Azure portal) is not supported.
-
One Identity does not support adding Azure managed disks to your SSB logspaces as a shared disk. You can only add one Azure managed disk to one SSB device.
-
The number of managed disks you can add on the Microsoft Azure portal depends on the type of Microsoft Azure subscription you are using.
After adding a new managed disk on your cloud service provider side, and adding it as a custom cloud service provider data disk to your SSB configuration, you have to assign the SSB logspace of your choice to a custom cloud service provider data disk.
To assign the SSB logspace of your choice to a custom cloud service provider data disk,
-
Add a new managed disk on your cloud service provider side.
-
Add the newly created managed disk as a custom cloud service provider data disk to your SSB configuration.
-
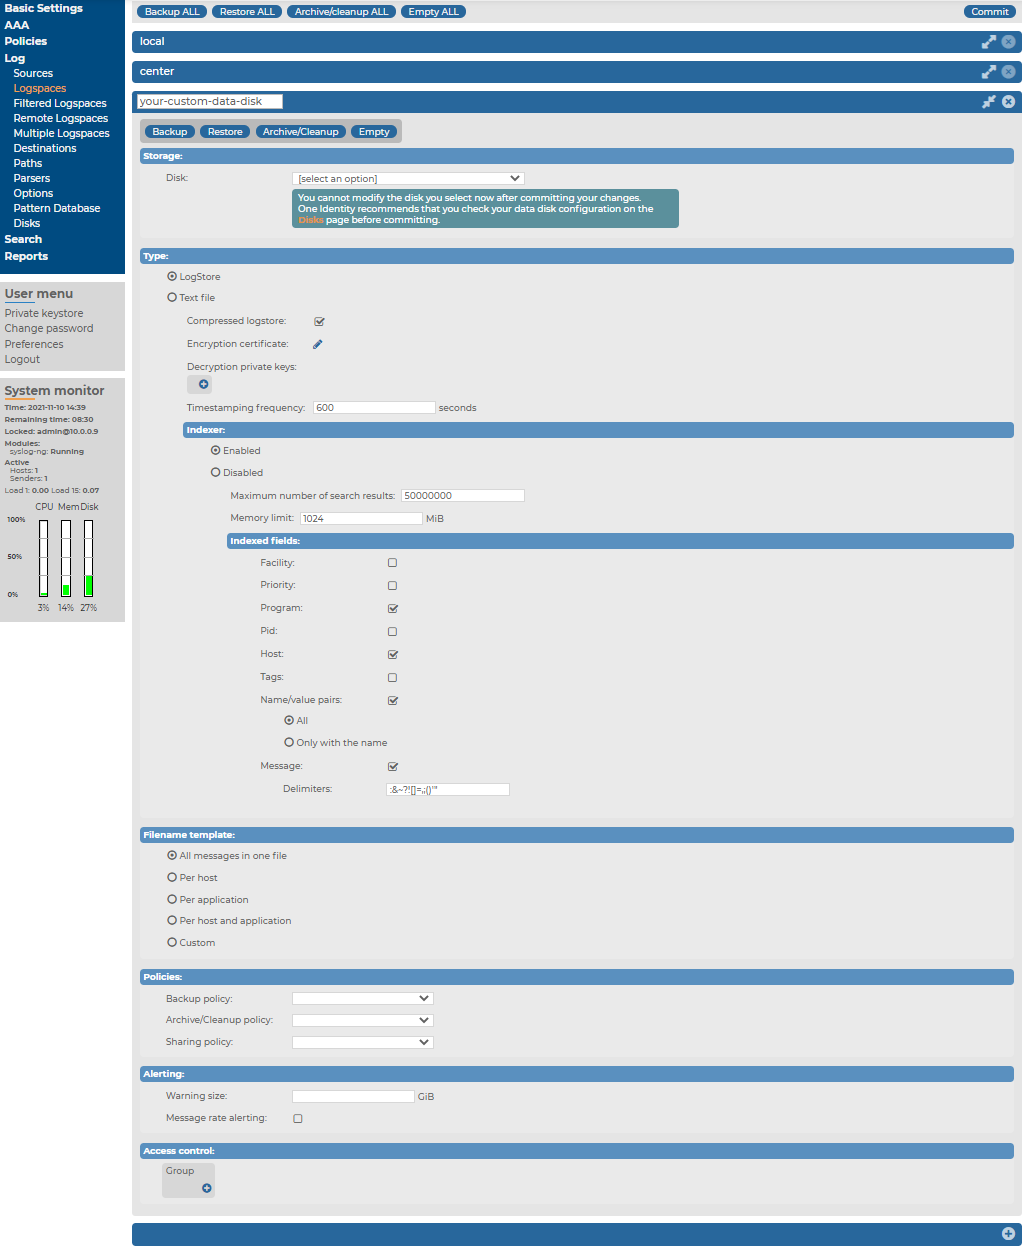
Navigate to Log > Logspaces, then click  to add a new logspace, and find a descriptive name for it (for example, the same name that you added for the new custom cloud service provider data disk, in this case, your-custom-data-disk).
Figure 131: Log > Logspaces — Adding a new logspace that you will assign to the new custom cloud service provider data disk
-
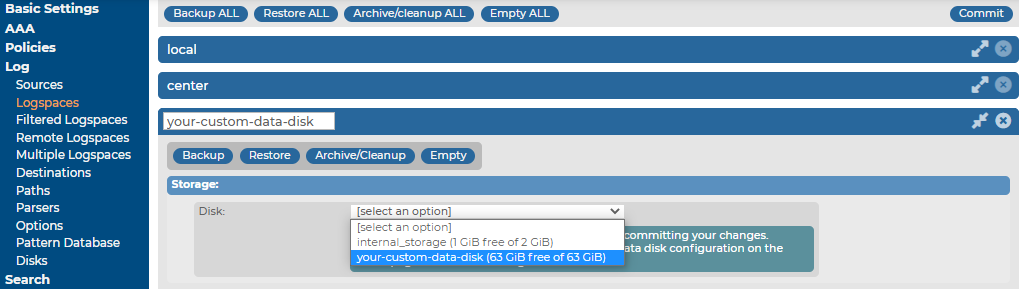
Under Log > Logspaces > <your-new-logspace-with-custom-data-disk> > Storage > Disk, select the data disk you want to use for your new logspace.
In addition to the default SSB internal storage option, you will have more data disk options in the dropdown list, including any newly created custom cloud service provider data disks you recently added to your SSB configuration.
Figure 132: Log > Logspaces > <your-new-logspace-with-custom-data-disk> > Storage > Disk — Selecting the data disk for your new logspace
NOTE:
If you set a custom cloud service provider data disk under Log > Logspaces > <your-new-logspace-with-custom-data-disk> > Storage > Disk, you can not change it after committing your logspace configuration.
NOTE: For newly created logspaces, selecting a data disk for your logspace is required.
-
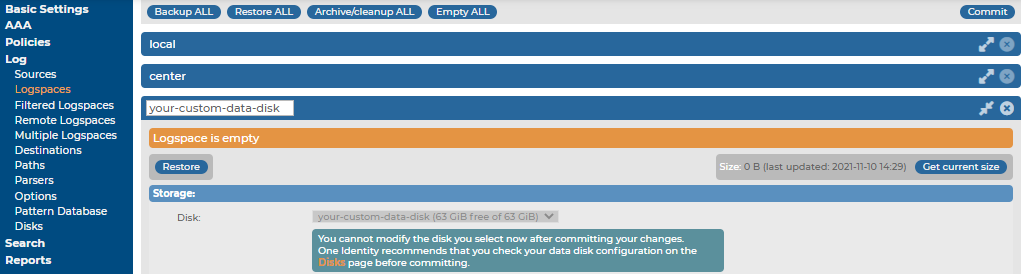
After selecting the data disk of your choice (in this case, the custom cloud service provider data disk we added earlier, that is, your-custom-data-disk), click  .
.
Figure 133: Log > Logspaces > <your-new-logspace-with-custom-data-disk> > Storage > Disk — New logspace assigned to your new custom cloud service provider data disk
NOTE: After adding a newly created custom cloud service provider data disk to your SSB configuration, and assigning the SSB logspace of your choice to it, removing the custom cloud service provider data disk from your SSB configuration has a strict order, especially if there are referenced objects tied to the custom cloud service provider data disk. For more information about the process to remove such custom cloud service provider data disks from your SSB configuration, see Removing a custom cloud service provider data disk from your SSB configuration.
TIP: The size of the logspace is displayed in the Size row of the logspace details. To refresh the data, select Get current size.
Creating filtered logspaces
Filtered logspaces allow you to create a smaller, filtered subset of the logs contained in an existing local, remote or multiple logspace. Assigning a user group to a filtered logspace enables fine grained access control by creating a group which sees only a subset of the logs from a logspace.
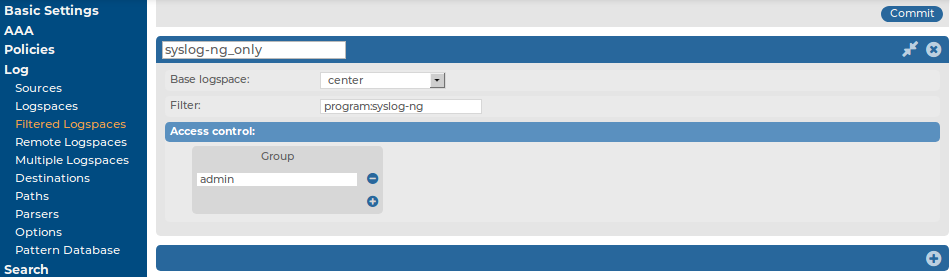
You can use the same search expressions and logic as on the Search interface to create a filtered logspace. In the following example, we have configured a filtered logspace that only contains messages from syslog-ng:
NOTE: The filtered logspace is only a view of the base logspace. The log messages are still stored in the base logspace (if the base logspace is a remote logspace, the log messages are stored on the remote syslog-ng Store Box (SSB) appliance). Therefore, you cannot alter any configuration parameters of the logspace directly. To do this, navigate to the base logspace itself.
NOTE: If there are any multiple logspaces using your logspace as a member logspace, the multiple logspaces in question will be listed under Multiple logspaces using this as member. The list items are clickable links that will take you directly to the logspaces on the SSB web interface.
This list is only visible on the SSB web interface for Logspaces, Filtered Logspaces, Multiple Logspaces, and Remote Logspaces if they are member logspaces in any multiple logspaces.
Figure 134: Log > Filtered Logspaces — Filtered logspaces
To create filtered logspaces
-
Navigate to Log > Filtered Logspaces and click .
-
Enter a name for the logspace into the top field. Use descriptive names that help you to identify the source easily. Note that the name of the logspace must begin with a number or a letter.
-
Choose which logspace to filter in Base logspace.
-
Enter the search expression in the Filter field.
You can create complex searches using wildcards and boolean expressions. For more information and practical examples, see Using complex search queries.
NOTE: SSB only indexes the first 59 characters of every name-value pair (parameter). This has two consequences:
-
If the parameter is longer than 59 characters, an exact search might deliver multiple, imprecise results.
Consider the following example. If the parameter is:
.sdata.security.uid=2011-12-08T12:32:25.024+01:00-hostname-12345
SSB indexes it only as:
.sdata.security.uid=2011-12-08T12:32:25.024+01:00-hostname-
This corresponds to the first 59 characters. As a result, searching for:
nvpair:.sdata.security.uid=2011-12-08T12:32:25.024+01:00-hostname-12345
returns all log messages that contain:
.sdata.security.uid=2011-12-08T12:32:25.024+01:00-hostname-
-
Using wildcards might lead to the omission of certain messages from the search results.
Using the same example as above, searching for the value:
nvpair:*=2011-12-08T12:32:25.024+01:00-hostname-12345
does not return any results (as the 12345 part was not indexed). Instead, you have to search for:
nvpair:*=2011-12-08T12:32:25.024+01:00-hostname-*
This, as explained above, might find multiple results.
-
By default, members of the search group can view the stored messages online. Use the Access control option to control which usergroups can access the logspace. For details, see also Managing user rights and usergroups.
-
Click .
