Chat now with support
Chat with Support

One Identity Safeguard for Privileged Sessions 6.0.12 - Administration Guide

Preface Introduction The concepts of One Identity Safeguard for Privileged Sessions (SPS) Cloud deployment considerations The Welcome Wizard and the first login Basic settings
Supported web browsers and operating systems The structure of the web interface Network settings Configuring date and time System logging, SNMP and e-mail alerts Configuring system monitoring on SPS Data and configuration backups Archiving and cleanup Forwarding data to third-party systems Joining to One Identity Starling
User management and access control Managing One Identity Safeguard for Privileged Sessions (SPS)
Controlling One Identity Safeguard for Privileged Sessions (SPS): reboot, shutdown Managing Safeguard for Privileged Sessions (SPS) clusters Managing a high availability One Identity Safeguard for Privileged Sessions (SPS) cluster Upgrading One Identity Safeguard for Privileged Sessions (SPS) Managing the One Identity Safeguard for Privileged Sessions (SPS) license Accessing the One Identity Safeguard for Privileged Sessions (SPS) console Sealed mode Out-of-band management of One Identity Safeguard for Privileged Sessions (SPS) Managing the certificates used on One Identity Safeguard for Privileged Sessions (SPS)
General connection settings HTTP-specific settings ICA-specific settings RDP-specific settings SSH-specific settings Telnet-specific settings VMware Horizon View connections VNC-specific settings Indexing audit trails Using the Search interface Searching session data on a central node in a cluster Advanced authentication and authorization techniques Reports The One Identity Safeguard for Privileged Sessions (SPS) RPC API The One Identity Safeguard for Privileged Sessions (SPS) REST API One Identity Safeguard for Privileged Sessions (SPS) scenarios Troubleshooting One Identity Safeguard for Privileged Sessions (SPS) Using SPS with SPP Configuring external devices Using SCP with agent-forwarding Security checklist for configuring One Identity Safeguard for Privileged Sessions (SPS) Jumplists for in-product help LDAP user and group resolution in SPS Appendix: Deprecated features Glossary

Configuring the IPMI from the console

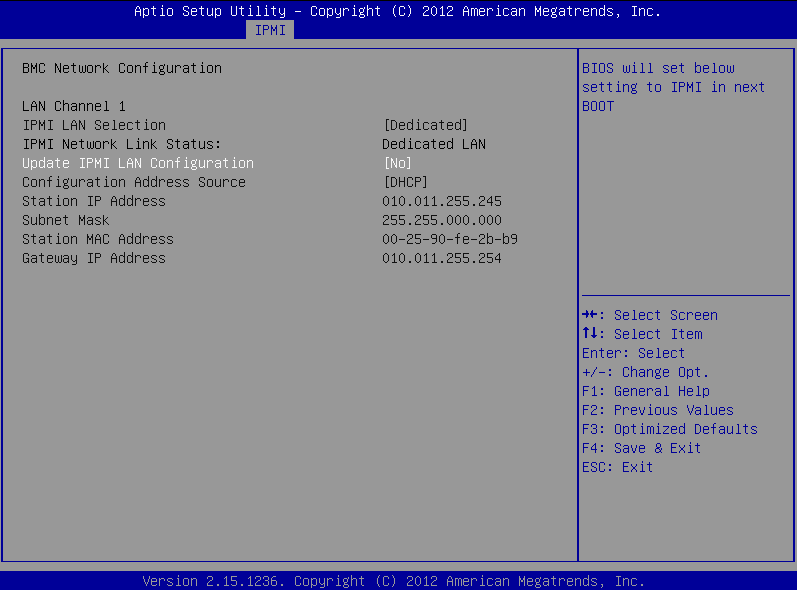
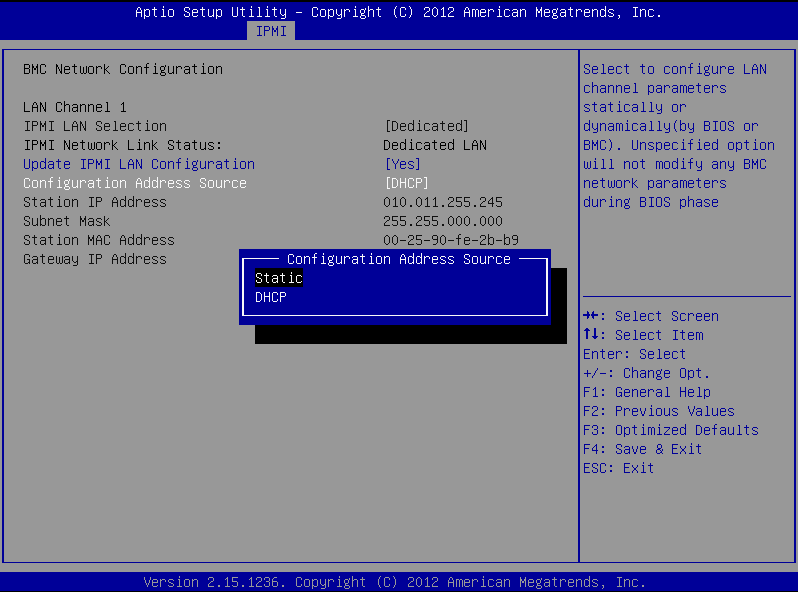
The following describes how to modify the network configuration of IPMI from the console of One Identity Safeguard for Privileged Sessions (SPS).

Prerequisites

SPS is accessible using the IPMI only if the IPMI is physically connected to the network. For details on connecting the IPMI, see "Installing the SPS hardware" in the Installation Guide.

Caution:

IPMI searches for available network interfaces during boot. Make sure that IPMI is connected to the network through the dedicated Ethernet interface before SPS is powered on.

Caution: SECURITY HAZARD!

The IPMI, like all out-of-band management interfaces, has known vulnerabilities that One Identity cannot fix or have an effect on. To avoid security hazards, One Identity recommends that you only connect the IPMI to well-protected, separated management networks with restricted accessibility. Failing to do so may result in an unauthorized access to all data stored on the SPS appliance. Data on the appliance can be unencrypted or encrypted, and can include sensitive information, for example, passwords, decryption keys, private keys, and so on.

For more information, see Best Practices for managing servers with IPMI features enabled in Datacenters.

NOTE:

The administrator of SPS must be authorized and able to access the IPMI for support and troubleshooting purposes in case vendor support is needed.

The following ports are used by the IPMI:

  • Port 22 (TCP): SSH (configurable)

  • Port 80 (TCP): Web (configurable)

  • Port 161 (UDP, TCP): SNMP (configurable)

  • Port 443 (TCP): Web SSL (configurable)

  • Port 623 (UDP): Virtual Media (configurable)

  • Port 5900 (TCP): IKVM Server (configurable)

  • Port 5985 (TCP): Wsman (configurable)

The SSH encrypted connection (port 22) works with the following properties:

Supported:

Safeguard Sessions Appliance 3000

Safeguard Sessions Appliance 3500

Ciphers

aes128-ctr, aes256-ctr

3des-cbc, aes128-ctr, aes128-cbc, aes256-ctr, aes256-cbc

KEX algorithm

curve25519-sha256, ecdh-sha2-nistp256, curve25519-sha256@libssh.org, ecdh-sha2-nistp384, diffie-hellman-group1-sha1, ecdh-sha2-nistp521, diffie-hellman-group14-sha1

curve25519-sha256, ecdh-sha2-nistp256, curve25519-sha256@libssh.org, ecdh-sha2-nistp384, diffie-hellman-group1-sha1, ecdh-sha2-nistp521, diffie-hellman-group14-sha1

MACs

hmac-sha1, hmac-sha2-256, hmac-sha1-96, hmac-sha2-512

hmac-md5, hmac-sha2-256, hmac-sha1, hmac-sha2-512, hmac-sha1-96

HostKey algorithms

ssh-rsa, ssh-dss

ssh-rsa, ssh-dss

Compression

enabled

enabled

SSL encrypted connections work with the following properties:

Supported:

Safeguard Sessions Appliance 3000

Safeguard Sessions Appliance 3500

TLSv1.2

enabled

enabled

TLS Fallback SCSV

supported

supported

Heartbleed

not vulnerable

not vulnerable

Server Ciphers

Preferred TLSv1.2 256 bits ECDHE-RSA-AES256-GCM-SHA384 Curve P-256 DHE 256

Accepted TLSv1.2 256 bits ECDHE-RSA-AES256-SHA384 Curve P-256 DHE 256

Accepted TLSv1.2 256 bits DHE-RSA-AES256-GCM-SHA384 DHE 2048 bits

Accepted TLSv1.2 256 bits DHE-RSA-AES256-SHA256 DHE 2048 bits

Accepted TLSv1.2 256 bits AES256-GCM-SHA384

Accepted TLSv1.2 256 bits AES256-SHA256

Accepted TLSv1.2 128 bits ECDHE-RSA-AES128-GCM-SHA256 Curve P-256 DHE 256

Accepted TLSv1.2 128 bits ECDHE-RSA-AES128-SHA256 Curve P-256 DHE 256

Accepted TLSv1.2 128 bits DHE-RSA-AES128-GCM-SHA256 DHE 2048 bits

Accepted TLSv1.2 128 bits DHE-RSA-AES128-SHA256 DHE 2048 bits

Accepted TLSv1.2 128 bits AES128-GCM-SHA256

Accepted TLSv1.2 128 bits AES128-SHA256

Server Key Exchange Groups

TLSv1.2 128 bits secp256r1 (NIST P-256)

TLSv1.2 128 bits secp256r1 (NIST P-256)

Server Signature Algorithms

TLSv1.2 Server accepts all signature algorithms.

TLSv1.2 Server accepts all signature algorithms.

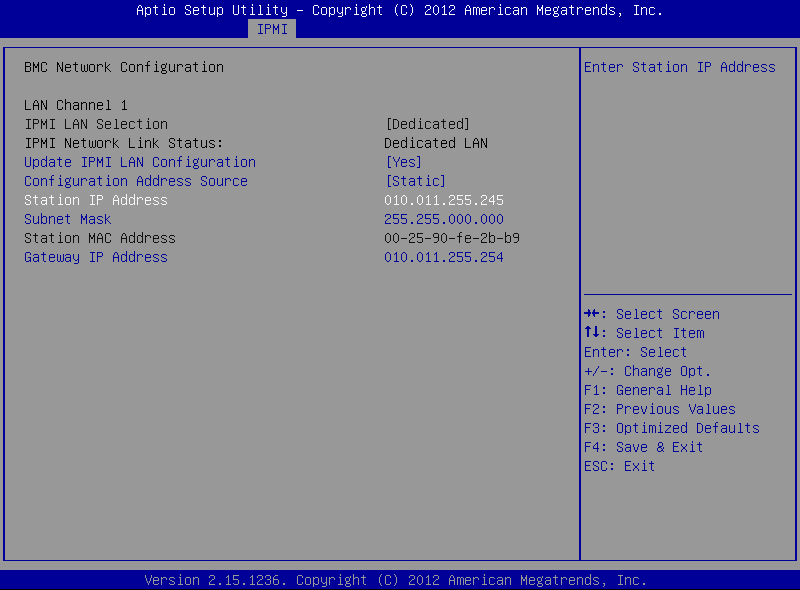
To modify the network configuration of IPMI from the console of SPS

  1. Use the local console (or SSH) to log in to SPS as root.

  2. Choose Shells > Boot shell.

  3. Check the network configuration of the interface:

    # ipmitool lan print

    This guide assumes that channel 1 is used for LAN. If your setup differs, adjust the following commands accordingly.

  4. Configure the interface. You can use DHCP or configure a static IP address manually.

    Use an IPv4 address.

    • To use DHCP, enter the following command:

      # ipmitool lan set 1 ipsrc dhcp

    • To use static IP, enter the following command:

      # ipmitool lan set 1 ipsrc static

      Set the IP address:

      # ipmitool lan set 1 ipaddr <IPMI-IP>

      Set the netmask:

      # ipmitool lan set 1 netmask <IPMI-netmask>

      Set the IP address of the default gateway:

      # ipmitool lan set 1 defgw ipaddr <gateway-IP>

  5. Configure IPMI to use the dedicated Ethernet interface.

    • On the N1000, T1, T4, and T10 appliances, issue the following command:

      # ipmitool raw 0x30 0x70 0xc 1 0

    • On the 1000d and 10000 appliances, issue the following command:

      # ipmitool raw 0x30 0x70 0xc 1 1 0

  6. Verify the network configuration of IPMI:

    # ipmitool lan print 1

    Use a browser to connect to the reported network address.

  7. Change the default password:

    1. Log in to the IPMI web interface using the default login credentials (username: ADMIN, password: ADMIN or changeme, depending on your hardware).

      NOTE:

      The login credentials are case sensitive.

    2. Navigate to Configure > Users.

    3. Select ADMIN, and choose Modify User.

    4. Change the password, and save the changes with Modify.

Configuring the IPMI from the BIOS

To configure IPMI from the BIOS when configuring your One Identity Safeguard for Privileged Sessions (SPS) physical appliance for the first time, complete the following steps.

Prerequisites

To apply the procedure outlined here, you will need physical access to a monitor and keyboard.

To configure the IPMI from the BIOS

  1. Press the DEL button when the POST screen comes up while the appliance is booting.

    Figure 113: POST screen during booting

  2. In the BIOS, navigate to the IPMI page.

  3. On the IPMI page, select BMC Network Configuration, and press Enter.

    Figure 114: IPMI page > BMC Network Configuration option

  4. On the BMC Network Configuration page, select Update IPMI LAN Configuration, press Enter, and select Yes.

    Figure 115: BMC Network Configuration page > Update IPMI LAN Configuration

  5. Stay on the BMC Network Configuration page, select Configuration Address Source, press Enter, and select Static.

    Figure 116: BMC Network Configuration page > Configuration Address Source

  6. Still on the BMC Network Configuration page, configure the Station IP Address, Subnet Mask, and Gateway IP Address individually.

    Figure 117: BMC Network Configuration page > Station IP Address, Subnet Mask, Gateway IP Address

  7. Press F4 to save the settings, and exit from the BIOS.

    About a minute later, you will be able to log in on the IPMI web interface.

Managing the certificates used on One Identity Safeguard for Privileged Sessions (SPS)

One Identity Safeguard for Privileged Sessions (SPS) uses a number of certificates for different tasks that can be managed from the Basic Settings > Management > SSL certificates menu.

Figure 118: Basic Settings > Management > SSL certificates — Changing the web certificate of SPS

The following certificates can be modified here:

  • CA certificate: The certificate of the internal Certificate Authority of SPS.

  • Server certificate: The certificate of the SPS web interface, used to encrypt the communication between SPS and the administrators.

    NOTE:

    If this certificate is changed, the browser of SPS users will display a warning stating that the certificate of the site has changed.

  • TSA certificate: The certificate of the internal Timestamping Authority that provides the timestamps used when creating encrypted audit-trails.

NOTE:

SPS uses other certificates for different purposes that are not managed here, for example, to encrypt data stored on SPS. For details, see Encrypting audit trails.

Use every keypair or certificate only for one purpose. Do not reuse cryptographic keys or certificates (for example, do not use the certificate of the One Identity Safeguard for Privileged Sessions (SPS) webserver to encrypt audit trails, or the same keypair for signing and encrypting data).

For every certificate, the distinguished name (DN) of the X.509 certificate and the fingerprint of the private key is displayed. To display the entire certificate click on the DN. To display the public part of the private key, click on the fingerprint. It is not possible to download the private key itself from the SPS web interface, but the public part of the key can be downloaded in different formats (for example PEM, DER, or OpenSSH). Also, the X.509 certificate can be downloaded in PEM and DER formats.

During the initial configuration, SPS creates a self-signed CA certificate, and uses this CA to issue the certificate of the web interface (see Server certificate) and the internal Timestamping Authority (TSA certificate).

There are two methods to manage certificates of SPS:

  • Recommended: Generate certificates using your own PKI solution and upload them to SPS.

    Generate a CA certificate and two other certificates signed with this CA using your PKI solution and upload them to SPS. For the Server and TSA certificates, upload the private key as well. One Identity recommends using 2048-bit RSA keys (or stronger), and to use certificates that have the appropriate keyUsage or extendedKeyUsage fields set (for example, extendedKeyUsage=serverAuth for the SPS web server certificate).

    For details on uploading certificates and keys created with an external PKI, complete Uploading external certificates to One Identity Safeguard for Privileged Sessions (SPS).

    Caution:

    The Server and the TSA certificates must be issued by the same Certificate Authority.

  • Use the certificates generated on SPS. In case you want to generate new certificates and keys for SPS using its self-signed CA certificate, or generate a new self-signed CA certificate, complete Generating certificates for One Identity Safeguard for Privileged Sessions (SPS).

    NOTE:

    Generate certificates using your own PKI solution and upload them to SPS whenever possible. Certificates generated on SPS cannot be revoked, and can become a security risk if they are somehow compromised.

Generating certificates for One Identity Safeguard for Privileged Sessions (SPS)

Create a new certificate for the One Identity Safeguard for Privileged Sessions (SPS) webserver or the Timestamping Authority using the internal CA of SPS, or create a new, self-signed CA certificate for the internal Certificate Authority of SPS.

One Identity recommends using 2048-bit RSA keys (or stronger).

To create a new certificate for the SPS webserver

  1. Navigate to Basic Settings > Management > SSL certificates.

  2. Fill the fields of the new certificate:

    1. Country: Select the country where SPS is located (for example HU - Hungary).

    2. Locality name: The city where SPS is located (for example Budapest).

    3. Organization name: The company who owns SPS (for example Example Inc.).

    4. Organization unit name: The division of the company who owns SPS (for example IT Security Department).

    5. State or Province name: The state or province where SPS is located.

  3. Select the certificate you want to generate.

    • To create a new certificate for the SPS web interface, select Generate Server.

    • To create a new certificate for the Timestamping Authority, select Generate TSA.

    • To create a new certificate for the internal Certificate Authority of SPS, select Generate All. Note that in this case new certificates are created automatically for the server and TSA certificates as well.

    NOTE:

    When generating new certificates, the server and TSA certificates are signed using the certificate of the CA. If you have uploaded an external CA certificate along with its private key, it will be used to create the new server and TSA certificates. If you have uploaded an external CA certificate without its private key, use your external PKI solution to generate certificates and upload them to SPS.

    Caution:

    Generating a new certificate automatically deletes the earlier certificate.

  4. Click Commit.

Related Documents

The document was helpful.

Select Rating

I easily found the information I needed.

Select Rating