Chat now with support
Chat with Support

One Identity Safeguard for Privileged Sessions 6.0.12 - Administration Guide

Preface Introduction The concepts of One Identity Safeguard for Privileged Sessions (SPS) Cloud deployment considerations The Welcome Wizard and the first login Basic settings
Supported web browsers and operating systems The structure of the web interface Network settings Configuring date and time System logging, SNMP and e-mail alerts Configuring system monitoring on SPS Data and configuration backups Archiving and cleanup Forwarding data to third-party systems Joining to One Identity Starling
User management and access control Managing One Identity Safeguard for Privileged Sessions (SPS)
Controlling One Identity Safeguard for Privileged Sessions (SPS): reboot, shutdown Managing Safeguard for Privileged Sessions (SPS) clusters Managing a high availability One Identity Safeguard for Privileged Sessions (SPS) cluster Upgrading One Identity Safeguard for Privileged Sessions (SPS) Managing the One Identity Safeguard for Privileged Sessions (SPS) license Accessing the One Identity Safeguard for Privileged Sessions (SPS) console Sealed mode Out-of-band management of One Identity Safeguard for Privileged Sessions (SPS) Managing the certificates used on One Identity Safeguard for Privileged Sessions (SPS)
General connection settings HTTP-specific settings ICA-specific settings RDP-specific settings SSH-specific settings Telnet-specific settings VMware Horizon View connections VNC-specific settings Indexing audit trails Using the Search interface Searching session data on a central node in a cluster Advanced authentication and authorization techniques Reports The One Identity Safeguard for Privileged Sessions (SPS) RPC API The One Identity Safeguard for Privileged Sessions (SPS) REST API One Identity Safeguard for Privileged Sessions (SPS) scenarios Troubleshooting One Identity Safeguard for Privileged Sessions (SPS) Using SPS with SPP Configuring external devices Using SCP with agent-forwarding Security checklist for configuring One Identity Safeguard for Privileged Sessions (SPS) Jumplists for in-product help LDAP user and group resolution in SPS Appendix: Deprecated features Glossary

Creating and editing protocol-level Telnet settings

Procedure

Telnet settings determine the parameters of the connection on the protocol level, including timeout value, and so on. Complete the following procedure to create a new Telnet settings profile or edit an existing one:

Caution:

Modifying the Telnet settings is recommended only to advanced users. Do not modify these settings unless you exactly know what you are doing.

To create and edit protocol-level Telnet settings

  1. Navigate to the Settings tab of the Telnet Control menu item and click to create a Telnet setting profile. Enter a name for the profile (for example telnet_special).

  1. Click to display the parameters of the connection.

  2. Modify the parameters as needed. The following parameters are available:

    • Idle timeout: Timeout value for the connection in milliseconds. To avoid early timeout, set it to a larger value, for example a week (604800000 milliseconds).

      Caution:

      Determining if a connection is idle is based on the network traffic generated by the connection, not the activity of the user. For example, if an application or the taskbar of a graphical desktop displays the time which is updated every minute, it generates network traffic every minute, negating the effects of timeout values greater than one minute and preventing One Identity Safeguard for Privileged Sessions (SPS) from closing the connection.

    • Enable pre channel check: Select this option to evaluate the connection and channel policies before establishing the server-side connection. That way if the connection is not permitted at all, SPS does not establish the server-side connection.

    • To configure TLS security settings on both the Client side and the Server side, proceed to TLS security settings.

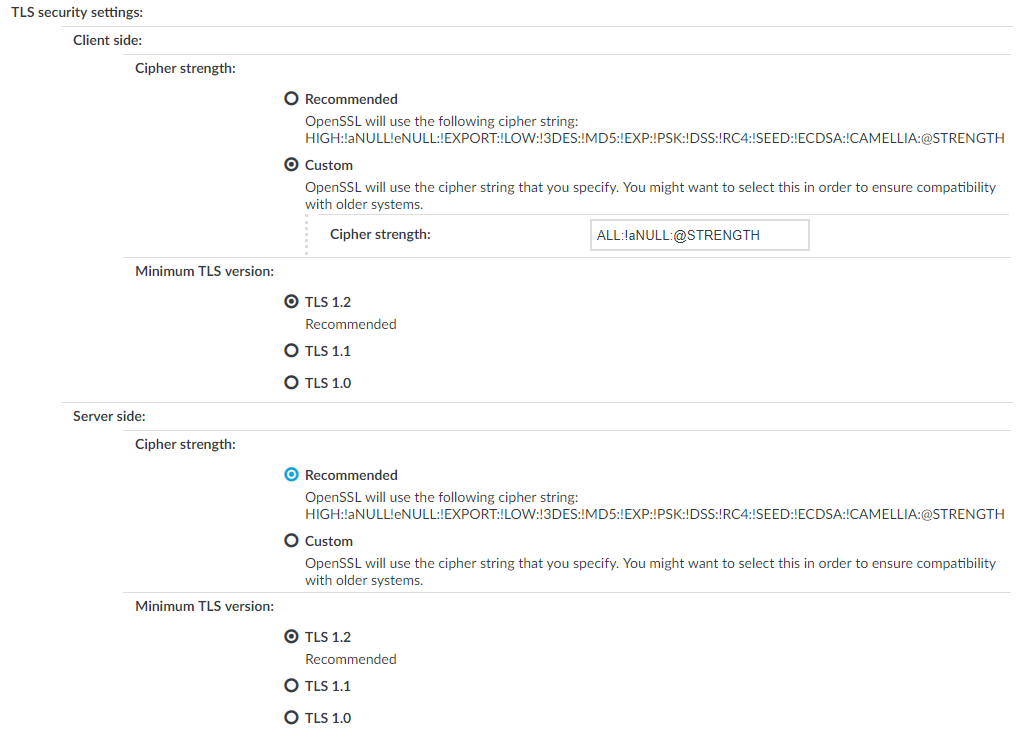
      Figure 200: <Protocol> Control > Settings > TLS security settings - configuring TLS security settings

      • Cipher strength specifies the cipher string OpenSSL will use. The following settings options are possible:

        • Recommended: this setting only uses ciphers with adequate security level.

        • Custom: this setting allows you to specify the list of ciphers you want to permit SPS to use in the connection. This setting is only recommended in order to ensure compatibility with older systems. For more details on customizing this list, check the 'openssl-ciphers' manual page on your SPS appliance.

          For example: ALL:!aNULL:@STRENGTH

      • Minimum TLS version specifies the minimal TLS version SPS will offer during negotiation. The following settings options are possible:

        • TLS 1.2: this setting will only offer TLS version 1.2 during negotiation. This is the recommended setting.

        • TLS 1.1: this setting will offer TLS version 1.1 and later versions during negotiation.

        • TLS 1.0: this setting will offer TLS version 1.0 and later versions during negotiation.

      NOTE:

      Note that SPS only permits TLS-encrypted connections. SSLv3 is not supported.

  3. Click Commit.

  1. To display a banner message to the clients before authentication, enter the message into the Banner field. For example, this banner can inform the users that the connection is audited.

  2. Select this settings profile in the TELNET settings field of your connections.

Inband destination selection in Telnet connections

When using inband destination selection in Telnet connections, the user can provide the server address and the username using the following methods:

  • By setting the TELNET ENVIRON option using the SERVER environment variable in the server:port format.

  • By setting the TELNET ENVIRON option using the USER environment variable in the user@server:port format.

  • If neither the SERVER nor the USER environment variable, One Identity Safeguard for Privileged Sessions (SPS) displays a terminal prompt where the user can enter the username and the server address.

Limitations of using TN5250 protocol with IBM iSeries Access for Windows

Using the TN5250 protocol with IBM iSeries Access for Windows is not supported in non-transparent mode if the client tries to set up all its connections using One Identity Safeguard for Privileged Sessions's (SPS's) IP addresses (for example, when both the client and SPS are within the same zone and the firewall is behind SPS). This is problematic in the case of an IBM iSeries Access for Windows client, which initiates administrative communication with components other than the Telnet server itself. Bypassing non-audited traffic goes against the purpose of non-transparent mode.

Possible workarounds:

VMware Horizon View connections

The following sections describe how to use One Identity Safeguard for Privileged Sessions (SPS) to control and audit VMware Horizon View (formerly known as VMware View) connections. When using SPS to control and audit VMware Horizon View connections, the following requirements and restrictions apply:

  • Only connections using the Remote Desktop (RDP) display protocol are supported. Connections using the PCoIP or HP Remote Graphics Software display protocols are not supported.

  • Both direct connections and tunnel connections are supported.

  • The VMware Horizon View connections must pass SPS directly. It is best if SPS is deployed directly before the Virtual Desktops accessed with VMware Horizon View, and connections are configured in transparent mode.

    Deploying SPS that way has the advantage of auditing connections even if the clients access the Virtual Desktops directly, without using a View Connection Server.

    NOTE:

    Using non-transparent mode is also possible if the VMware Horizon View traffic is routed to SPS with an external device (for example, a firewall).

SPS treats VMware Horizon View connections that satisfy these criteria as common RDP connections. All the features of SPS that are available for RDP connections can be used with VMware Horizon View connections as well, for example, four-eyes authorization, auditing and replaying, indexing the recorded audit trails, and so on. For details on RPD-specific settings, see RDP-specific settings.

Related Documents

The document was helpful.

Select Rating

I easily found the information I needed.

Select Rating