Timestamping audit trails with built-in timestamping service
The following describes how to add timestamps to the audit trails by using the built-in timestamping service of One Identity Safeguard for Privileged Sessions (SPS).
To add timestamps to the audit trails by using the built-in timestamping service of SPS
-
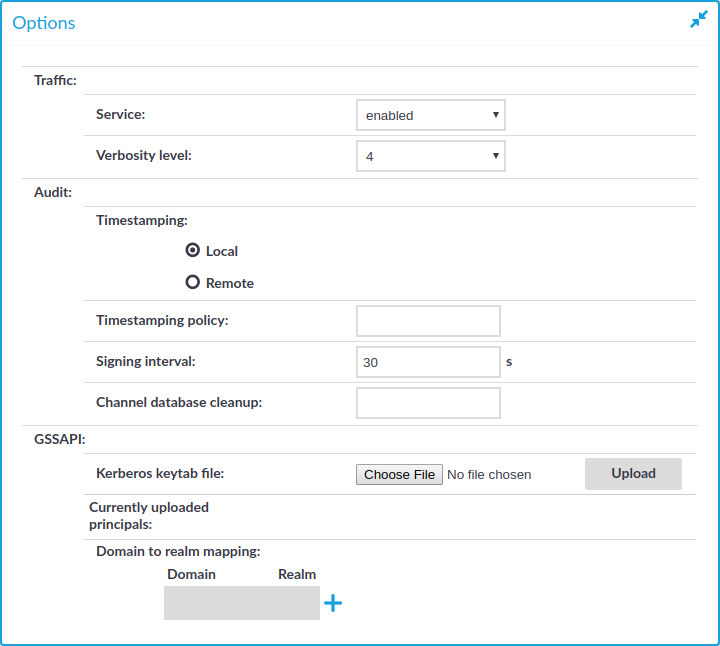
Configure the timestamping interval. You have to repeat these steps for each protocol (HTTP, ICA, RDP, SSH, Telnet, and VNC) you want to configure:
Figure 152: <Protocol name> Control > Global Options —Configuring local timestamping
-
In the protocol control settings, navigate to Global Options > Timestamping (for example, SSH Control > Global Options > Timestamping).
-
Select Local.
|

|
NOTE:
Make sure that you leave the Timestamping policy field empty. Timestamping policy has relevance only when Timestamping is set to Remote. |
-
Set the Signing interval. You can choose any value between 10 and 100 000 seconds.
|
|
NOTE:
The same interval setting applies to timestamping and signing. |
-
Click  .
.
-
Configure audit policies to use timestamping. You have to repeat these steps for each audit policy you want to configure:
-
Navigate to Policies > Audit Policies and select the audit policy you will use in your connections.
|
|
TIP:
By default, every connection uses the built-in default audit policy. Unless you use a custom audit policy, modifying the default audit policy will affect every audited channel of the connections passing through One Identity Safeguard for Privileged Sessions (SPS). |
-
Select the Enable timestamping option.
Figure 153: Policies > Audit Policies — Timestamping audit trails
-
Click . SPS will automatically add timestamps to the audit trails of every connection that is audited and uses this audit policy.
Timestamping audit trails with external timestamping service
The following describes how to request timestamps from a remote Timestamping Authority (TSA).
To request timestamps from a remote TSA
-
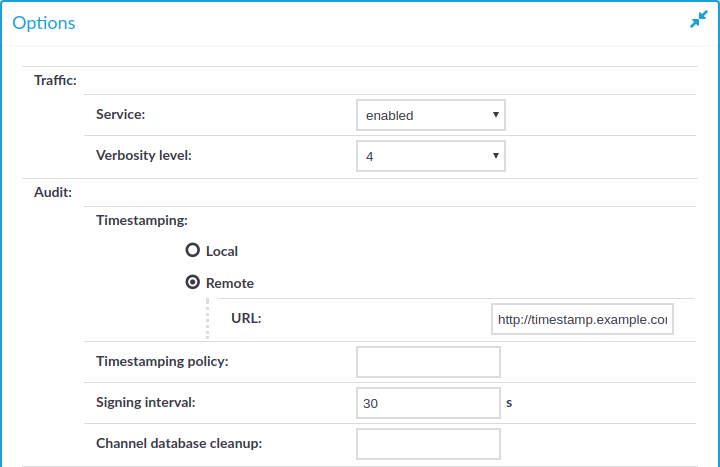
Configure the remote TSA, and the timestamping interval. You have to repeat these steps for each protocol (HTTP, ICA, RDP, SSH, Telnet, and VNC) you want to configure:
Figure 154: <Protocol name> Control > Global Options — Configuring a remote TSA
-
In the protocol control settings, navigate to Global Options > Timestamping (for example, SSH Control > Global Options > Timestamping).
-
Select Remote.
-
Enter the address of the timestamping server into the URL field. Note that currently only plain HTTP services are supported, password-protected and HTTPS services are not supported.
-
If the Timestamping Server has timestamping policies configured, enter the OID of the policy to use into the Timestamping policy field. One Identity Safeguard for Privileged Sessions (SPS) will include this ID in the timestamping requests sent to the TSA.
-
Set the Signing interval. You can choose any value between 10 and 100 000 seconds.
|
|
NOTE:
The same interval setting applies to timestamping and signing. |
-
Click .
-
Configure audit policies to use timestamping. You have to repeat these steps for each audit policy you want to configure:
-
Navigate to Policies > Audit Policies and select the audit policy you will use in your connections.
|
|
TIP:
By default, every connection uses the built-in default audit policy. Unless you use a custom audit policy, modifying the default audit policy will affect every audited channel of the connections passing through One Identity Safeguard for Privileged Sessions (SPS). |
-
Select the Enable timestamping option.
Figure 155: Policies > Audit Policies — Timestamping audit trails
-
Click . SPS will automatically add timestamps to the audit trails of every connection that is audited and uses this audit policy.
Digitally signing audit trails
One Identity Safeguard for Privileged Sessions (SPS) can digitally sign the audit trails to prevent the manipulation of the audit trail files. This requires an X.509 certificate and also the private key of the certificate. Note that SPS can generate a private key that you can use to create a certificate, but SPS itself cannot create the certificate used to sign the audit trails.
To enable the digital signing of the audit trails
-
Configure the signing interval. You have to repeat these steps for each protocol (HTTP, ICA, RDP, SSH, Telnet, and VNC) you want to configure:
Figure 156: <Protocol name> Control > Global Options — Configuring the signing interval
-
In the protocol control settings, navigate to Global Options > Timestamping (for example, SSH Control > Global Options > Timestamping).
-
Set the Signing interval. You can choose any value between 10 and 100 000 seconds.
|
|
NOTE:
The same interval setting applies to timestamping and signing. |
-
Click .
-
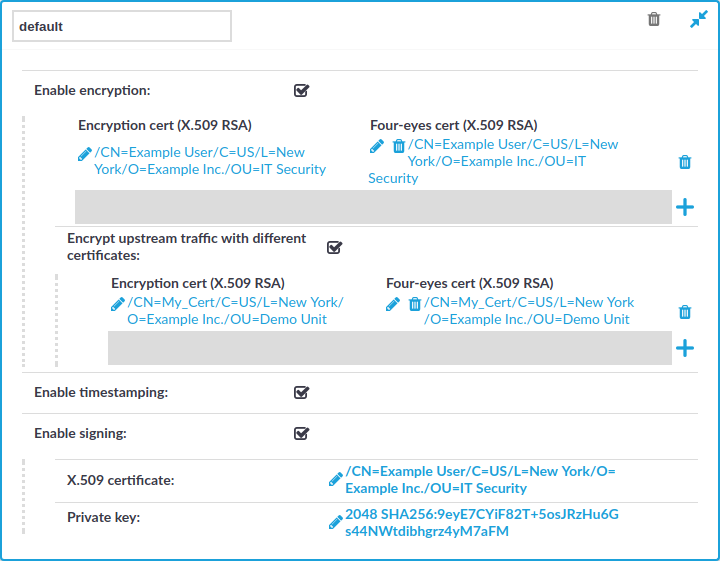
Navigate to Policies > Audit Policies and select the audit policy you will use in your connections.
Figure 157: Policies > Audit Policies — Signing audit trails
|
|
TIP:
By default, every connection uses the built-in default audit policy. Unless you use a custom audit policy, modifying the default audit policy will affect every audited channel of the connections passing through One Identity Safeguard for Privileged Sessions (SPS). |
-
Select the Enable signing option.
-
Upload a certificate and the corresponding private key to SPS.
-
Click . SPS will automatically sign the audit trails of every connection that is audited and uses this audit policy.
-
Repeat the above steps for other audit policies if needed.
Verifying certificates with Certificate Authorities
One Identity Safeguard for Privileged Sessions (SPS) can check the validity of certificates using the certificates and certificate-revocation lists of the certificate authorities that issued the certificates. This can be used for example to verify the certificates of the servers in SSH/RDP connections.
To create a list of CA certificates to use during the certificate validation
-
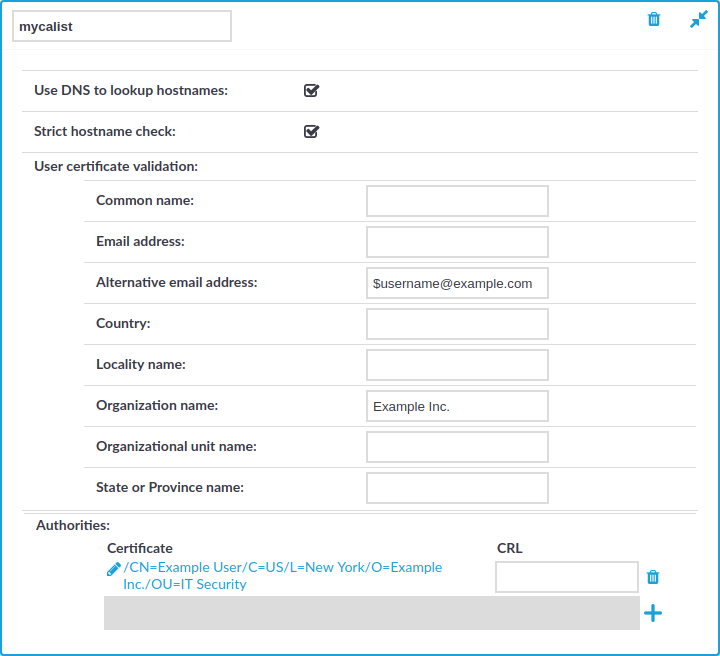
Navigate to Policies > Trusted CA Lists and click  to create a new list.
Figure 158: Policies > Trusted CA Lists — Creating Trusted CA lists
-
Enter a name for the CA list into the topmost field.
-
Click  in the Certificate field, and upload the certificate of the Certificate Authority (CA) that will be used to validate the certificates.
-
Enter the URL of the Certificate Revocation List of the CA into the CRL field. Certificates appearing on the CRL list will be automatically rejected.
|
|
NOTE:
Note that only .pem format CRLs are accepted. CRLs that are in PKCS7 format (.crl) are not accepted. |
-
To further limit which certificates are accepted, you may use the following options:
-
Strict hostname check: Select this option to accept only certificates when the Common Name of the certificate contains the hostname or the IP address of the host showing the certificate.
-
Use DNS to lookup hostnames: Select this option to use the domain name server set on Basic Settings > Network > Naming to resolve the hostnames and IP addresses for certificate validation. If you have enabled the Strict hostname check option, you probably want to enable this option as well.
-
To restrict the accepted certificates based on the content of the certificate, enter the required value into the appropriate field of the User certificate validation section. For example, to accept only certificates that contain Example Inc. in their Organization Name field, enter Example Inc. in to the Organization Name field. In the Common name, E-mail address, and Alternative e-mail address fields you can use the $username macro to refer to the username used in the connection. This macro makes it possible to check that the user is using his own certificate.
-
Click .
