The following describes how to configure a local Credential Store that stores the credentials used to login to the target host. The Credential Store will be protected by custom passwords. This password must be entered every time One Identity Safeguard for Privileged Sessions (SPS) is rebooted to make the Credential Store available.
Prerequisites
|
|
NOTE:
Users accessing connections that use Credential Stores to authenticate on the target server must authenticate on One Identity Safeguard for Privileged Sessions (SPS) using gateway authentication or an AA plugin. Therefore gateway authentication or an AA plugin must be configured for these connections. For details, see "Configuring gateway authentication" in the Administration Guide and "Integrating external authentication and authorization systems" in the Administration Guide. |

To configure a local Credential Store that stores the credentials used to login to the target host
-
Navigate to Policies > Credential Stores.
-
Click
and enter a name for the Credential Store.
-
Select Local.
-
Select Encryption key > Password protected.
NOTE: The contents of the Credential Store, as well as the passwords are included in the configuration backups of SPS. Make sure to encrypt the configuration backups.
-
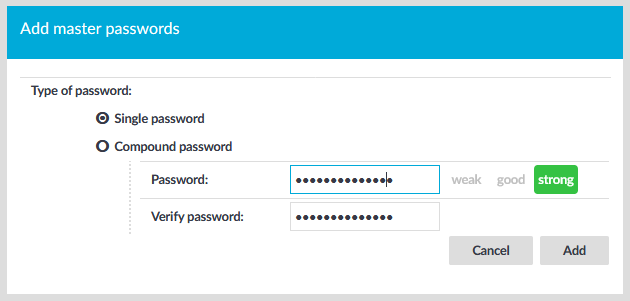
Select Master passwords and click
Figure 260: Policies > Credential Stores > Local > Password protected — Set Master Password
-
To protect the Credential Store with a single password, select Single password and enter the password into the Password and Verify password fields. Anyone who knows this password and has the Unlock Credential Store privilege will be able to open the Credential Store. Password-protected Credential Stores must be unlocked on the SPS web interface or console after every SPS reboot.
-
To protect the Credential Store with multiple passwords, select Compound password, click
SPS encrypts the master passwords using an aes-256-cbc cipher, and stores them in a local database.
NOTE: One Identity Safeguard for Privileged Sessions (SPS) accepts passwords that are not longer than 150 characters. The following special characters can be used: !"#$%&'()*+,-./:;<=>?@[\]^-`{|}
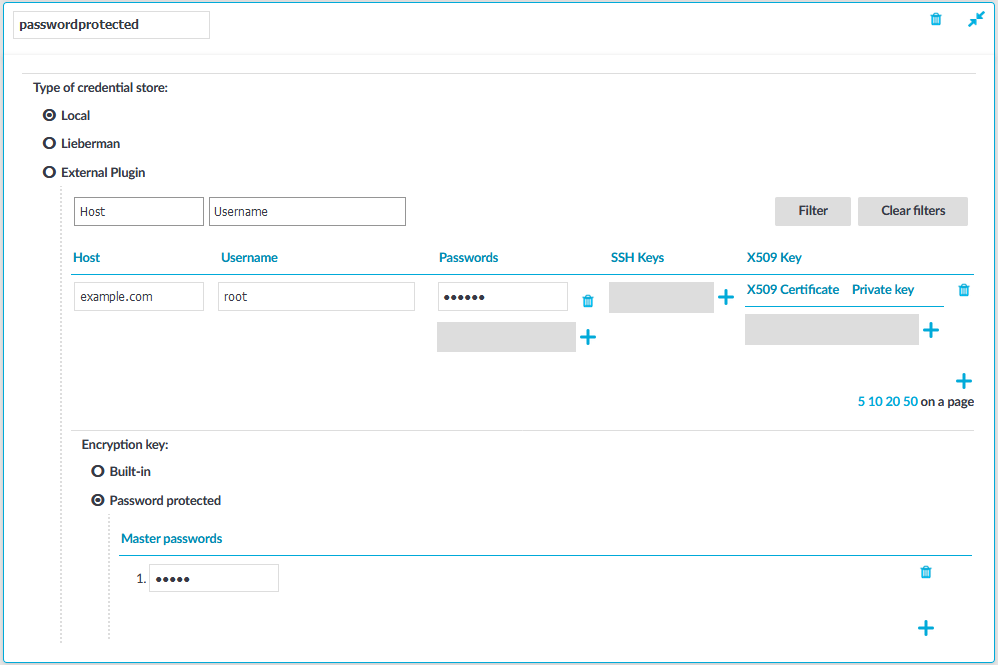
Figure 261: Policies > Credential Stores > Local > Password protected — Configure Credential Store
-
-
Repeat the previous step to add another single or compound password. That way, different password sets can be defined for the Credential Store. For example, if a single and a compound password is configured, the chief administrator can unlock the Credential Store with a single password, and two of his subordinates can open the Credential Store together if they know one element each of the compound password.
TIP: To change the password, just click
to delete the old password. Then add new passwords as needed.
-
Add credentials to the Credential Store.
-
Click
-
Usernames are case sensitive.
-
To authenticate users of a Windows domain, enter the name of the domain into the Host field.
Use an IPv4 address.
-
-
Set the credentials. SPS will use these credentials to login to the destination host if the credential store is selected in a Connection policy. If more than one credential is specified to a host-username pair, SPS will attempt to use the credentials as the destination host requests it.
-
To add a password, click Passwords >
-
To upload a private key, click SSH Keys >
, then paste or upload a private key.
NOTE: If the private key is protected by a passphrase, enter the passphrase. The passphrase is needed only once during the upload, it is not required for the later operation of the Credential Store.
-
To generate a keypair on SPS click SSH Keys >
NOTE: One Identity recommends using 2048-bit RSA keys (or stronger).
-
To upload a certificate and the corresponding private key, click X509 Keys >
NOTE: If the private key is protected by a passphrase, enter the passphrase. The passphrase is needed only once during the upload, it is not required for the later operation of the Credential Store.
NOTE: One Identity Safeguard for Privileged Sessions (SPS) accepts passwords that are not longer than 150 characters. The following special characters can be used: !"#$%&'()*+,-./:;<=>?@[\]^-`{|}
-
-
Repeat the previous step to add further credentials to the username as necessary.
-
-
Repeat the previous step to add further hosts or usernames as necessary.
NOTE: Credential Stores can be used together with usermapping policies to simplify the administration of users on the target hosts. For details, see Configuring usermapping policies.
-
Click
.
-
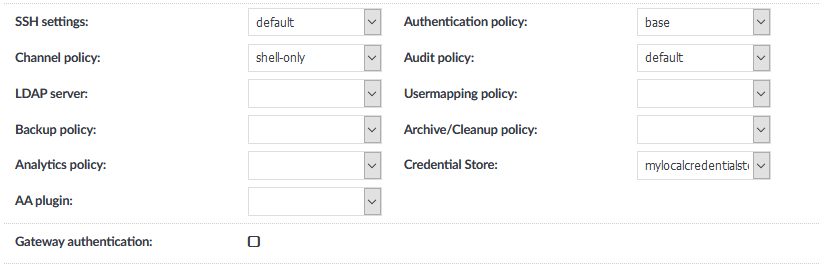
Navigate to the Connection policy where you want to use the Credential Store (for example, to SSH Control > Connections), select the Credential Store to use in the Credential Store field, then click
Figure 262: Control > Connections — Select a Credential Store to use
-
Navigate to Basic Settings > Alerting & Monitoring > Traffic related traps and enable the Decryption of a credential failed (scbCredStoreDecrpytError) and The requested credential store is closed (scbCredStoreClosed) events. That way SPS sends automatic alerts if a Credential Store needs to be unlocked.
Caution: Password-protected Credential Stores must be unlocked every time after SPS is rebooted. Connections using a password-protected Credential Store will automatically fail until the Credential Store is locked.
To unlock a Credential Store, users must have the Unlock Credential Store privilege, or editing (read and write) privileges to the particular Credential Store.