Chat now with support
Chat with Support

syslog-ng Store Box 6.10.0 - Administration Guide

Preface Introduction The concepts of SSB The Welcome Wizard and the first login Basic settings User management and access control Managing SSB Configuring message sources Storing messages on SSB Forwarding messages from SSB Log paths: routing and processing messages Configuring syslog-ng options Searching log messages Searching the internal messages of SSB Classifying messages with pattern databases The SSB RPC API Monitoring SSB Troubleshooting SSB Security checklist for configuring SSB Glossary

Creating an alias IP address (Microsoft Windows)

This procedure describes how to assign an alias IP address to a network interface on Microsoft Windows platforms.

To assign an alias IP address to a network interface on Microsoft Windows platforms

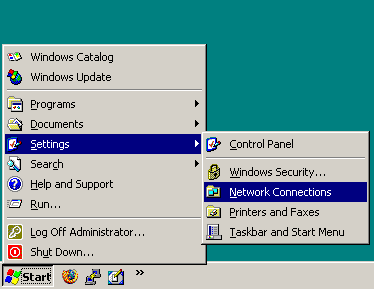
  1. Navigate to Start menu > Settings > Network Connections.

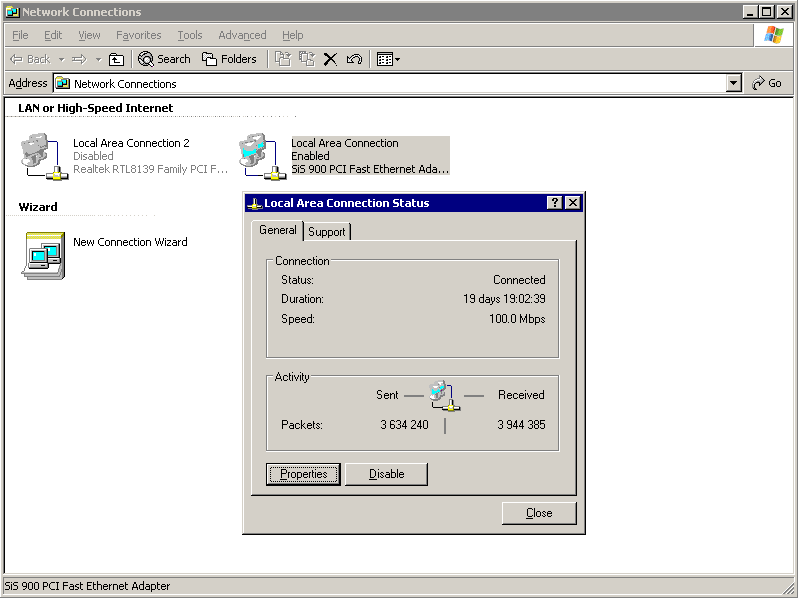
  2. Double-click the Local Area Connection and then click Properties.

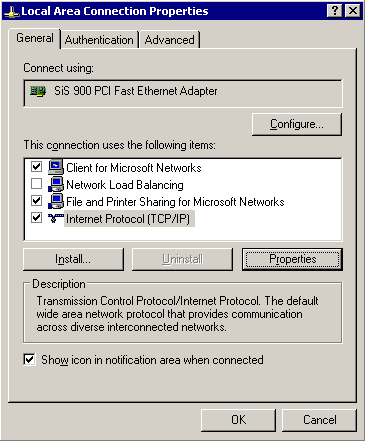
  3. Select the Internet Protocol (TCP/IP) component in the list and click Properties.

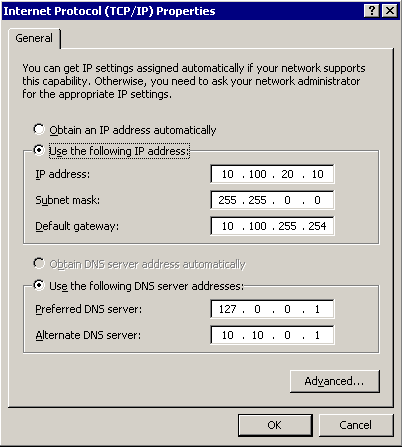
  4. To display the Advanced TCP/IP Settings window, click Advanced.

  5. Select the IP Settings tab and in the IP Addresses section, click Add.

  6. Into the IP Address field, enter 192.168.1.2. Into the Netmask field, enter 255.255.255.0.

    Caution:

    If your internal network uses the 192.168.1.0/24 IP range, the 192.168.1.1 and 192.168.1.2 addresses might already be in use. In this case, disconnect syslog-ng Store Box (SSB) from the network, and connect directly a computer to its external interface using a standard cross-link cable.

  7. To complete the procedure, click Add.

Creating an alias IP address (Linux)

This procedure describes how to assign an alias IP address to a network interface on Linux platforms.

To assign an alias IP address to a network interface on Linux platforms

  1. Start a terminal console (for example gnome-terminal, konsole, xterm, and so on).

  2. Issue the following command as root:

    ifconfig <ethX>:0 192.168.1.2

    where <ethX> is the ID of the network interface of the client, usually eth0 or eth1.

  3. Issue the ifconfig command. The <ethX>:0 interface appears in the output, having inet addr:192.168.1.2.

  4. Issue the ping -c 3 192.168.1.1 command to verify that syslog-ng Store Box (SSB) is accessible. A similar result is displayed:

    user@computer:~$ ping -c 3 192.168.1.1
                PING 192.168.1.1 (192.168.1.1) 56(84) bytes of data.
                64 bytes from 192.168.1.1: icmp-seq=1 ttl=63 time=0.357 ms
                64 bytes from 192.168.1.1: icmp-seq=2 ttl=63 time=0.306 ms
                64 bytes from 192.168.1.1: icmp-seq=3 ttl=63 time=0.314 ms
    
                --- 192.168.1.1 ping statistics ---
                3 packets transmitted, 3 received, 0% packet loss, time 2013ms
                rtt min/avg/max/mdev = 0.306/0.325/0.357/0.030 ms

Modifying the IP address of SSB

The following describes how to configure syslog-ng Store Box (SSB) to listen for connections on a custom IP address.

Caution:

Use this procedure only before the initial configuration of SSB, that is, before completing the Welcome Wizard. For details on changing the IP address or other network settings of a configured SSB system, see Network settings.

If you change the IP address of SSB, make sure that you use this address as the External interface — IP address in Configuring SSB with the Welcome Wizard.

To configure SSB to listen for connections on a custom IP address

  1. Access SSB from the local console, and log in with username root and password default.

  2. In the Console Menu, select Shells > Core shell.

  3. Change the IP address of SSB:

    ip addr add <IP-address>/24 dev eth0

    Replace <IP-address> with an IPv4 address suitable for your environment.

  4. Set the default gateway using the following command:

    ip route add default via <IP-of-default-gateway>

    Replace <IP-of-default-gateway> with the IP address of the default gateway.

  5. Type exit, then select Logout from the Console Menu.

  6. Open the page https://<IP-address-you-set-for-SSB> from your browser and accept the certificate shown. The Welcome Wizard of SSB appears.

Configuring SSB with the Welcome Wizard

The Welcome Wizard guides you through the basic configuration steps of syslog-ng Store Box (SSB). All parameters can be modified before the last step by using the Back button of the wizard, or later via the web interface of SSB.

The initial Welcome Wizard

To start configuring SSB with the Welcome Wizard

  1. Open the https://<IP-address-of-SSB-external-interface> page in your browser and accept the displayed certificate. The Welcome Wizard of SSB appears.

    TIP: The SSB console displays the IP address the external interface is listening on. SSB either receives an IP address automatically via DHCP, or if a DHCP server is not available, listens on the 192.168.1.1 IP address.

  2. Select your SSB configuration mode (Configuring SSB as a standalone unit, or as the primary node of a HA cluster, or Configuring your SSB unit as the secondary node of a HA cluster) for your SSB unit.

    Figure 4: The Welcome Wizard

Related Documents

The document was helpful.

Select Rating

I easily found the information I needed.

Select Rating