Physical syslog-ng Store Box (SSB) appliances include a dedicated out-of-band management interface conforming to the Intelligent Platform Management Interface (IPMI) v2.0 standards. The IPMI interface allows system administrators to monitor the system health of SSB and to manage the computer events remotely, independently of the operating system of SSB. SSB is accessible using the IPMI interface only if the IPMI interface is physically connected to the network.
Note that the IPMI interface supports only 100Mbps Full-Duplex speed.
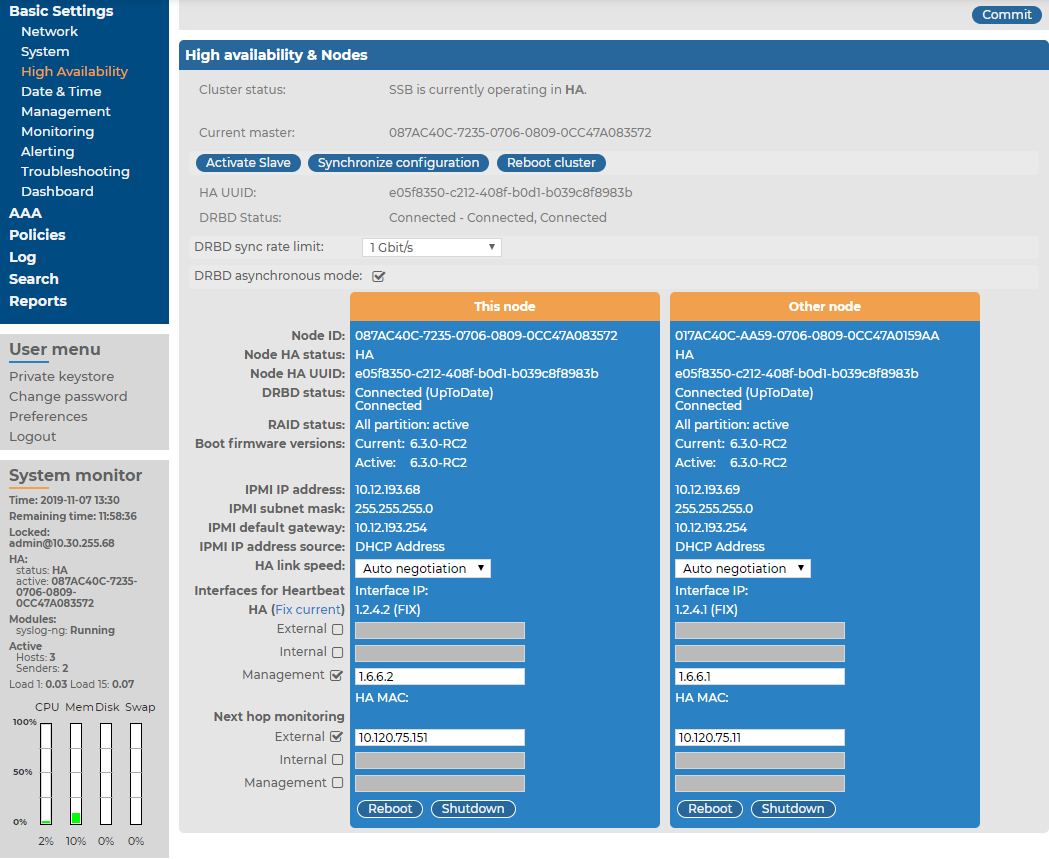
Basic information about the IPMI interface is available also on the SSB web interface on the Basic Settings > High Availability page. The following information is displayed:
Figure 91: Basic Settings > High Availability — Information about the IPMI interface SSB
-
Hardware serial number: The unique serial number of the appliance.
-
IPMI IP address: The IP address of the IPMI interface.
-
IPMI subnet mask: The subnet mask of the IPMI interface.
-
IPMI default gateway IP: The address of the default gateway configured for the IPMI interface.
-
IPMI IP address source: Shows how the IPMI interface receives its IP address: dynamically from a DHCP server, or it uses a fixed static address.
The following describes how to modify the network configuration of IPMI from the console of syslog-ng Store Box(SSB).
Prerequisites:
SSB is accessible using the IPMI interface only if the IPMI interface is physically connected to the network. For details on connecting the IPMI interface, see "Installing the SSB hardware" in the Installation Guide.
|

|
Caution:
IPMI searches for available network interfaces during boot. Make sure that IPMI is connected to the network through the dedicated ethernet interface before SSB is powered on. |
It is not necessary for the IPMI interface to be accessible from the Internet, but the administrator of SSB must be able to access it for support and troubleshooting purposes in case vendor support is needed. The following ports are used by the IMPI interface:
-
Port 623 (UDP): IPMI (cannot be changed)
-
Port 5123 (UDP): floppy (cannot be changed)
-
Port 5901 (TCP): video display (configurable)
-
Port 5900 (TCP): HID (configurable)
-
Port 5120 (TCP): CD (configurable)
-
Port 80 (TCP): HTTP (configurable)
To modify the network configuration of IPMI from the console of SSB
-
Use the local console (or SSH) to log in to SSB as root.
-
Choose Shells > Boot shell.
-
Check the network configuration of the interface:
# ipmitool lan print
This guide assumes that channel 1 is used for LAN. If your setup differs, adjust the following commands accordingly.
-
Configure the interface. You can use DHCP or configure a static IP address manually.
-
To use DHCP, enter the following command:
# ipmitool lan set 1 ipsrc dhcp
-
To use static IP, enter the following command:
# ipmitool lan set 1 ipsrc static
Set the IP address:
# ipmitool lan set 1 ipaddr <IPMI-IP>
Set the netmask:
# ipmitool lan set 1 netmask <IPMI-netmask>
Set the IP address of the default gateway:
# ipmitool lan set 1 defgw ipaddr <gateway-IP>
-
Configure IPMI to use the dedicated Ethernet interface. Issue the following command, which works for all appliances (that is, for syslog-ng Store Box T1, syslog-ng Store Box T4, syslog-ng Store Box T10, syslog-ng Store Box Appliance 3000, and syslog-ng Store Box Appliance 3500):
ipmitool raw 0x30 0x70 0xc 1 0
-
Verify the network configuration of IPMI:
# ipmitool lan print 1
Use a browser to connect to the reported network address.
-
Change the default password:
-
Log in to the IPMI web interface using the default login credentials (username: ADMIN, password: ADMIN).
NOTE: The login credentials are case sensitive.
-
Navigate to Configure > Users.
-
Select ADMIN, and choose Modify User.
-
Change the password, and save the changes with Modify.
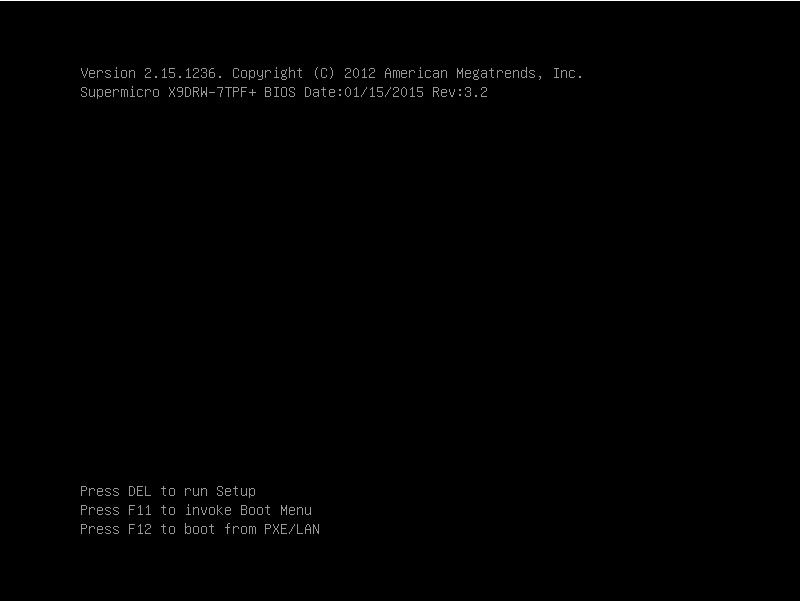
To configure IPMI from the BIOS when configuring your syslog-ng Store Box (SSB) physical appliance for the first time, complete the following steps.
Prerequisites:
To apply the procedure outlined here, you will need physical access to a monitor and keyboard.
-
Press the DEL button when the POST screen comes up while the appliance is booting.
Figure 92: POST screen during booting
-
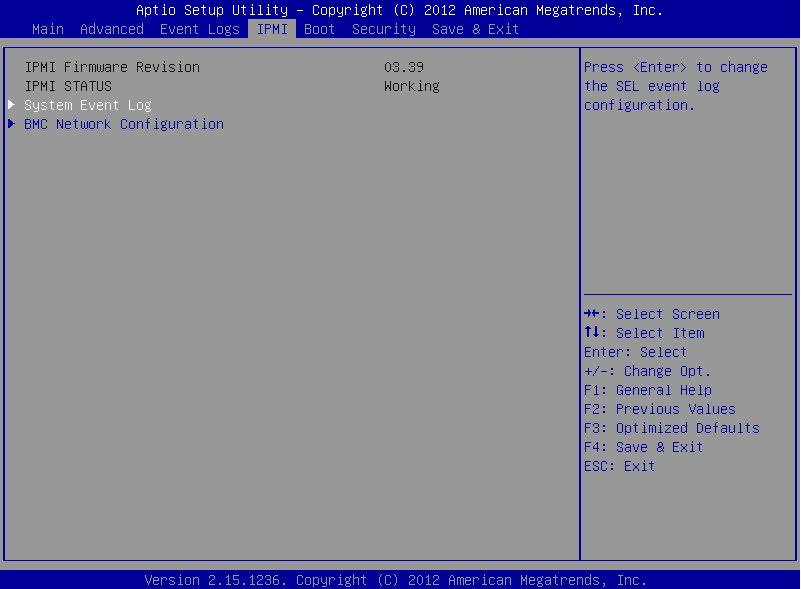
In the BIOS, navigate to the IPMI page.
-
On the IPMI page, select BMC Network Configuration, and press Enter.
Figure 93: IMPI page > BMC Network Configuration option
-
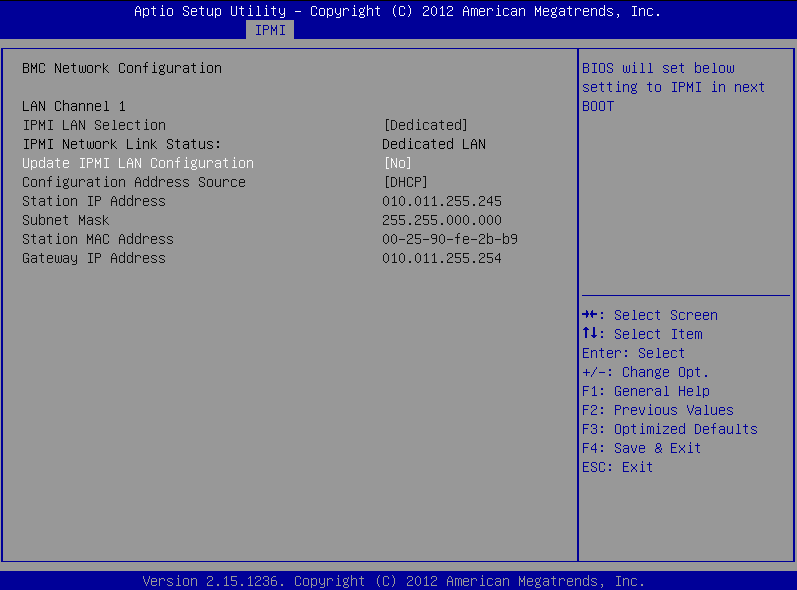
On the BMC Network Configuration page, select Update IPMI LAN Configuration, press Enter, and select Yes.
Figure 94: BMC Network Configuration page > Update IPMI LAN Configuration
-
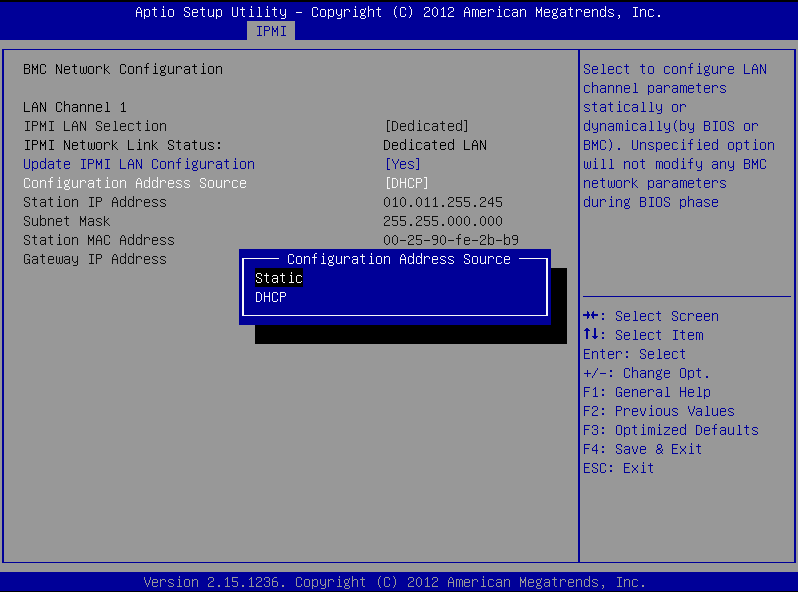
Stay on the BMC Network Configuration page, select Configuration Address Source, press Enter, and select Static.
Figure 95: BMC Network Configuration page > Configuration Address Source
-
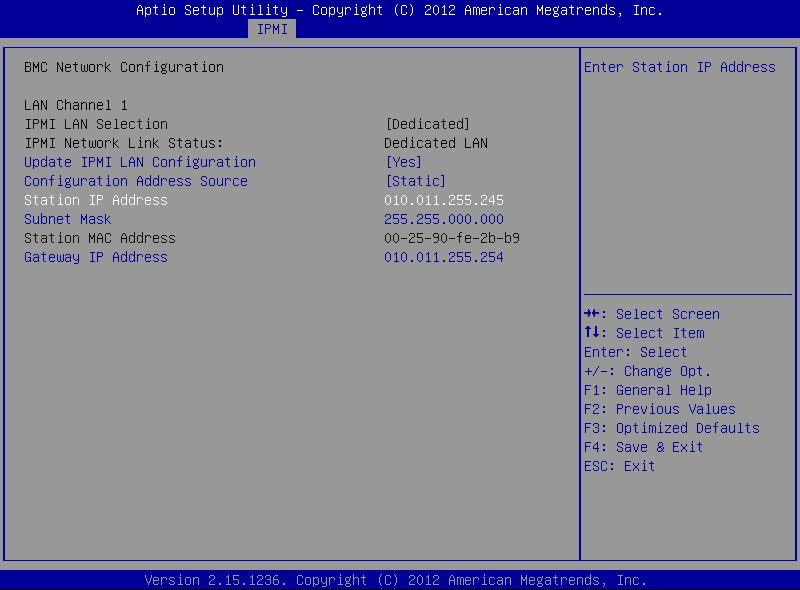
Still on the BMC Network Configuration page, configure the Station IP Address, Subnet Mask, and Gateway IP Address individually.
Figure 96: BMC Network Configuration page > Station IP Address, Subnet Mask, Gateway IP Address
-
Press F4 to save the settings, and exit from the BIOS.
About a minute later, you will be able to log in on the IPMI web interface.
SSB uses a number of certificates for different tasks that can be managed from the Basic Settings > Management > SSL certificate menu.
Figure 97: Basic Settings > Management > SSL certificate — Changing the web certificate of SSB
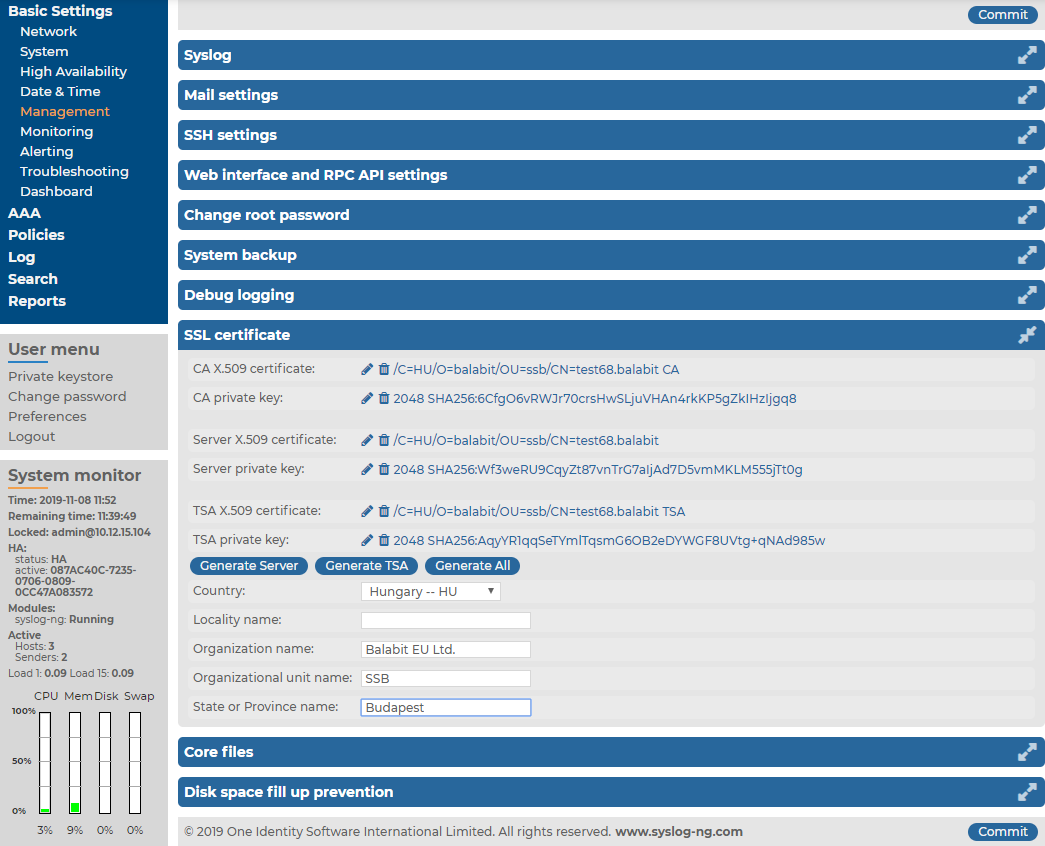
The following certificates can be modified here:
-
CA certificate: The certificate of the internal Certificate Authority of SSB.
NOTE: When you upload your own CA certificate, make sure that the certificate you upload is the issuer certificate of the Server and TSA certificates.
-
Server certificate: The certificate of the SSB web interface, used to encrypt the communication between SSB and the administrators.
NOTE: If this certificate is changed, the browser of SSB users will display a warning stating that the certificate of the site has changed.
NOTE: When you have a certificate chain, you have to upload the entire chain in a single file, using PEM format. The uploaded file (or pasted text) must contain the following elements, concatenated in this order:
-
the server certificate
-
the issuer CA
-
the root CA certificates.
-
TSA certificate: The certificate of the internal Time Stamping Authority that provides the time stamps used when creating encrypted logstores.
NOTE:SSB uses other certificates for different purposes that are not managed here, for example, to encrypt data stored on SSB. For details, see Creating logstores.
Use every keypair or certificate only for one purpose. Do not reuse cryptographic keys or certificates, for example, do not use the same certificate for the SSB webserver and for encrypting logstores.
For every certificate, the distinguished name (DN) of the X.509 certificate and the fingerprint of the private key is displayed. To display the entire certificate, click on the DN. To display the public part of the private key, click on the fingerprint. It is not possible to download the private key itself from the SSB web interface, but the public part of the key can be downloaded in different formats (for example, PEM, DER, OpenSSH, Tectia). Also, the X.509 certificate can be downloaded in PEM and DER formats, with the exception of certificate chains, which can only be downloaded in PEM format.
NOTE: Other parts of SSB may use additional certificates that are not managed here.
During the initial configuration, SSB creates a self-signed CA certificate, and uses this CA to issue the certificate of the web interface (see Server certificate) and the internal Time Stamping Authority (TSA certificate).
There are two methods to manage certificates of SSB:
-
Recommended: Generate certificates using your own PKI solution and upload them to SSB.
Generate a CA certificate and two other certificates signed with this CA using your PKI solution and upload them to SSB. For the Server and TSA certificates, upload the private key as well. One Identity recommends:
For details on uploading certificates and keys created with an external PKI, complete Uploading external certificates to SSB.
|
|
Caution:
The Server and the TSA certificates must be issued by the same Certificate Authority. |
-
Use the certificates generated on SSB. In case you want to generate new certificates and keys for SSB using its self-signed CA certificate, or generate a new self-signed CA certificate, complete Generating certificates for SSB.
NOTE: Generate certificates using your own PKI solution and upload them to SSB whenever possible. Certificates generated on SSB cannot be revoked, and can become a security risk if they are somehow compromised.
