Generating certificates for SSB
Create a new certificate for the syslog-ng Store Box (SSB) webserver or the Time Stamping Authority using the internal CA of SSB, or create a new, self-signed CA certificate for the internal Certificate Authority of SSB.
One Identity recommends using 2048-bit RSA keys (or stronger).
To generate certificates for SSB
-
Navigate to Basic Settings > Management > SSL certificate.
-
Fill the fields of the new certificate:
-
Country: Select the country where SSB is located (for example HU - Hungary).
-
Locality: The city where SSB is located (for example Budapest).
-
Organization: The company who owns SSB (for example Example Inc.).
-
Organization unit: The division of the company who owns SSB (for example IT Security Department).
-
State or Province: The state or province where SSB is located.
-
Select the certificate you want to generate.
-
To create a new certificate for the SSB web interface, select Generate Server certificate.
-
To create a new certificate for the Time Stamping Authority, select Generate TSA certificate.
-
To create a new certificate for the internal Certificate Authority of SSB, select Generate All. Note that in this case new certificates are created automatically for the server and TSA certificates as well.
NOTE: When generating new certificates, the server and TSA certificates are signed using the certificate of the CA. If you have uploaded an external CA certificate along with its private key, it will be used to create the new server and TSA certificates. If you have uploaded an external CA certificate without its private key, use your external PKI solution to generate certificates and upload them to SSB.
|

|
Caution:
Generating a new certificate automatically deletes the earlier certificate. |
-
Click  .
.
Uploading external certificates to SSB
Upload a certificate generated by an external PKI system to syslog-ng Store Box (SSB).
The certificate to upload. For the TSA and Server certificate, the private key of the certificate is needed as well. The certificates must meet the following requirements:
-
SSB accepts certificates in PEM format. The DER format is currently not supported.
-
SSB accepts private keys in PEM (RSA and DSA), PUTTY, and SSHCOM/Tectia format. Password-protected private keys are also supported.
NOTE: The syslog-ng Store Box (SSB) appliance accepts passwords that are not longer than 150 characters. The following special characters can be used:
! " # $ % & ' ( ) * + , - . / : ; < > = ? @ [ ] ^ - ` { | } |
For the internal CA certificate of SSB, uploading the private key is not required.
-
One Identity recommends:
-
For the TSA certificate, the X509v3 Extended Key Usage attribute must be enabled and set to critical. Also, its default value must be set to Time Stamping.
-
For the Server certificate, the X509v3 Extended Key Usage attribute must be enabled and its default value set to TLS Web Server Authentication. Also, the Common Name of the certificate must contain the domain name or the IP address of the SSB host. If the web interface is accessible from multiple interfaces or IP addresses, list every IP address using the Subject Alt Name option.
One Identity recommends using 2048-bit RSA keys (or stronger).
To upload a certificate generated by an external PKI system to SSB
-
Navigate to Basic Settings > Management > SSL certificate.
-
To upload a new certificate, click  next to the certificate you want to modify. A pop-up window is displayed.
Figure 98: Basic Settings > Management > SSL certificate — Uploading certificates
Select Browse, select the file containing the certificate, and click Upload. Alternatively, you can also copy-paste the certificate into the Certificate field and click Set.
You can choose to upload a single certificate or a certificate chain (that is, intermediate certificates and the end-entity certificate).
After uploading a certificate or certificate chain, you can review details by clicking the name of the certificate, and looking at the information displayed in the pop-up window that comes up.
Figure 99: Log > Options > TLS settings — X.509 certificate details
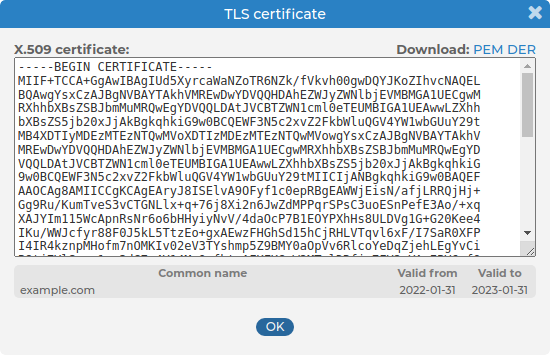
The pop-up window allows you to:
-
Download the certificate or certificate chain.
NOTE: Certificate chains can only be downloaded in PEM format.
-
View and copy the certificate or certificate chain.
-
Check the names and the hierarchy of certificates (if it is a certificate chain and there is more than one certificate present).
On hovering over a certificate name, the subject of the certificate is displayed, describing the entity certified.
-
Check the validity dates of the certificate or certificates making up the chain.
On hovering over a particular date, the exact time of validity is also displayed.
After uploading the certificate or certificate chain, the presence or absence of the string (chain) displayed after the name of the certificate will indicate whether the certificate is a certificate chain or a single certificate.
-
To upload the private key corresponding to the certificate, click icon. A pop-up window is displayed.
Select Browse, select the file containing the private key, provide the Password if the key is password-protected, and click Upload. Alternatively, you can also copy-paste the private key into the Key field, provide the Password there, and click Set.
Expected result:
The new certificate is uploaded. If you receive the Certificate issuer mismatch error message after importing a certificate, you must import the CA certificate which signed the certificate as well (the private key of the CA certificate is not mandatory).
NOTE: To download previously uploaded certificates, click on the certificate and download the certificate in one single PEM or DER file.
Note that certificate chains can only be downloaded in PEM format.
Generating TSA certificate with Windows Certificate Authority on Windows Server 2008
To generate a TSA certificate with Windows Certificate Authority (CA) that works with syslog-ng Store Box (SSB), generate a CSR (certificate signing request) on a computer running OpenSSL and sign it with Windows CA, then import this certificate into SSB for time stamping.
Prerequisites:
A valid configuration file for OpenSSL with the following extensions:
[ tsa_cert ]
extendedKeyUsage = critical,timeStamping
TIP: You can copy /etc/ssb/openssl-ca.cnf from SSB to the computer that will be used for signing. Rename the file to openssl-temp.cnf.
The TSA certificate is considered valid, in terms of compatibility with SSB, if the following conditions are met:
-
Must be a valid CA certificate (CA is true).
-
Key Usage: Time Stamping is required. No other key usage is permitted.
-
Extended Key Usage: Must be set to critical.
-
Optional Key Usage: If Key Usage is present, it must be digitalSignature and/or nonRepudiation. Other values are not permitted. Make sure that in Encryption, Allow key exchange without key encryption (key agreement) is selected.
|
|
Caution:
In Encryption, do NOT select Allow key exchange only with key encryption (key encipherment), because it will result in errors. |
The following X509v3 extensions are supported:
-
Hard requirement:
X509v3 Extended Key Usage must be critical, and must only contain Time Stamping.
-
Optional:
X509v3 Key Usage, if present, must be digitalSignature and/or nonRepudiation.
To generate TSA certificate with Windows Certificate Authority on Windows Server 2008
-
Create CSR using the new configuration file: openssl req -set_serial 0 -config openssl-temp.cnf -reqexts tsa_cert -new -newkey rsa:2048 -keyout timestamp.key -out timestamp.csr -nodes
-
Complete the required fields according to your environment:
Generating a 2048 bit RSA private key
........................+++
......................................+++
writing new private key to 'timestamp.key'
-----
You are about to be asked to enter information that will be incorporated
into your certificate request.
What you are about to enter is what is called a Distinguished Name or a DN.
There are quite a few fields but you can leave some blank
For some fields there will be a default value,
If you enter '.', the field will be left blank.
-----
Country Name (2 letter code) [AU]:HU
State or Province Name (full name) []:Budapest
Locality Name (eg, city) []:Budapest
Organization Name (eg, company) [Internet Widgits Pty Ltd]:BalaBit IT Security
Organizational Unit Name (eg, section) []:Service Delivery
Common Name (eg, YOUR name) []:scb35-1-i1.tohuvabohu.balabit
Email Address []:vlad@balabit.com
-
Sign the generated CSR with your Windows CA. Make sure that the CSR file is accessible from your Windows CA server.
-
To issue and sign the new certificate request, open the Microsoft Certification Authority Management Console: Start > Run and run certsrv.msc.
-
Right-click on the server name and navigate to All Tasks > Submit new request.
Figure 100: Submitting a new request

-
Select the CSR created in the second step.
-
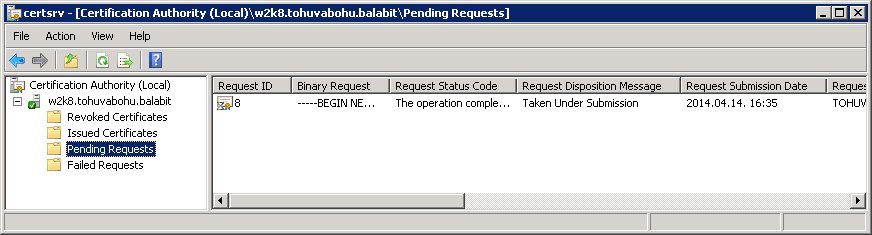
On the left pane, click Pending Requests. The new certificate request is displayed in the right pane.
Figure 101: Issuing a new certificate
-
To issue the new SSL certificate, right-click the pending certificate request, select All Tasks and click Issue.
-
Select Issued Certificates and double-click on the certificate issued in the previous step.
-
The CA Certificate window opens. Navigate to the Details tab. Ensure that the required Enhanced Key Usage field is visible and contains the Time Stamping value.
Figure 102: Verifying certificate details

-
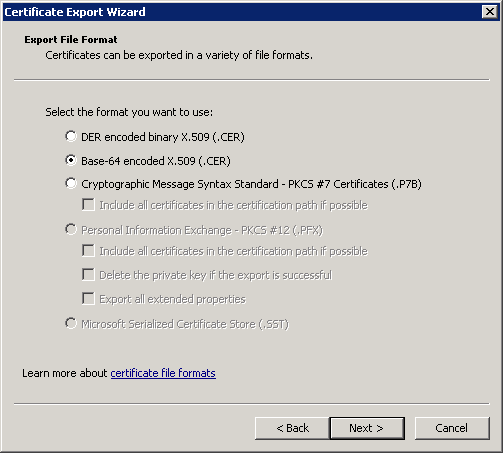
Click Copy to File. The Certificate Export Wizard launches. Click Next.
-
Select the format of the certificate: Base-64 encoded X.509 (.CER). Click Next.
Figure 103: Selecting certificate file format
-
Select location to save the certificate, and save it.
-
The Completing the Certificate Export Wizard screen is displayed. Click Finish.
-
In SSB, navigate to Basic Settings > Management > SSL certificate.
-
Click next to TSA X.509 certificate, browse for the previously generated certificate, and click Upload.
-
Click next to TSA private key, browse for the previously generated key, and click Upload.
NOTE: If the root CA (the CA X.509 certificate field under Basic Settings > Management > SSL certificate) that is used for other certificates on SSB is different from the CA that was used to sign the TSA certificate, a warning is displayed. In this scenario, ignore this warning.
Generating TSA certificate with Windows Certificate Authority on Windows Server 2012
To generate a TSA certificate with Windows Certificate Authority (CA) that works with syslog-ng Store Box (SSB), generate a CSR (certificate signing request) on a computer running OpenSSL and sign it with Windows CA, then import this certificate into SSB for time stamping.
Prerequisites:
A valid configuration file for OpenSSL with the following extensions:
[ tsa_cert ]
extendedKeyUsage = critical,timeStamping
TIP: You can copy /etc/ssb/openssl-ca.cnf from SSB to the computer that will be used for signing. Rename the file to openssl-temp.cnf.
The TSA certificate is considered valid, in terms of compatibility with SSB, if the following conditions are met:
-
Must be a valid CA certificate (CA is true).
-
Key Usage: Time Stamping is required. No other key usage is permitted.
-
Extended Key Usage: Must be set to critical.
-
Optional Key Usage: If Key Usage is present, it must be digitalSignature and/or nonRepudiation. Other values are not permitted. Make sure that in Encryption, Allow key exchange without key encryption (key agreement) is selected.
|
|
Caution:
In Encryption, do NOT select Allow key exchange only with key encryption (key encipherment), because it will result in errors. |
The following X509v3 extensions are supported:
-
Hard requirement:
X509v3 Extended Key Usage must be critical, and must only contain Time Stamping.
-
Optional:
X509v3 Key Usage, if present, must be digitalSignature and/or nonRepudiation.
To generate TSA certificate with Windows Certificate Authority on Windows Server 2012
-
Create CSR using the new configuration file: openssl req -set_serial 0 -config openssl-temp.cnf -reqexts tsa_cert -new -newkey rsa:2048 -keyout timestamp.key -out timestamp.csr -nodes
-
Complete the required fields according to your environment:
Generating a 2048 bit RSA private key
........................+++
......................................+++
writing new private key to 'timestamp.key'
-----
You are about to be asked to enter information that will be incorporated
into your certificate request.
What you are about to enter is what is called a Distinguished Name or a DN.
There are quite a few fields but you can leave some blank
For some fields there will be a default value,
If you enter '.', the field will be left blank.
-----
Country Name (2 letter code) [AU]:HU
State or Province Name (full name) []:Budapest
Locality Name (eg, city) []:Budapest
Organization Name (eg, company) [Internet Widgits Pty Ltd]:BalaBit IT Security
Organizational Unit Name (eg, section) []:Service Delivery
Common Name (eg, YOUR name) []:scb35-1-i1.tohuvabohu.balabit
Email Address []:vlad@balabit.com
-
Create and configure a time stamping web server template in the Certificate Authority, and use that to generate the TSA certificate.
-
Start the Certification Authority Microsoft Management Console, and select the CA server.
-
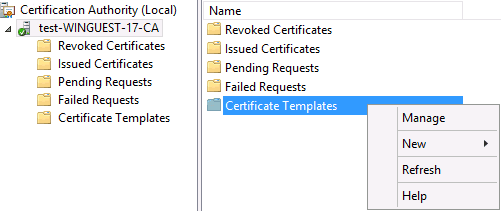
Right-click Certificate Templates, and choose Manage.
Figure 104: Managing certificate templates
The Certificate Templates Console opens.
-
Right-click the Web Server template, and choose Duplicate Template.
Figure 105: Duplicating a Template

The Properties of New Template window is displayed.
-
Make the following changes to the new template:
-
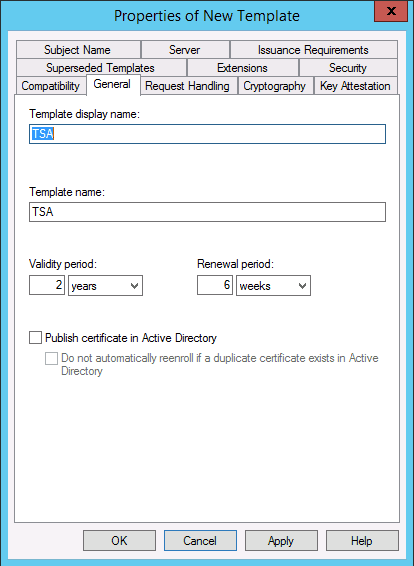
On the General tab, change the Template display name to TSA.
Figure 106: Creating the new template
-
On the Request Handling tab, enable the Allow private key to be exported option.
-
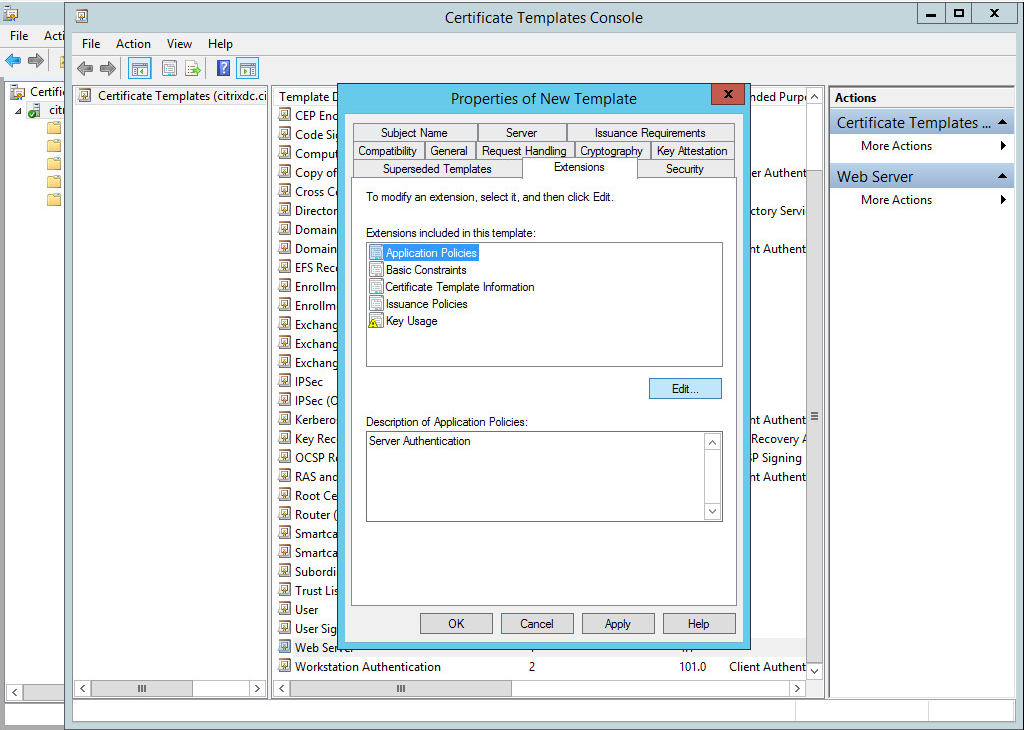
On the Extensions tab, make the following changes:
To edit Application Policies
To remove Server Authentication
To add Time Stamping
To make Time Stamping critical
-
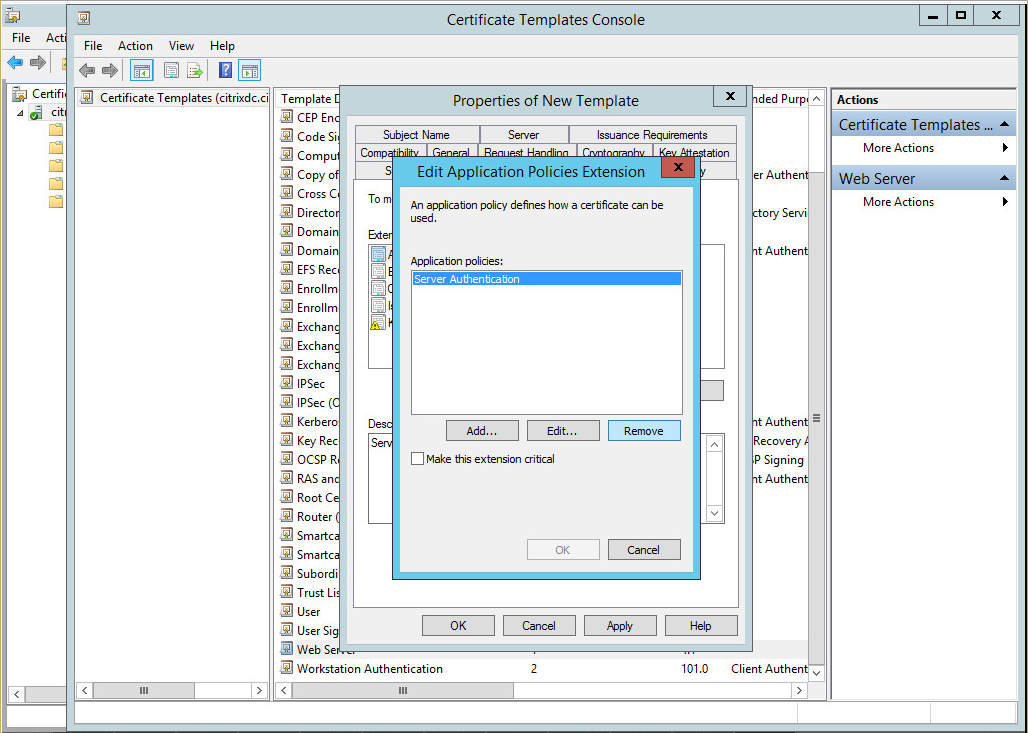
Select Time Stamping and enable the Make this extension critical option, then click OK.
Figure 110: Making Time Stamping critical
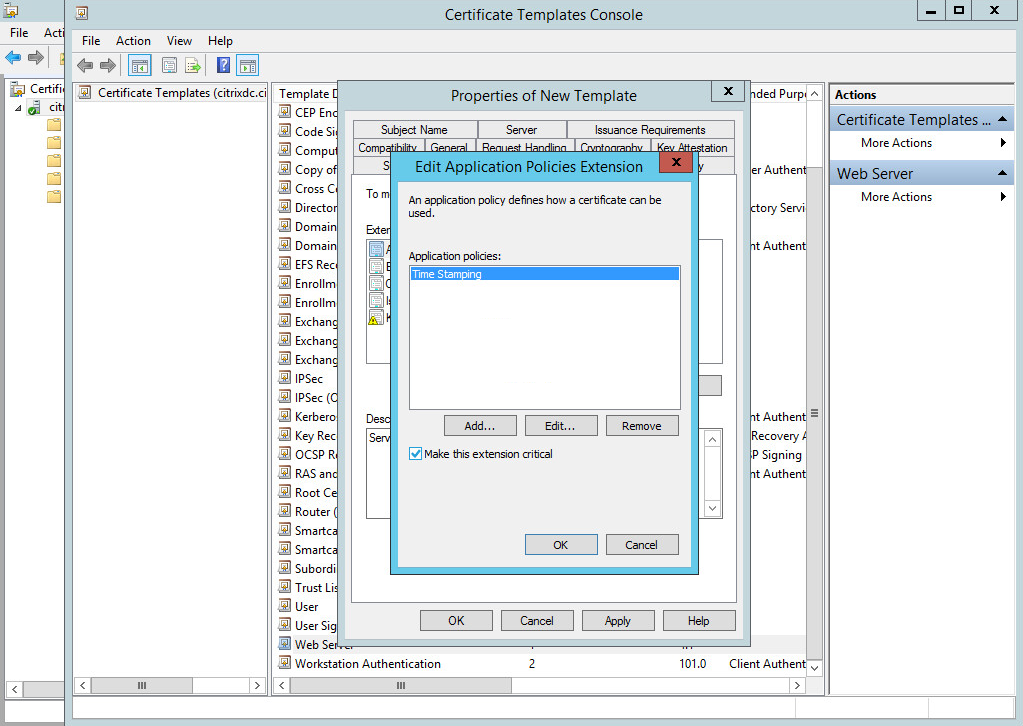
Time Stamping and Critical extension are listed in the Description of Application Policies.
Figure 111: Description of Application Policies

To edit Key Usage
- Select Key usage, click Edit. Enable the Signature is proof of origin (nonrepudiation) option.
-
Select Allow key exchange without key encryption (key agreement).
-
Click OK.
Figure 112: Editing Key Usage
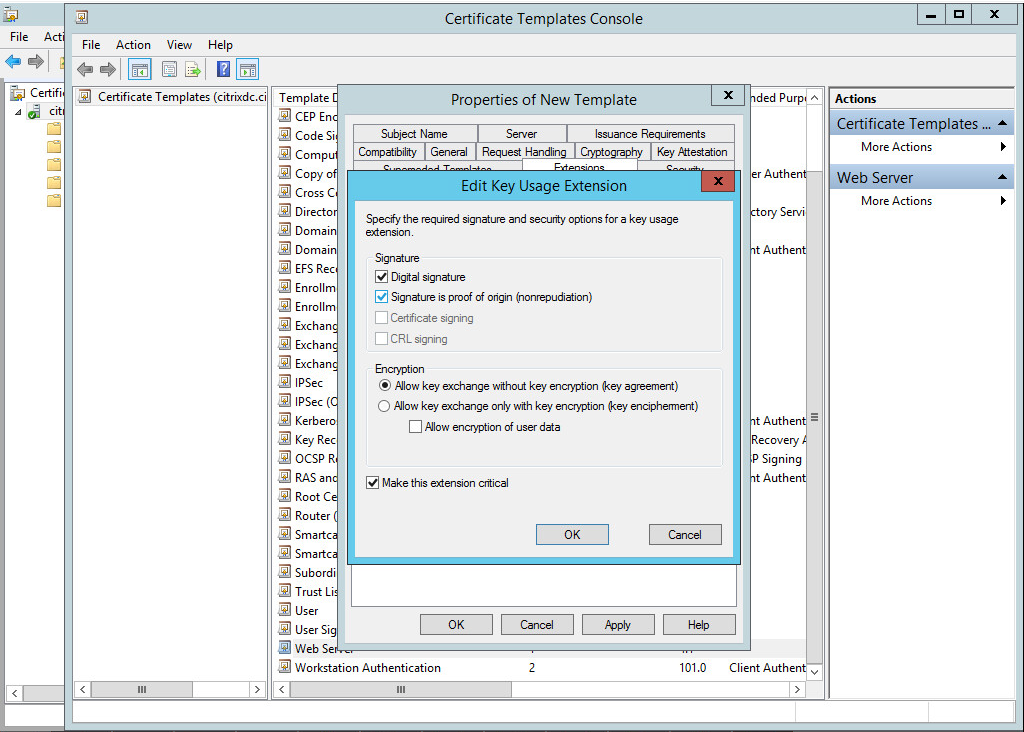
The following are listed in the Description of Key Usage.
Figure 113: Description of Key Usage

-
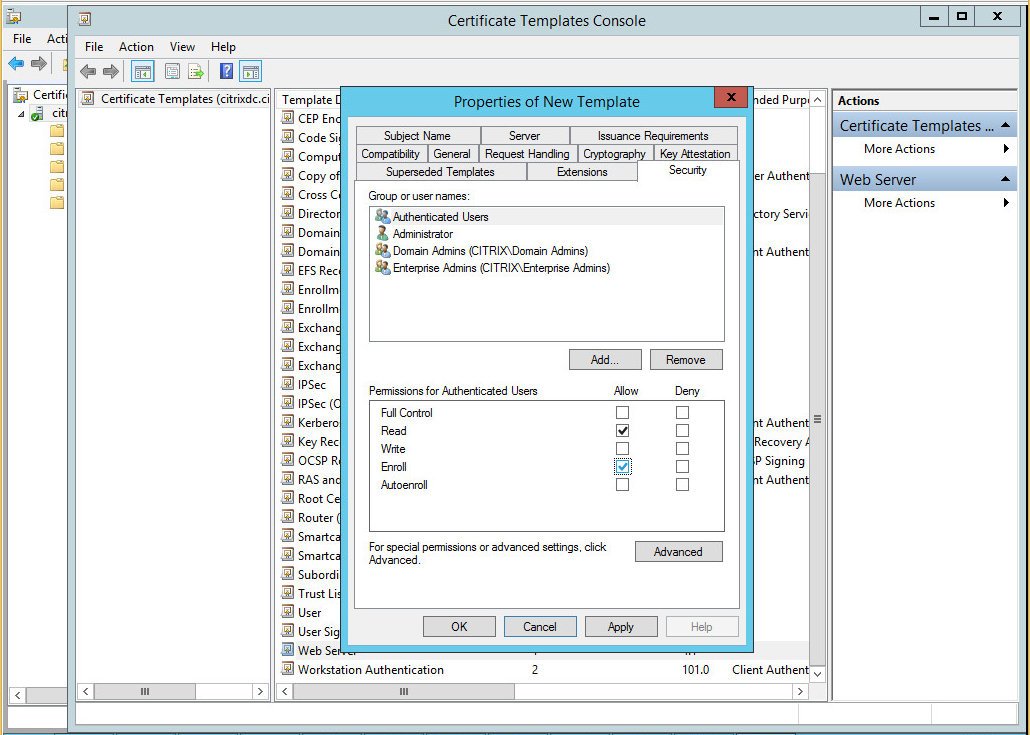
On the Security tab, select Authenticated Users, and set Enroll to Allowed.
Figure 114: Configuring permissions for the template
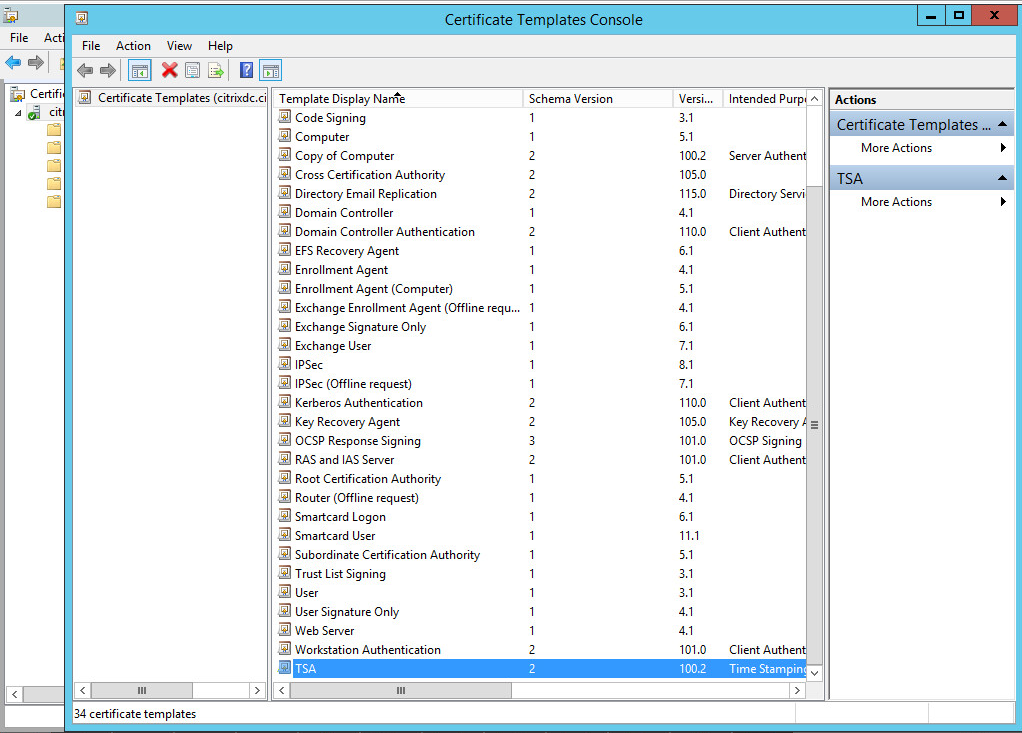
-
Click Apply. Click OK. The new TSA template is now displayed in the list of templates.
Figure 115: The new TSA template is now displayed in the list of templates
-
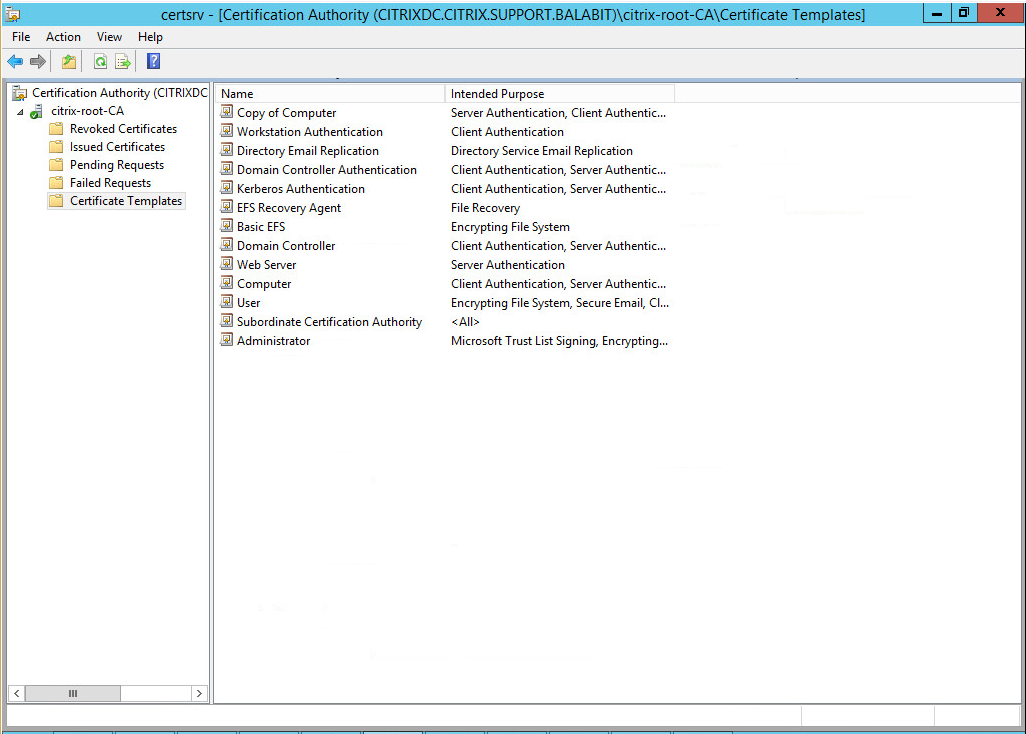
Close this window and return to the Certification Authority main screen, and select the Certificate Templates folder.
Figure 116: Certificate Templates
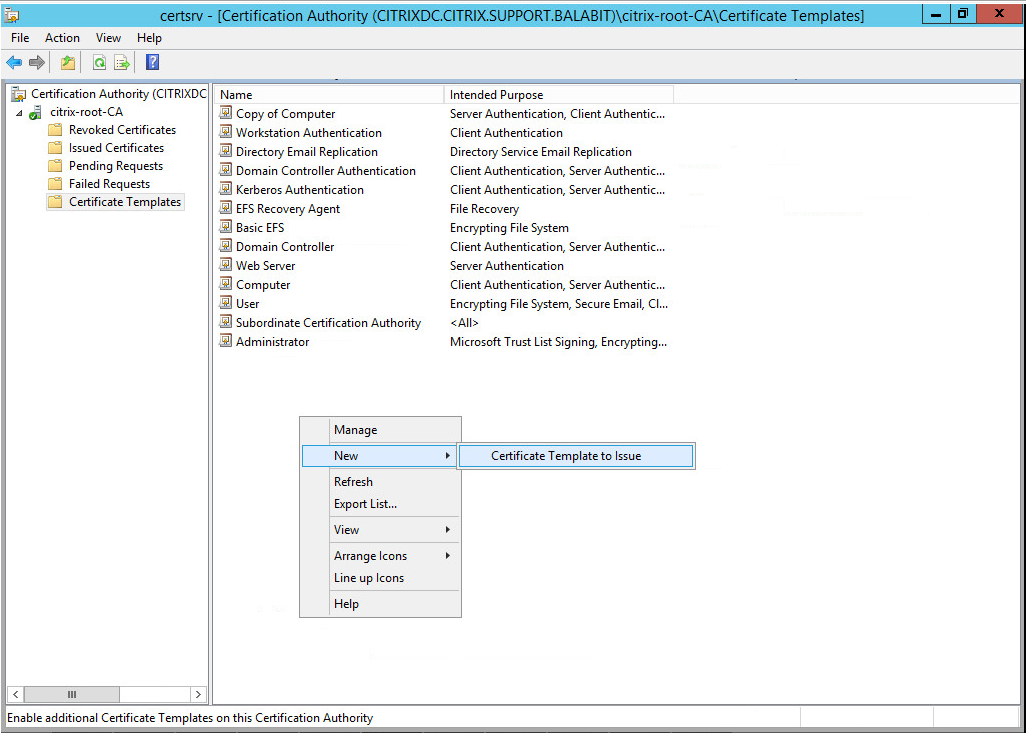
Right-click under the list, and choose New > Certificate Template to Issue.
Figure 117: Certificate Template to Issue
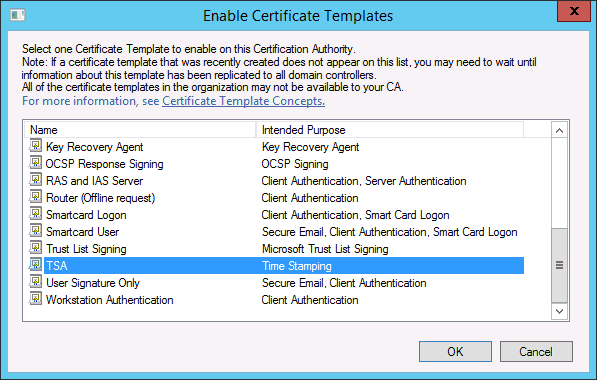
The Enable Certificate Templates window is displayed.
Figure 118: Enable the new template
-
Select the TSA certificate template, and choose OK. Close this window.
-
Open the command line, and issue the following command:
certreq -submit -attrib "CertificateTemplate:TSA" <CSR>
Replace <CSR> with the full path of the CSR created earlier (in the second step).
-
The Certification Authority List is displayed. Select the CA.
-
The Save Certificate window is displayed. Choose an output folder.
The certificate is generated to the specified folder.
-
In SSB, navigate to Basic Settings > Management > SSL certificate.
-
Click next to TSA X.509 certificate, browse for the previously generated certificate, and click Upload.
-
Click next to TSA private key, browse for the previously generated key, and click Upload.
NOTE: If the root CA (the CA X.509 certificate field under Basic Settings > Management > SSL certificate) that is used for other certificates on SSB is different from the CA that was used to sign the TSA certificate, a warning is displayed. In this scenario, ignore this warning.