Chat now with support
Chat with Support

syslog-ng Store Box 6.10.0 - Administration Guide

Preface Introduction The concepts of SSB The Welcome Wizard and the first login Basic settings User management and access control Managing SSB Configuring message sources Storing messages on SSB Forwarding messages from SSB Log paths: routing and processing messages Configuring syslog-ng options Searching log messages Searching the internal messages of SSB Classifying messages with pattern databases The SSB RPC API Monitoring SSB Troubleshooting SSB Security checklist for configuring SSB Glossary

Customizing the fetch history settings for your SQL type message source

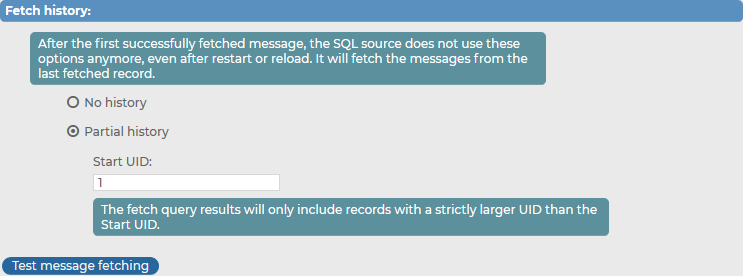
After customizing your fetch query settings for your SQL type message source, you can customize your fetch history settings as well.

NOTE: Customizing your fetch history has relevance when you are configuring your SQL type message source for the first time. After the initial message history fetching, the message source does not use these settings, but fetches the messages from the last fetched record instead.

To customize the fetch history settings for your SQL type message source

  1. Navigate to Log > Source > <your-new-source> > SQL > Fetch history.

    Figure 134: Log > Source > <your-new-source> > SQL > Fetch history — Customizing the fetch history settings for your SQL type message source

  2. Select how extensive you want your fetch history.

    • To skip the initial message fetching from the database, select No history.

    • To specify from which particular UID you want the message source to fetch messages from your database, select Partial history, and specify the Start UID of your preference.

      Caution:

      Consider that the message source only fetches messages with a UID that is strictly larger than the specified Start UID. As a result, the message with the UID specified as the Start UID will not be fetched from the database.

  3. To quickly check your fetch history settings before committing your message source configuration, click Test message fetching. The message source will fetch a sample of the database, and you can check if your settings are right and if the fetched data match your database and your desired configuration and settings.

Configuring the fetching frequency settings for your SQL type message source

Under Log > Sources > <your-new-source> > SQL > Fetching frequency, you can customize your fetching frequency preferences for your SQL type message source.

To customize your fetching frequency preferences for your SQL type message source

  1. Navigate to Log > Sources > <your-new-source> > SQL > Fetching frequency.

    Figure 135: Log > Sources > <your-new-source> > SQL > Fetching frequency — Customizing your fetching frequency preferences for your SQL type message source

  2. Specify how often you want syslog-ng Store Box (SSB) to periodically fetch data by entering the number of your choice (in seconds) in Fetch data every: <number> seconds.

  3. (Optional) To allow SSB to read the database as fast as possible, enable Fast follow mode.

    NOTE: SSB reads the database periodically, performing one query (that fetches multiple records) at a time. With Fast follow mode enabled, SSB continuously keeps querying the database until it fetches all records available at the time.

Configuring the Monitoring settings for your SQL type message source

Under Log > Sources > <your-new-source> > SQL > Monitoring you can customize your monitoring settings, including enabling Message rate alerting and customizing your Alerts, for your SQL type message source.

To customize the Monitoring settings for your SQL type message source

  1. Navigate to Log > Sources > <your-new-source> > SQL > Monitoring.

    Figure 136: Log > Sources > <your-new-source> > SQL > Monitoring — Configuring the Monitoring settings for your SQL type message source

  2. (Optional) Enable Message rate alerting.

  3. Select the basis of your alerts under Counter.

  4. Select the frequency of alerts (in minutes) under Period.

  5. Specify the amount of alerts you want to receive within the specified Period (ranging between the minimum and maximum numbers of your choice) under Minimum and Maximum.

  6. Select the alerting frequency in the Alert field.

    Once sends only one alert (and after the problem is fixed, a "Fixed" message).

    Always sends an alert each time the result of the measurement falls outside the preset range.

  7. (Optional) To set the configured alert settings as your default, enable Master alert.

  8. (Optional) To leave the Log > Sources > <your-new-source> > SQL > Monitoring page and customize Message rate alerting statistics settings that apply to the entire syslog-ng Store Box (SSB) appliance, clicking Global settings takes you to Log > Options > Message rate alerting statistics.

    For more information about the configurable settings you can customize under Log > Options > Message rate alerting statistics, see Configuring message rate alerting.

NOTE: You can configure multiple alerts under Monitoring and pick the alert of your choice as your Master alert. To add a new alert under Message rate alerting, click 
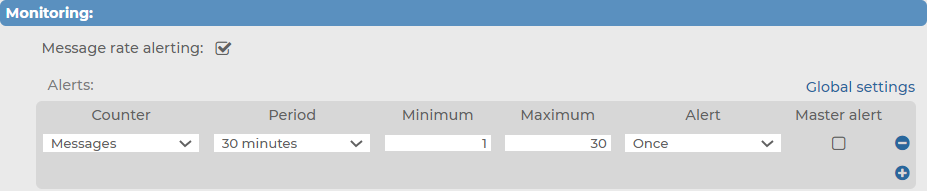
. To delete a redundant alert, click .

Receiving SNMP messages

The syslog-ng Store Box (SSB) appliance can receive SNMP messages using the SNMPv2c protocol and convert these messages to syslog messages. SNMP messages are received using a special SNMP source that can be used in log paths like any other source. The following describes how to configure receiving SNMP messages.

To configure receiving SNMP messages

  1. Navigate to Log > Options > SNMP source.

  2. Ensure that the SNMP source option is enabled.

    Figure 137: Log > Options > SNMP source — Receiving SNMP messages

  3. The default community of the SNMP messages is public. Modify the Community field if your hosts use a different community.

    NOTE:SSB can receive messages only from a single community.

  4. To limit which hosts can send SNMP messages to SSB, create a hostlist policy, add the permitted hosts to the policy, and select the policy from the Hostlist field. For details on creating hostlists, see Creating hostlist policies.

  5. To limit the rate of messages a host can send to SSB, enter the maximum number of packets (not messages) that SSB is allowed to accept from a single host into the Rate limit field. (This parameter sets the hashlimit parameter of the iptables packet filter that is applied to the source.)

    Caution:

    When rate limiting is enabled, and a host sends a large number of messages, SSB processes only the amount set in the Rate limit field. Any additional messages are dropped, and most probably lost.

  6. To use name resolution for SNMP messages, enable the Use DNS option.

  7. Click .

Related Documents

The document was helpful.

Select Rating

I easily found the information I needed.

Select Rating