Assigning target tables and target columns
On the Match target tables and columns page in Data Import, specify the how the data is stored in the One Identity Manager database.
To assign target table and target columns
-
In the Target table section, select the target table into which data is imported.
TIP: Use the  button in the Target table section to assign the target columns and key automatically. You should always check this suggestion.
Assigns a column if one is found in the target table whose name matches the name in the source column.
-
In the Target columns and key section, specify the mapping of data in the target columns of the table.
NOTE: If a target column is not yet assigned, Not assigned is displayed as a column identifier.
Click the arrow button beside a column identifier to open the assignment wizard and record the following information for every column.
Table 46: Properties for target columns and keys
|
Use as a key column |
Specifies whether the column is used as a key column.
More than one key columns can be defined. The data records to import into the database are determined based on key columns. Data records should be uniquely identified with these key columns. |
|
Conversion script |
Use the conversion script to modify source column values to match the permitted value of the target column. This is required, for example, if a list of permitted values is defined for the target columns.
Write the conversion script in VB.Net syntax. You access the values with the variable value. Use dollar notation to access the source columns. For more information about scripts in One Identity Manager, see the One Identity Manager Configuration Guide. |
|
Target column |
Select the target columns to be imported into the data. All columns from the target table are displayed with their data type. Following applies:
-
Compulsory data is labeled with a blue triangle in front of the data type.
-
Columns without sufficient permissions are displayed in gray.
-
Columns, deactivated by preprocessor condition, are not shown.
TIP:
-
Use the button to suggest a column if a column whose identifier matches the designation of the source column is found in the target table. You should always check this suggestion.
-
Use the Show column captions option to switch between the display name and technical name of the column. |
TIP: In the assignment wizard, you can use the > button to switch to the next column. The Data preview pane contains a preview of the values.
Related topics
Inserting columns with fixed values
In Data Import, you can insert additional columns with fixed values in the data import and import into a defined column.
To insert columns with fixed values
-
In the Target columns and key section, click the arrow button beside any column name to open the assignment wizard.
-
Click the  button.
-
Enter the value in the Fixed value field.
- OR -
If the value is to be determined from the values in source columns, enter a conversion script.
-
Assign the target column.
-
Close the system assignment wizard.
Related topics
Specifying the data hierarchy
If an import contains data that includes dependencies, you must ensure that the reference targets are processed before the reference sources.
For example, child departments (Department.UID_Department) are imported after parent departments (Department.UID_ParentDepartment).
NOTE:
-
Sorting the data into a hierarchical structure can consume a great deal of memory in the Data Import. Therefore, only use this procedure for imports with small amounts of data.
-
For more extensive CSV imports, sort the data in advance in the import file to resolve the object dependencies.
-
For extensive imports from external databases, use the Order-by clause to sort the data.
To sort the data in the Data Import hierarchically
-
On the Specify hierarchy page, enable the Sort by hierarchy option.
-
Select the Key column in which the data is mapped, for example, Department.UID_Department.
-
Select the Parent key column, for example, Department.UID_ParentDepartment.
Related topics
Options for handling records
In the Data Import on the Handling options for data sets page, specify how new and existing data records are handled when imported. The import must take several cases into account and respond accordingly in each case. During the import, the data records of the source data are compared with the database entries. You can use a condition to further limit the relevant database entries.
Use the following settings to specify how the data records are processed.
Table 47: Options for handling records
|
Insert new data set |
The data record from the source data does not yet exist in the database. If the option is enabled, the data record is inserted in the database. |
|
Adapting existing records |
There is an entry in the database that matches the source data record. If the option is enabled, the data record is updated in the database.
If multiple entries exist in the database, which match the source data record, an entry is written to the error log. |
|
Delete records that no longer exist |
The database contains an entry that is not contained in the source data. If the option is enabled, the entry is deleted from the database. |
|
Limiting the target objects |
Use a condition to limit the quantity of relevant database entries. The condition is tested when importing begins.
There is a wizard available though the  button next to the input field, to help you formulate your condition. button next to the input field, to help you formulate your condition.
NOTE: If the Insert new data set option is enabled, source data records that do not fall within the area of relevant database entries due to the limit are handled as new data records and inserted in the database. Under certain circumstances, this can lead to errors such as duplicate data records. |
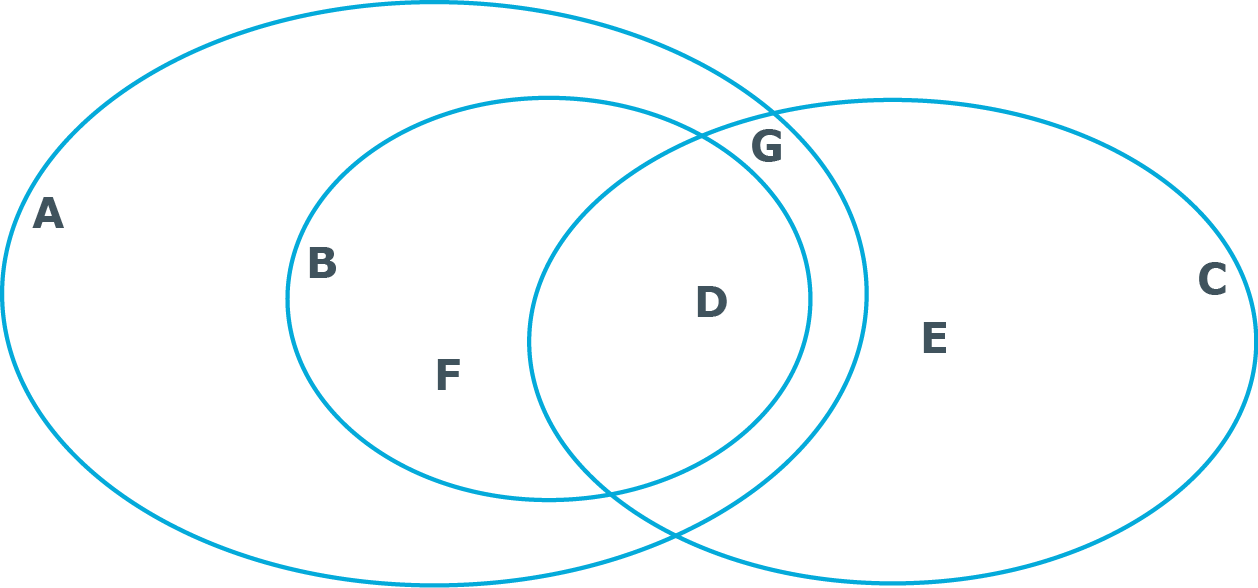
Example for handling data sets
|
A |
All objects in the database. |
|
B |
Database set restricted by condition. |
|
C |
Entry in source data. |
|
D |
All entries in the database and in the source data. Typical action: update all entries in the database. |
|
E |
Entries that are only in the source data but not in the database. Typical action: add new entry in the database. |
|
F |
Entries that are in the database but not in the source data. Typical action: clean up entries in the database. |
|
G |
Entries that are in the source data but no in range selected in the database. These entries are treated as in case E although adding entries may cause conflicts in certain circumstances. |
