
Security Analytics Engine Overview
Plugins
Conditions
Introduction
Conditions page
Condition types
Applications
Abnormal Browser
Abnormal Location
Abnormal Time
Associated w/ Malware
Dynamic Blacklist
Restricted Country
Approved Country
Whitelist
Adding and managing conditions
Introduction
Applications page
Adding and managing applications
Adding and managing risk policies
Application wizard
Auditing
Introduction
Auditing page
Filtering the audit events
Configuring the retention settings
Displaying details for an individual audit event
Adding and managing overrides on the Auditing page
Policy Overrides
Fallback Password
Security Settings
Glossary
About Dell
Managing risk policies
|
5 |
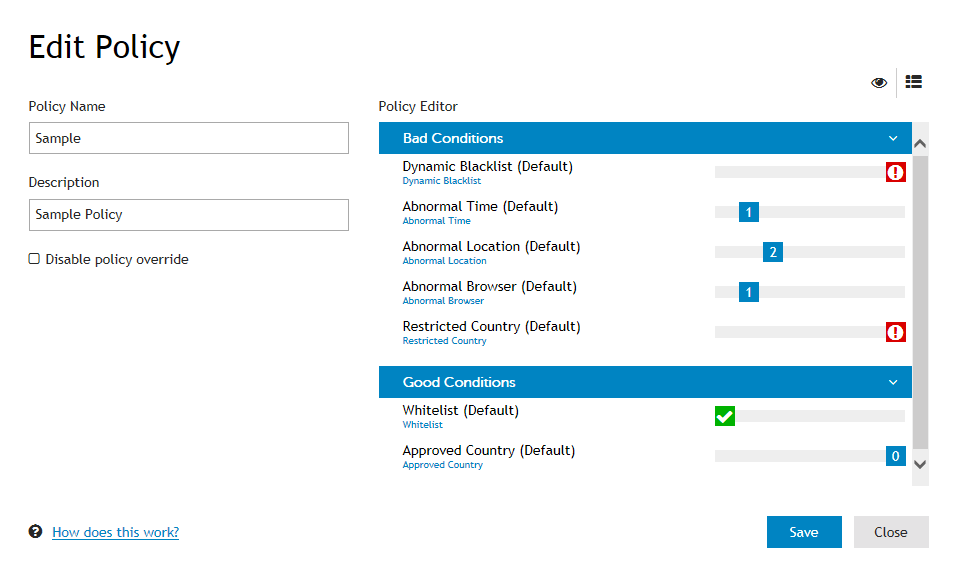
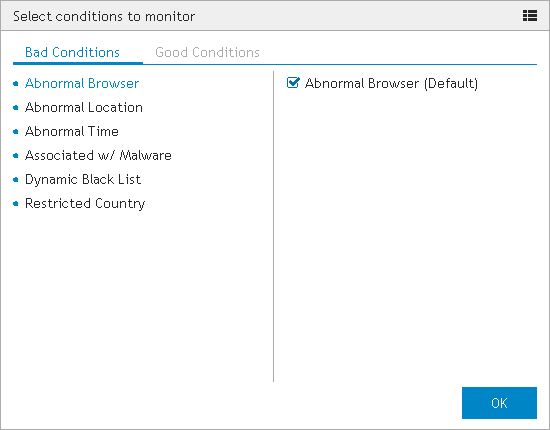
After making changes to the selected conditions, click OK to close the Select conditions to monitor dialog and return to the Edit Policy dialog. |
|
• |
Bad Conditions - Move the slider from left to right to increase the score between 0 (ignores the condition) and Major Threat (increases the risk score by 1000). |
|
• |
Good Conditions - Move the slider from right to left to decrease the score between 0 (ignores the condition) and Safe (decreases the risk score by 100). |
|
NOTE: Depending on the conditions selected, the Real sum of conditions and Threat level reported fields may display different numbers. This occurs when the total possible risk score is higher or lower than the values that can be reported as a threat level (0-7).
For example, if a selected condition is assigned a score of Major Threat the value of the Real sum of conditions will be 1000. However, the Security Analytics Engine will only send the application the highest reportable threat level (7) which is displayed in the Threat level reported field. |
|
8 |
Once you have finished editing the risk scores, click the Save button to save changes and close the Edit Policy dialog. |
|
9 |
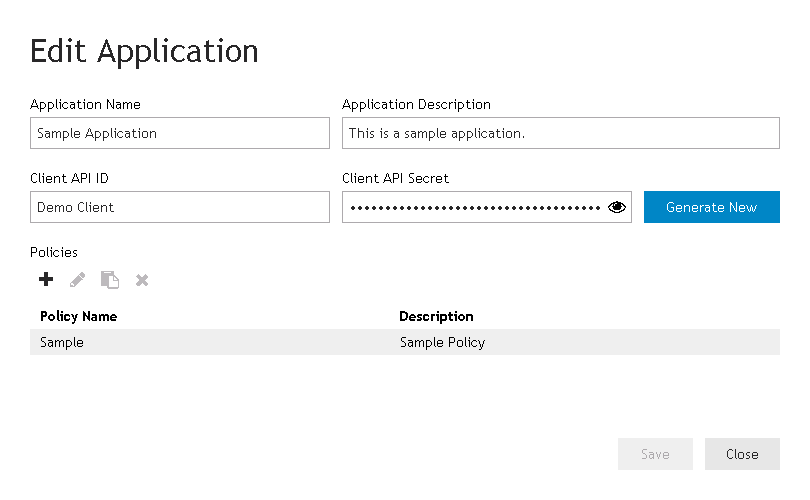
Click the Save button on the Edit Application dialog to save the application and return to the Applications page. |
|
4 |
In the Policy Name field, enter a name for the risk policy. |
|
5 |
After editing the duplicate risk policy, click the Save button to return to the Edit Application dialog. |
|
6 |
The duplicated policy will now appear in the Policies section. Click Save to return to the Applications page. |
|
4 |
|
5 |
The deleted policy will no longer appear listed in the Policies section of the Edit Application dialog. Click Save to return to the Applications page. |
Application wizard
 | |||||||||
|
|
|||||||||
|
|
|||||||||
|
|
|||||||||
|
|
After selecting a policy, click this button to delete the selected policy. A confirmation dialog will appear, click Delete to delete the policy. | ||||||||
 | |||||||||
|
|
|||||||||
|
|
|||||||||
|
|
| ||||||||
|
|
| ||||||||
 | |||||||||
Auditing
Introduction
From the Home page of the Security Analytics Engine Administration web site, click on the Auditing link to open the Auditing page where you can view and manage the auditing data captured by the Security Analytics Engine. This page is also used for overriding a user’s risk score to allow them access to the Security Analytics Engine protected applications for a specified period of time.