
Further considerations
When you have added an application to Cloud Access Manager, you may want to ensure users only access the application using Cloud Access Manager. This may be required if you use Cloud Access Manager to enforce strong authentication for the application, or want to use Cloud Access Manager’s auditing features to monitor application usage. For further information on how to ensure that users access the application using Cloud Access Manager, please refer to Preventing direct access to applications protected by Cloud Access Manager in the One Identity Cloud Access Manager Security and Best Practices Guide.
HTTP header value
To configure the HTTP header value
-
Log in to the Administration Console using the desktop shortcut Cloud Access Manager Application Portal and select Add New from the Applications section on the home page.
Cloud Access Manager provides a set of application templates to automatically configure common applications. This example describes how to configure an application manually, rather than using a template.
- Click Configure Manually.
- Select HTTP Header and click Next.
-
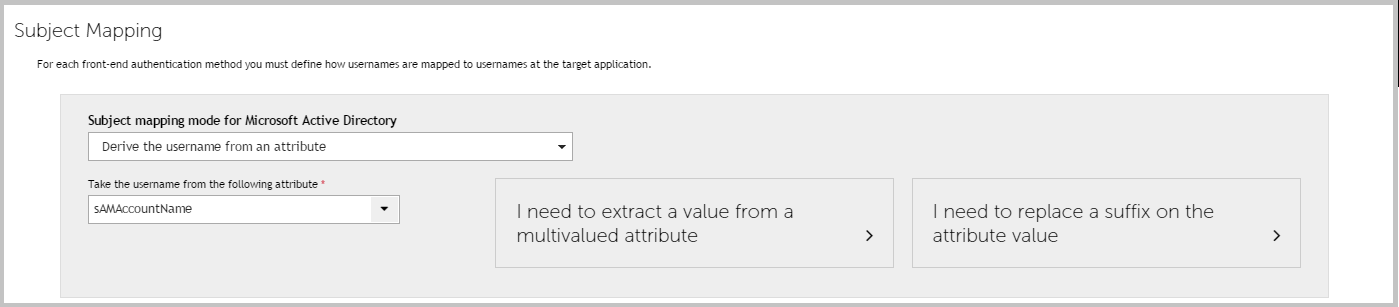
You now need to configure how Cloud Access Manager will derive the user's username that will be used to authenticate to the application. This step will vary depending on which front-end authentication method you are using. In this example, we will run through the steps required for Active Directory front-end authentication. Select Derive the username from an attribute. A text box is displayed for you to enter the Active Directory attribute to use. Enter sAMAccountName and click Next.
-
Enter the name of the header you wish to use to send the derived username. The application's web server may prefix this header name with HTTP_. If this is the case, the application must include this prefix when referencing the header. Click Next.
NOTE: Additional user attributes can also be sent in HTTP headers. In this example we will send the user's username only.
-
Enter the protocol and Fully Qualified Domain Name (FQDN) used by the application you wish to Single Sign-On (SSO). Click Next.
NOTE: The protocol and FQDN can be obtained from the URL used to access the application. For example, if the application is normally accessed using https://ars.democorp.local/ARServerAdmin, the protocol would be HTTPS and the FQDN would be ars.democorp.local.
-
In this step, Cloud Access Manager needs to know how to proxy the application. Typically this involves configuring Cloud Access Manager to proxy the entire web server used by the application using a new fully qualified domain name. This is the preferred method and the method which is compatible with the most applications. To configure Cloud Access Manager in this way, simply enter a new public FQDN into the field provided on the Proxy URL page, and click Next.
The new FQDN should be within the wildcard DNS subdomain created during the installation, which will resolve to the public IP address used by the proxy. For example, if you created the wildcard DNS subdomain *.webapps.democorp.com during the installation you could use the FQDN owa.webapps.democorp.com to proxy Microsoft Outlook Web App. If you did not create a wildcard DNS subdomain for Cloud Access Manager during the installation you will need to add this new FQDN into your public DNS manually. The new FQDN should be covered by the wildcard SSL certificate you are using.
Alternatively, some applications are installed entirely within their own virtual directory on the web server where they reside. One example of such an application is One Identity Active Roles which installs into the virtual directory /ARServerAdmin. In this case you may be able to configure Cloud Access Manager to proxy the application's virtual directory only, rather than the whole web server, and reuse the FQDN of the proxy. To configure this option, select the proxy's FQDN from the list, then enter the virtual directory where the application is installed into the field below and click Next.
NOTE: Take care to ensure that the path entered is unaltered, even down to subtle changes such as character case, in the example Active Roles Server the path must be ARServerAdmin.
- You will now see the Permissions page, which enables you to control the users who can access the application. By default, all Cloud Access Manager users have access to the application. You can restrict access to the application to users who belong to a specific role, but for this example, simply click Next to allow all users to access the application.
- Enter a name for the application, then click Next.
-
You can now configure how the application is displayed on the Cloud Access Manager Portal. Enter the Title and Description you want to display on the Cloud Access Manager Portal. Many applications will require you to configure a particular entry point, for example for Active Roles Server you would need to add ARServerAdmin in the URL field of the Application Portal page.
NOTE: Take care to ensure that the URL entered is unaltered, even down to subtle changes such as character case, in the example Active Roles Server the URL must be ARServerAdmin. The Add application to application portal home and Allow user to remove application from application portal options allow you to specify whether the application should appear automatically on each user’s portal page, and how the user can manage the application from the application portal.
The options are shown in the table below.
Table 9: Application portal options Add application to application portal home Allow users to remove application from application portal home Functionality application is added to the portal and it cannot be removed by the user through the application catalog.
application is added to the portal and it can be removed by the user through the application catalog.
application is not automatically added to the portal. The user can add or remove the application to/from the portal through the application catalog.
To access the application catalog from the application portal, the user simply needs to click their username, then select Application Catalog. Depending on the settings in the Add application to application portal home and Allow user to remove application from application portal home options, the user can add or remove applications to/from the application portal.
- Configuration of the application is now complete. Click Finish.


To ensure that users are securely authenticated, you must configure applications that use header authentication to prevent users accessing the application directly. For further information on how to ensure that users access the application using Cloud Access Manager, please refer to Preventing direct access to applications protected by Cloud Access Manager in the One Identity Cloud Access Manager Security and Best Practice Guide.
No back-end SSO
To configure an application that uses no back-end SSO
-
Log in to the Administration Console using the desktop shortcut Cloud Access Manager Application Portal and select Add New from the Applications section on the home page.
Cloud Access Manager provides a set of application templates to automatically configure common applications. This example describes how to configure an application manually, rather than using a template.
- Click Configure Manually.
- Select Cloud Access Manager should not log the user in and click Next.
-
You can now configure the application for external access.
-
If the application is only accessible within your corporate network, select the internal option and click Next. This option will proxy the application so that users accessing Cloud Access Manager from outside of your corporate network can use the application.
NOTE: If users require access to the application before they have authenticated, or do not require authentication to access the application, then you can select the Allow un-authenticated access to this application box to allow un-authenticated access.
- If your application is already accessible from outside of your corporate network, select the external option and click Next. This option will not configure the proxy, you may skip to Step 7.
-
-
Enter the protocol and Fully Qualified Domain Name (FQDN) used by the application you wish to Single Sign-On (SSO). Click Next.
NOTE: The protocol and FQDN can be obtained from the URL used to access the application. For example, if the application is normally accessed using https://ars.democorp.local/ARServerAdmin, the protocol would be HTTPS and the FQDN would be ars.democorp.local.
-
In this step, Cloud Access Manager needs to know how to proxy the application. Typically this involves configuring Cloud Access Manager to proxy the entire web server used by the application using a new fully qualified domain name. This is the preferred method and the method compatible with the most applications. To configure Cloud Access Manager in this way, simply enter a new public FQDN into the field provided on the Proxy URL page, and click Next.
The new FQDN should be within the wildcard DNS subdomain created during the installation, which will resolve to the public IP address used by the proxy. For example, if you created the wildcard DNS subdomain *.webapps.democorp.com during the installation you could use the FQDN owa.webapps.democorp.com to proxy Microsoft Outlook Web App. If you did not create a wildcard DNS subdomain for Cloud Access Manager during the installation you will need to add this new FQDN into your public DNS manually. The new FQDN should be covered by the wildcard SSL certificate you are using.
Alternatively, some applications are installed entirely within their own virtual directory on the web server where they reside. One example of such an application is One Identity Active Roles which installs into the virtual directory /ARServerAdmin. In this case, you may be able to configure Cloud Access Manager to proxy the application's virtual directory only, rather than the whole web server, and re-use the FQDN of the proxy. To configure this option, select the proxy's FQDN from the list, then enter the virtual directory where the application is installed into the field below and click Next.
NOTE: Take care to ensure that the URL entered is not altered, even down to subtle changes such as character case. In the example Active Roles Server, the URL must be ARServerAdmin.
- You will now see the Permissions page, which enables you to control the users who can access the application. By default, all Cloud Access Manager users have access to the application. You can restrict access to the application to users who belong to a specific role, but for this example, simply click Next to allow all users to access the application.
- Enter a name for the application, then click Next.
-
You can now configure how the application is displayed on the Cloud Access Manager Portal. Enter the Title and Description you want to display on the Cloud Access Manager Portal. Many applications will require you to configure a particular entry point, for example, for Active Roles Server you would need to add ARServerAdmin in the URL field of the Application Portal page.
NOTE: Take care to ensure that the URL entered is unaltered, even down to subtle changes such as character case, in the example Active Roles Server the URL must be ARServerAdmin. The Add application to application portal home and Allow user to remove application from application portal home options allow you to specify whether the application should appear automatically on each user’s portal page, and how the user can manage the application from the application portal.
The options are shown in the table below.
Table 10: Application portal options Add application to application portal home Allow users to remove application from application portal home Functionality application is added to the portal and it cannot be removed by the user through the application catalog.
application is added to the portal and it can be removed by the user through the application catalog.
application is not automatically added to the portal. The user can add or remove the application to/from the portal through the application catalog.
To access the application catalog from the application portal, the user simply needs to click their username, then select Application Catalog. Depending on the settings in the Add application to application portal home and Allow user to remove application from application portal home options, the user can add or remove applications to/from the application portal.
- Configuration of the application is now complete. Click Finish.
Further considerations
When you have added an application to Cloud Access Manager, you may want to ensure users only access the application using Cloud Access Manager. This may be required if you use Cloud Access Manager to enforce strong authentication for the application, or want to use Cloud Access Manager’s auditing features to monitor application usage. For further information on how to ensure that users access the application using Cloud Access Manager, please refer to Preventing direct access to applications protected by Cloud Access Manager in the One Identity Cloud Access Manager Security and Best Practices Guide.