
Starling 2FA Dashboard
Starling 2FA Dashboard
When your subscription is confirmed, you will receive an email containing your subscription details. This will include the:
- Starling 2FA instance name
- Subscription key
- address and credentials required to access the Starling 2FA dashboard.
To access the Starling 2FA dashboard
- Open an Internet browser and navigate to the address in your email.
- You will be prompted for your email address and password, use the values in your confirmation email.
-
You will then be prompted for a token response.
NOTE: To obtain this response you must install the Starling 2FA App. Links to download the app are included in your confirmation email.
- When downloaded and configured, the app will display a one-time password that you can enter into the browser.
- When you are logged in, you are presented with a short video that explains the functionality of the dashboard.

To configure Cloud Access Manager to use Starling 2FA
Starling 2FA can be used as a two-factor authentication provider from within Cloud Access Manager. For instructions on how to configure two-factor authentication, please refer to Configuring front-end authenticators.
Using the Security Analytics Engine
The Security Analytics Engine calculates a risk score based on various factors relating to the user at the time of authentication. These factors can include the user’s browser, their IP address, the time of day and any historical data from previous authentications. This risk score is reported to Cloud Access Manager as a value from 0 to 100 percent. You can configure Cloud Access Manager to change the authentication requirements for the user based on their risk score.
This section describes how to configure Cloud Access Manager to use the Security Analytics Engine. The example takes you through the steps required to configure Cloud Access Manager to adapt its access control based on the risk score reported by the Security Analytics Engine. For more information on how to configure the Security Analytics Engine, please refer to the following chapters in the Security Analytics Engine User Guide:
- Plugins
- Conditions
- Applications
- Auditing
- Policy Overrides
- Glossary
- Shared Policies
- Issued Alerts
|
|
IMPORTANT: Any additional chapters within the Security Analytics Engine User Guide will not apply to Cloud Access Manager and using them may cause complications for both Cloud Access Manager and the Security Analytics Engine. |
|
|
NOTE: If multiple front-end authenticators are configured, step-up authentication will only be available for users authenticating with front-end authenticators which have two-factor authentication configured. In addition, when Cloud Access Manager is configured to use the Security Analytics Engine it is not important which two factor authentication mode is selected in the front-end authenticator configuration as all modes will be treated equally. The decision on when two factor authentication is required will be determined by the risk score returned. |
Enabling the Security Analytics Engine
The Security Analytics Engine is installed automatically when you install Cloud Access Manager, but the application is dormant until you enable it from within Cloud Access Manager.
To enable the Security Analytics Engine
- Navigate to the Settings page and then to the Externalized Access Control page.
- Select Security Analytics Engine will manage step-up authentication decisions from the list.
-
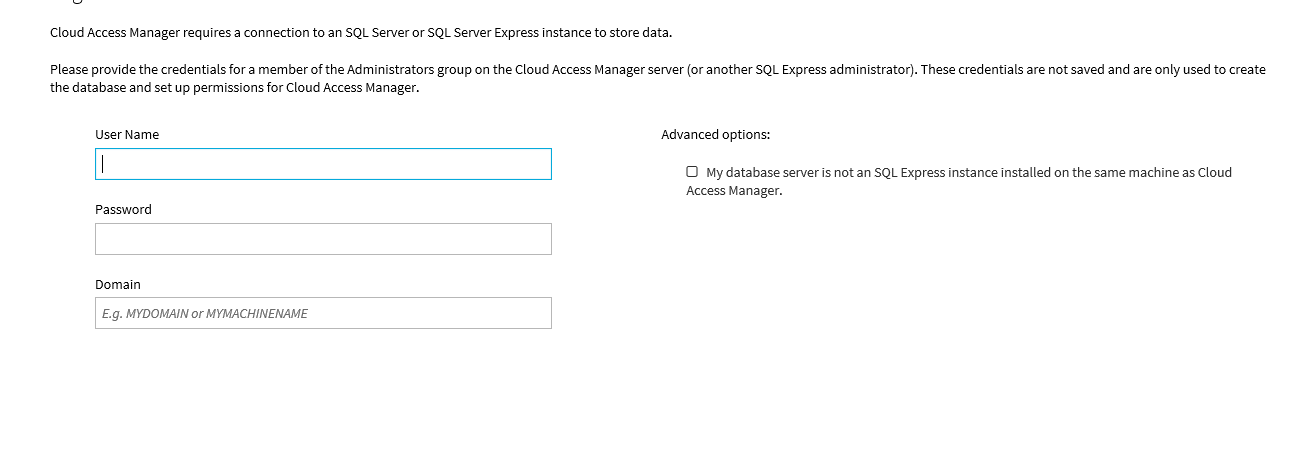
If you have upgraded from a version of Cloud Access Manager that did not include the Security Analytics Engine, and you are not using the LocalDB database, then you will be prompted to enter credentials allowing Cloud Access Manager to create a new database catalog. The credentials should be those of a member of the sysadmin role on the database server. In addition, the existing data source used by Cloud Access Manager will be set as the default data source. You may change this data source to store data for the Security Analytics Engine in a separate database to that used for storage of the main Cloud Access Manager data.
-
Cloud Access Manager then configures the Security Analytics Engine for use with Cloud Access Manager. This configuration will:
-
Configure the Security Analytics Engine to use Cloud Access Manager as a federated authenticator for allowing access to the Security Analytics Engine administration interface.
NOTE: Users should always access the Security Analytics Engine Administration web site through the links provided in Cloud Access Manager, please refer to the section To access the Security Analytics Engine user interface.
- Set the fallback password for the Security Analytics Engine to be the same as the fallback password for Cloud Access Manager.
-
Create a new Cloud Access Manager role named Security Analytics Engine Helpdesk.
NOTE: Users assigned the Security Analytics Engine Helpdesk role should refer to the following chapters of the Security Analytics Engine Help Desk User Guide for information on using the Security Analytics Engine:
- Auditing
- Policy Overrides
- Issued Alerts
- Configure the Security Analytics Engine to allow members of the Cloud Access Manager Admin and Security Analytics Engine Helpdesk roles to access the Security Analytics Engine administration interface.
- Create a Cloud Access Manager application within the Security Analytics Engine. When configuring policies within the Security Analytics Engine for use with Cloud Access Manager, you must edit policies within this application.
-
On completion you will see the page shown below:
-
Configuring Cloud Access Manager to use the Security Analytics Engine for access control
When a user attempts to access an application that is controlled by Cloud Access Manager a query is made to the Security Analytics Engine to evaluate the risk for the user. This risk score is a value from 0 to 100 percent, Cloud Access Manager maps this to one of three threat levels for low risk, medium risk and high risk users and then uses the threat level to decide what action to take on a per application basis. The action is either:
- Allow Access — user only requires a single level of authentication
- Step Up Authentication — user needs to be two factor authenticated
- Deny Access — user cannot access the application
|
|
NOTE: For guidance on deploying Security Analytics Engine, SonicWALL and Cloud Access Manager together, please refer to the document entitled One Identity Cloud Access Manager SonicWALL Integration Overview. |
To configure which Security Analytics Engine policy to use
Each application within the Security Analytics Engine can have multiple policies associated with it. To select which of these policies Cloud Access Manager will use as the default policy, perform the following steps:
- Navigate to the Settings page and then to the Externalized Access Control page.
- In the Security Analytics Engine Policy Name list select the required policy.
|
|
NOTE: Additional Security Analytics Engine policies can be configured from within the Security Analytics Engine Administration page. |
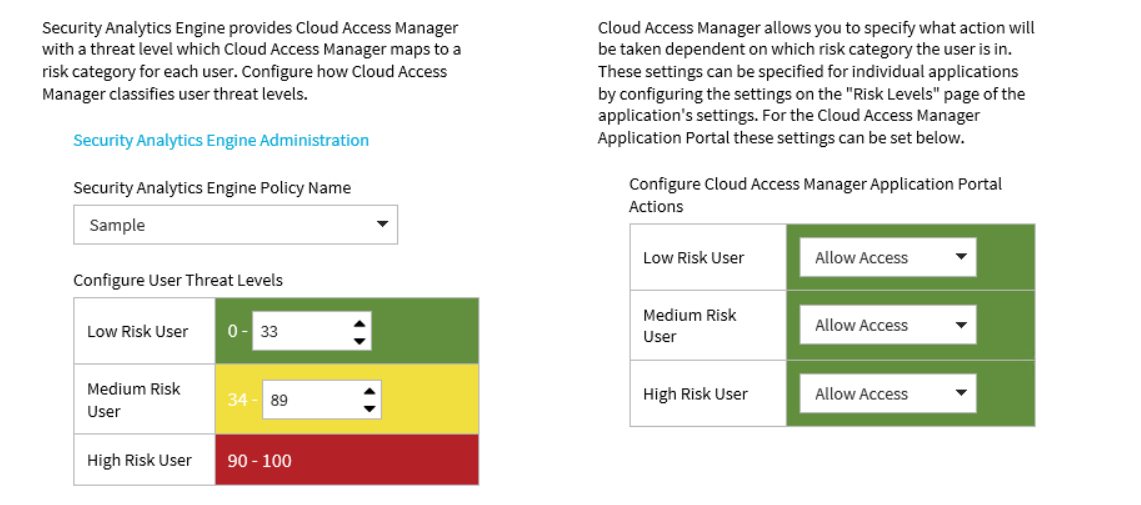
To configure threat levels
- Navigate to the Settings page and then to the Externalized Access Control page.
- In the Configure User Threat Levels table set the upper bound of the risk score for low risk users.
- In the Configure User Threat Levels table set the upper bound of the risk score for medium risk users.
|
|
NOTE: The lower bounds for medium and high risk users will automatically change based on the values you enter for low and medium risk users. |
To configure the action to take when logging on to the Cloud Access Manager Application portal
- Navigate to the Settings page and then to the Externalized Access Control page.
- In the Configure Cloud Access Manager Application Portal Actions table, set the desired actions for low, medium and high risk users.
To configure the action to take when a user accesses an application
- Navigate to the Applications page and click the name of the application that you wish to configure.
- Click the Threat Levels tab.
-
You can either:
- Select Use the configured user threat levels to set user access to this application to configure access based on the user threat levels configured on the Externalized Access Control page.
- Select Override configured user threat levels to set user access to this application to configure specific threat levels for this application.
- Select Roles determine which users are assessed by the Security Analytics Engine to configure specific threat levels for this application and only use the Security Analytics Engine to authorize users in particular roles.
- If you are using standard threat levels, set the desired actions for low, medium and high risk users.
-
If you are overriding the standard threat levels:
- Select the Security Analytics Engine policy to use.
- Set the upper bound of the risk score at which users will be allowed access with a single level of authentication.
- Set the upper bound for the risk score at which users must be two factor authenticated to access the application.
-
If you are using roles to determine which users are assessed by the Security Analytics Engine:
- Configure the Security Analytics Engine policy and risk score bounds as in Step 5.
- Select the required roles for users to be authorized by the Security Analytics Engine from the Standard authentication roles list, then click Add Role to add the role to the list of SAE authentication roles. Users not in roles required for authorization by Security Analytics Engine will be authorized for application access based on roles set on the Permissions tab.
The scores at which users will be denied access to the application will be set automatically based on the other scores.
|
|
NOTE: The default action for all threat levels is to allow access. You may edit the threat levels for multiple apps at once by using the commands on the Options menu on the Applications page. |
To configure Security Analytics Engine administrators and helpdesk users
- Navigate to the Roles page.
- To add a user as a Security Analytics Engine administrator, add them to the Admin role.
- To add a user as a Security Analytics Engine helpdesk user, add them to the Security Analytics Engine Helpdesk role.
To access the Security Analytics Engine user interface
- From the Cloud Access Manager Administration portal, navigate to the Settings page and then to the Externalized Access Control page.
- Click the Security Analytics Engine Administration link. If you are logged on as the fallback user you will be prompted to authenticate. Use the same password that you used to authenticate to Cloud Access Manager. If you are logged on as a federated user you will be taken directly to the Security Analytics Engine administration page without the need to re-authenticate.
From the Cloud Access Manager Application portal:
- Authenticate to the Cloud Access Manager Application portal as a user who is a member of either the Admin or Security Analytics Engine Helpdesk roles.
- Click the Security Analytics Engine Administration link.