
Using connection handlers
Connection handlers allow you to automatically perform specific actions on connected data systems before, after, or instead of specific data synchronization operations (such as create, modify, move, rename, delete, or password synchronization operation). When creating a connection handler, you can specify the action you want to perform and set the conditions for triggering the action.
Out of the box, One Identity Quick Connect Sync Engine includes only one predefined handler type that can execute your custom PowerShell script and thus perform the action you want.
|
|
IMPORTANT: If the predefined connection handler is configured to run your PowerShell script instead of a data synchronization operation, the script must return a system entry object. |

You can also develop and implement your own handler types. For more information, see the Software Development Kit (SDK) supplied with this One Identity Quick Connect Sync Engine version.
To create, modify, or delete handlers for a connection, you can use the Connection Handlers tab in the connection settings:
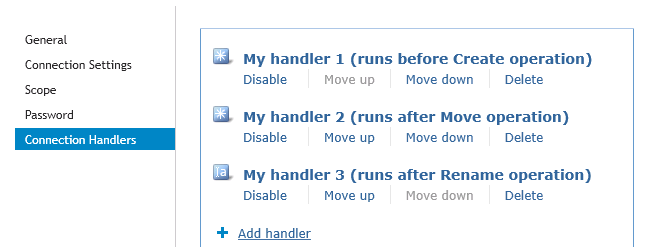
This tab provides the following elements:
- Add handler. Starts a wizard that helps you add a new connection handler. By default, the wizard creates a new handler that allows you to run your PowerShell script.
- Disable. Disables the connection handler.
- Enable. Enables the connection handler.
- Move up. Moves the connection handler one position up in the list.
- Move down. Moves the connection handler one position down in the list.
- Delete. Deletes the connection handler.
To create a connection handler
- In the Quick Connect Administration Console, open the Connections tab.
- Click the name of the connection for which you want to create a handler, and then click the Connection Handlers tab.
- Click Add handler, and then follow the steps in the wizard to create your handler.
To modify a connection handler
- In the Quick Connect Administration Console, open the Connections tab.
- Click the name of the connection for which you want to modify a handler, and then click the Connection Handlers tab.
- Click the name of the handler you want to modify, and then modify the handler settings as necessary. When you are finished, click OK.
You can also do the following:
- Change the order in which handlers are activated. One Identity Quick Connect Sync Engine activates handlers in the order in which they appear in the list. To move a handler in the list, use the Move up and Move down links below the handler.
- Disable or enable handlers. You can enable or disable existing handlers. To do so, use the Enable or Disable link below the handler.
- When you are finished, click Save.
To delete a connection handler
- In the Quick Connect Administration Console, open the Connections tab.
- Click the name of the connection for which you want to delete a handler, and then click the Connection Handlers tab.
- Click Delete below the handler you want to delete.
Specifying password synchronization settings for a connection
For each connected data system that supports password synchronization, you can set password synchronization settings. These settings allow you to enable or disable password synchronization and manage passwords in the data system by using Quest Password Manager.
Optionally, you can use the password synchronization settings to type a custom Windows PowerShell script you want to run each time the password synchronization completes for the connected data system.
To specify password synchronization settings
- In the Quick Connect Administration Console, open the Connections tab.
- Click the name of the connection for which you want to modify password synchronization settings.
- Open the Password tab, and use the following options to modify the password synchronization settings as necessary:
- Synchronize and manage passwords. Allows you to enable or disable password synchronization for this connection. Selecting this check box also allows you to manage passwords in the connected data system by using Quest Password Manager. For more information about this product, please visit www.quest.com/password-manager.
- Synchronize passwords for objects of this type. Allows you to specify an object type that will participate in password synchronization. Click Select next to this text box, and then specify the object type you want. This option is only available for certain types of connected systems, such as LDAP directory service.
- Password synchronization method. Allows you to select a password synchronization method. This option is only available for certain types of connected systems, such as LDAP directory service. You can select one of the following methods:
- Write password to this attribute. Displays the object attribute in which the object password will be stored. To specify a different attribute, click Select next to the text box in this option.
- Use LDAP extended operation. Allows you to automate the synchronization of user passwords in the connected data system regardless of the form of the authentication identity or the password storage mechanism used (for example, in the case of non-directory storage of passwords).
- Configure Query. Allows you to use an SQL query to specify the data you want to participate in the password synchronization. Click Configure, and then type your SQL query. This option is only available for certain types of connected systems, such as SQL Server or Oracle Database. For a sample SQL query, see the documentation supplied with the Quick Connect connector pack you are using.
- When you are finished, click Save.
Synchronizing identity data
- Getting started with identity data synchronization
- Managing synchronization workflows
- Managing workflow steps
- Using workflow alerts
Getting started with identity data synchronization
To synchronize identity data between connected data systems, you can use synchronization workflows and synchronization steps. A synchronization workflow is a set of data synchronization operations called synchronization steps. A workflow can include one or more steps. Each synchronization step defines a synchronization operation to be run between the source and target connected data systems. To manage workflows and their steps, you can use the Workflows tab in the Quick Connect Administration Console.
You can configure a synchronization step to perform one of the following operations:
- Provision. Creates objects in the target data system based on the changes made to specific objects in the source data system. When creating a new object in the target data system, One Identity Quick Connect Sync Engine generates initial values for the object attributes using the attribute population rules you have configured.
- Update. Modifies object attributes in the target data system based on the changes made to specific objects in the source data system. To specify the objects that will participate in the update operation you can use object mapping rules. For more information, see Mapping objects.
- Deprovision. Modifies or removes objects in the target data system after their counterparts have been disconnected from the source data system. One Identity Quick Connect Sync Engine can be configured to remove target objects permanently or change them to a specific state. To specify the objects that will participate in the deprovision operation you can use object mapping rules. For more information, see Mapping objects.
When configuring a synchronization step you can specify the following:
- Containers to which you want to provision or move objects.
- Settings to generate names for objects being created or modified.
- Settings to synchronize group memberships.
- Settings to synchronize attribute values.
To synchronize identity data between two data systems, you need to create a synchronization workflow, populate the workflow with synchronization steps, and then run the workflow manually or schedule the workflow run. The following figure illustrates how One Identity Quick Connect Sync Engine synchronizes identity data in connected data systems:
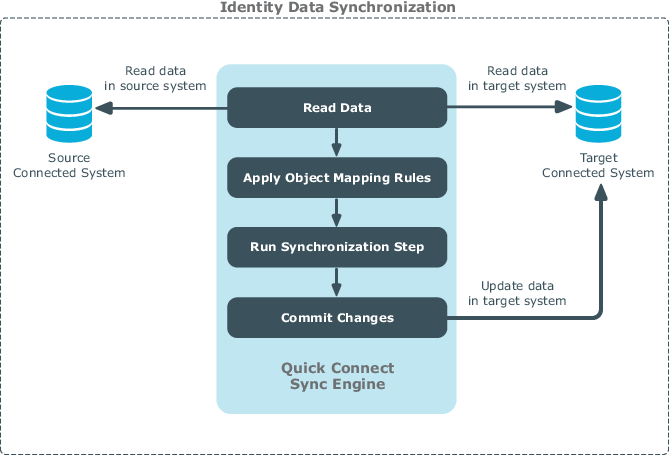
Running a workflow causes One Identity Quick Connect Sync Engine to read data in the source and target data systems according to the settings in the workflow steps and prepare a list of changes to be made in the target system. Then, you can commit these changes to the target data system.
Running a workflow manually allows you to review a list of changes before committing them to the target data system. A scheduled workflow run always commits changes to the target data system automatically.
You can configure as many synchronization workflows as needed, each performing its own set of synchronization steps.
In this chapter: