New Search interface
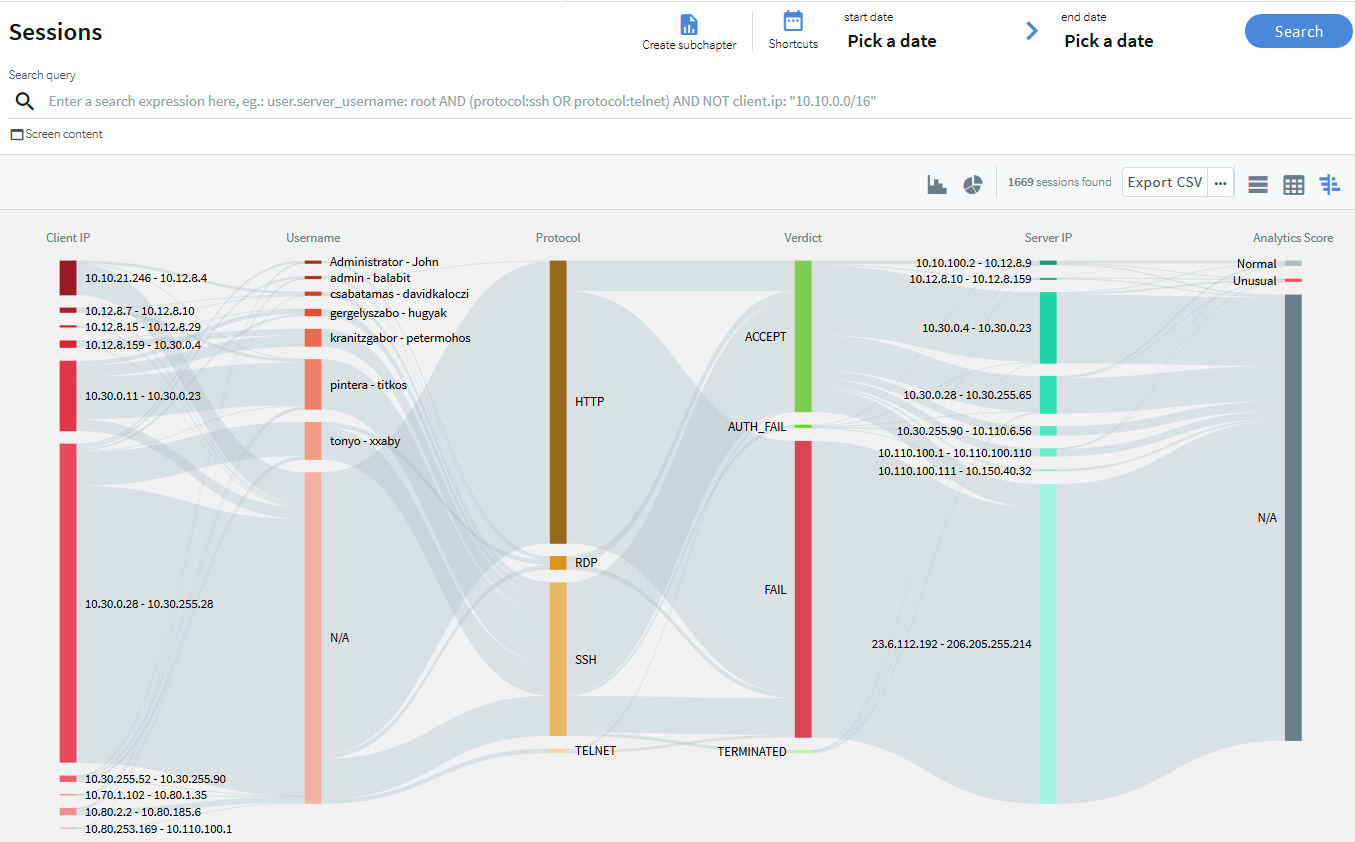
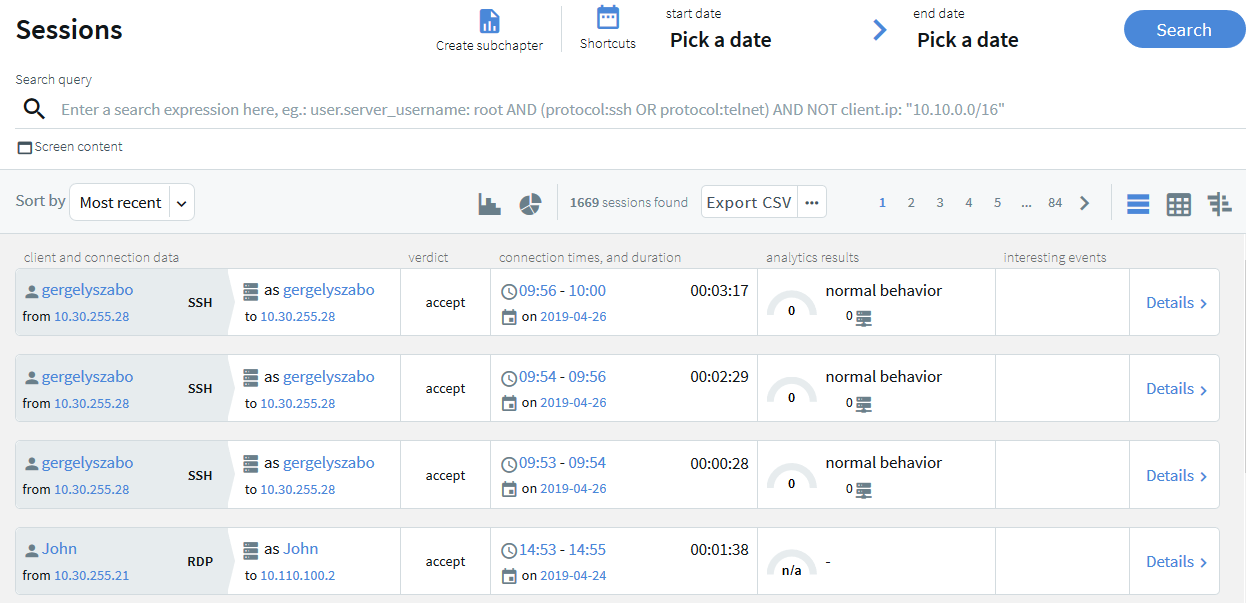
SPS's new search interface is built on a more modern technology stack and comes with a lean design and an easy-to-use interface. Our goal in overhauling the old search functionality was to better serve user needs and improve alignment with possible use cases. The result is a new search interface that offers ways to perform more complex searches in a more flexible way, often with improved speed.
Instead of simple tables, you can now display session information in a more visual view that allows you to get a faster overview about the important information of the sessions. For ongoing sessions, the Search interface is updated in real-time to always show the most up-to-date information. For more information on the new Search interface, see "Using the Search interface" in the Administration Guide.
Figure 1: Search interface improvements
Quick statistics and timeline from search results
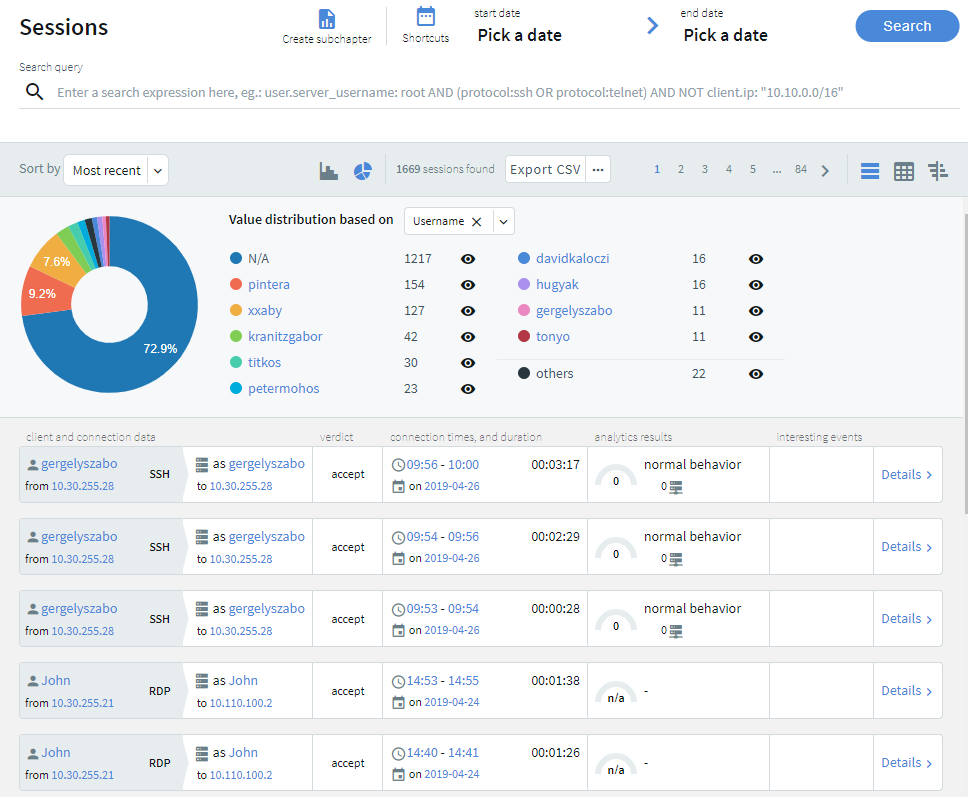
The Search interface can now display a timeline showing the search results. Also, you can quickly sort and visualize the distribution of the sessions based on their various metadata, for example, username, server address, and so on.
Figure 3: Search — Displaying statistics and timeline
Screen content search improvements
-
You can now combine content search queries arbitrarily with other search queries. As a result, flow view and quick statistics charts on the Search interface can handle content searches.
-
Screen content search is now available in search clusters.
-
Screen content hits are no longer limited to 3000 per query.
Search queries and statistics as custom report subchapters
It is now possible to turn any search query or statistics into a subchapter that can be included in reports. You can define reports about the monitored traffic in a more flexible and easy-to-use way than was possible before. Reporting subchapters can also include reports about specific content search queries (Reporting > Search subchapters). For details, see "Creating search-based report subchapters from scratch" in the Administration Guide.
Improvements to central configuration management
Starting with version 5 F6, it became possible to join multiple SPS nodes into a cluster, monitor their status, and update their configuration from a central location. In this new version, this feature was improved in a number of ways:
- You can now promote a node to become the Central Management node and join additional nodes to the cluster using the web interface of One Identity Safeguard for Privileged Sessions. Previously, building a cluster was only possible through the REST API.
- When building a cluster, using the REST API, you can now query the join status of nodes to find out whether or not particular nodes have been joined to a cluster.
- When using a configuration synchronization plugin, it is now possible to enable the plugin through the web interface. Previously, this was also only possible through the REST API.
- SPS now also provides information about the status of configuration synchronization.
- When you want to create a backup or archive policy on SPS instances that are nodes in a cluster, you can choose to include the node ID in the path to the relevant directory name to prevent cluster nodes from backing up data to the same location, and so overwriting each other's data. For details, see "Data and configuration backups" in the Administration Guide and "Archiving or cleaning up the collected data" in the Administration Guide.
- When querying the status of all nodes or one particular node using the /api/cluster/status endpoint, the response now contains the hash of the latest downloaded configuration file (downloaded_xml_hash) that the nodes used for configuration synchronization.
Note that the cluster management feature is currently in an experimental status: consult your Support representative before enabling it.
For details, see "Assigning roles to nodes in your cluster" in the Administration Guide and "Manage Safeguard for Privileged Sessions clusters" in the REST API Reference Guide.
Central search across clusters
Starting with SPS version 5 F6, it became possible to join multiple SPS nodes into a cluster, monitor their status, and update their configuration from a central location. Starting with this version, when you have a cluster of nodes set up, you have the possibility to search all session data recorded by all nodes in the cluster on a single node. This is achieved by assigning roles to the individual nodes in your cluster: you can set up one of your SPS nodes to be the Search Master and the rest of the nodes to be Search Minions. Search Minions send session data that they record to the Search Master, and the Search Master acts as a central search node. Consult with the Support Team to learn more about network and capacity requirements.
For more information, see "Searching session data on a central node in a cluster" in the Administration Guide.
One Identity Safeguard for Privileged Analytics on SPS
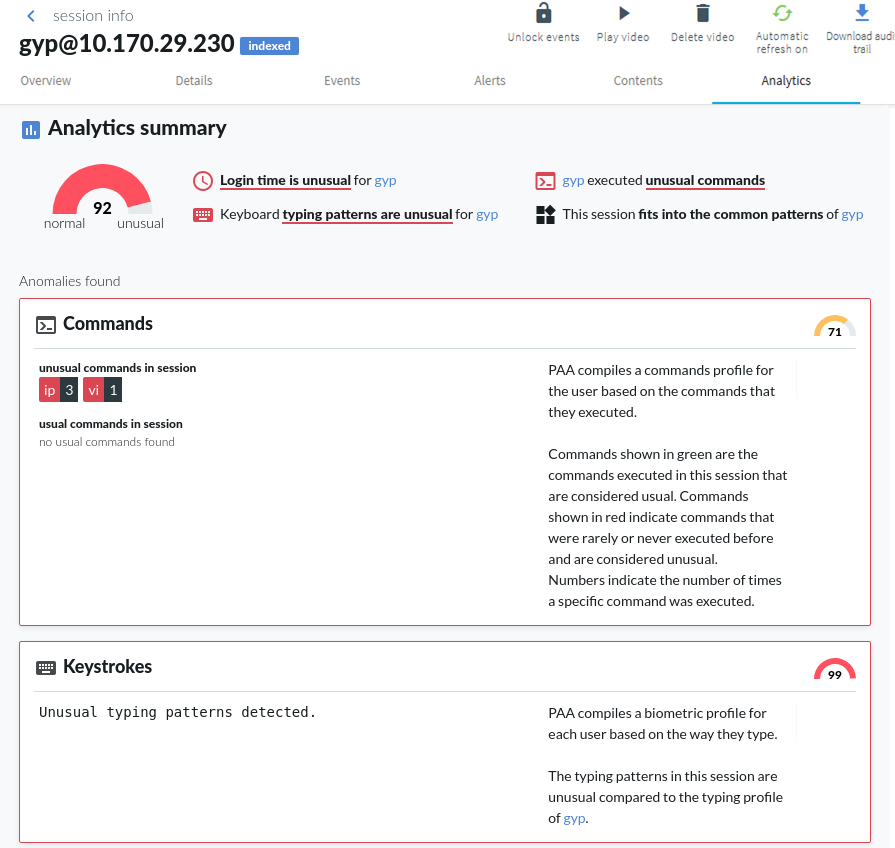
You can now run One Identity Safeguard for Privileged Analytics directly on SPS, to get insight about your privileged users, prevent identity theft, and more. To enable One Identity Safeguard for Privileged Analytics and analyze the behavior of your users, SPS requires a special license. Also, depending on the number of your users and sessions, the performance and sizing of SPS must be considered. If you are interested in One Identity Safeguard for Privileged Analytics, contact your One Identity representative, or directly contact our Sales Team.
If you are using One Identity Safeguard for Privileged Analytics, you can configure your indexer policies to extract biometric data from the recorded sessions for keystroke and pointing-device analytics.
Figure 4: One Identity Safeguard for Privileged Analytics
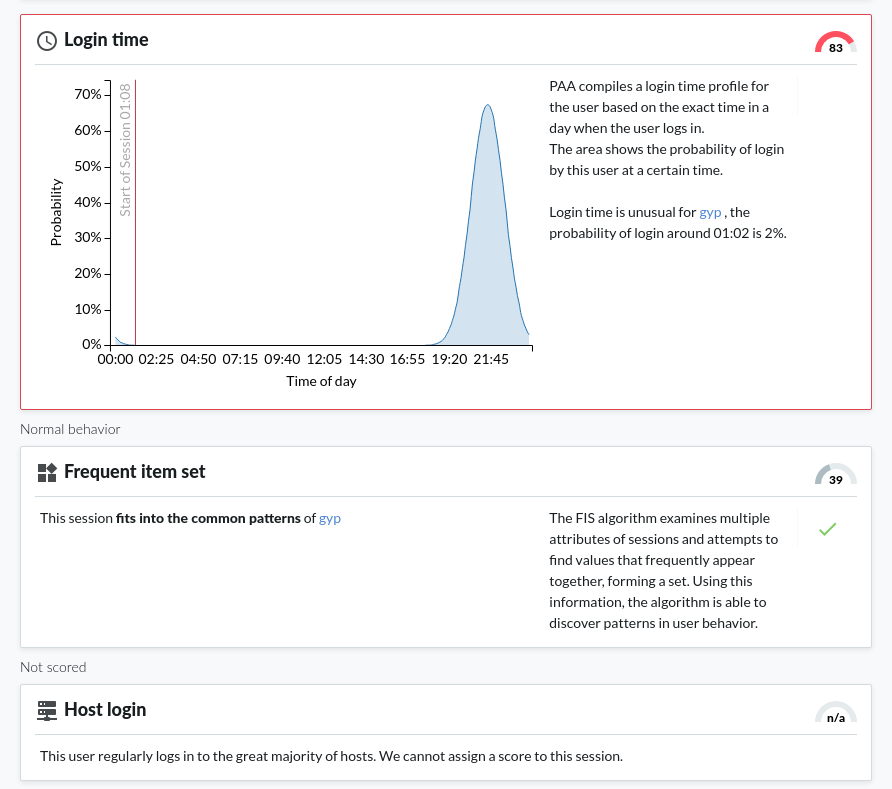
Detecting script usage with One Identity Safeguard for Privileged Analytics
Through enabling the Safeguard for Privileged Analytics module (licensed separately but can be enabled free for a 2-month trial), it is now possible to detect user accounts that show highly periodic and repetitive behavior that is likely the result of scripted activity.
For more information, see Safeguard for Privileged Analytics Configuration Guide.
Gapminder algorithm
The gapminder algorithm is able to detect scripted sessions based on the time gaps between the sessions that belong to a given account. When the time gaps between sessions have typical, repeating values, then that suggests unnatural periodic behavior.
Improvements to command algorithm
The command algorithm of One Identity Safeguard for Privileged Analytics has been improved significantly. Previously, the algorithm only analyzed users' activities separately for each user. Starting with this version, we also check if a command is issued frequently on the given server or globally by the majority of the users to improve the false positive rate.
New analytics algorithms
The window title algorithm analyzes window titles in graphical protocol sessions to uncover unusual user behavior. It identifies users based on what window titles they usually have on their screen. It is currently an experimental algorithm and is disabled by default.
The host login algorithm analyzes how likely it is for a user to log in to a given host. Peer groups are taken into consideration: when users log in to hosts that are unusual for them but frequently used by their peers, such sessions are scored low.
The frequent item set (FIS) algorithm examines multiple attributes of sessions and attempts to find values that frequently appear together, forming a set. Using this information, the algorithm is able to discover patterns in user behavior.
Fine-tune SPA configuration:
You can now configure which analytics algorithms to execute separately for every Connection Policy using Analytics Policies.
Self-evaluation of algorithms:
It is now possible to run a self-evaluation tool on all algorithms to get feedback about how well they perform in a given environment. Using the results of the evaluation, it is possible to fine-tune your algorithms where necessary.
For details, see Safeguard for Privileged Analytics Configuration Guide.
Free 2-month trial of One Identity Safeguard for Privileged Analytics available for all users
You can enable One Identity Safeguard for Privileged Analytics for free for 60 days on your SPS host to gain insight into what your users are doing, and how risky their actions are.
For more information, see Safeguard for Privileged Analytics Configuration Guide.
SIEM forwarder
You can now forward the log messages and events related to what happens in the privileged sessions to an external SIEM, such as Splunk or Arcsight, or other third-party systems that enable you to search, analyze, and visualize the forwarded data. SPS can send these events as industry-standard RFC3164 syslog messages, with the data formatted either as JSON or in Common Event Format (CEF).
For more information, see "Using the universal SIEM forwarder" in the Administration Guide.
- The Duo Multi-Factor Authentication plugin has been updated for Duo Client version 3.3.0.
- A new Credential Store plugin is available for Safeguard for Privileged Passwords.
- A new Log Adapter plugin is available for SSHD application logs.
Improved Splunk integration
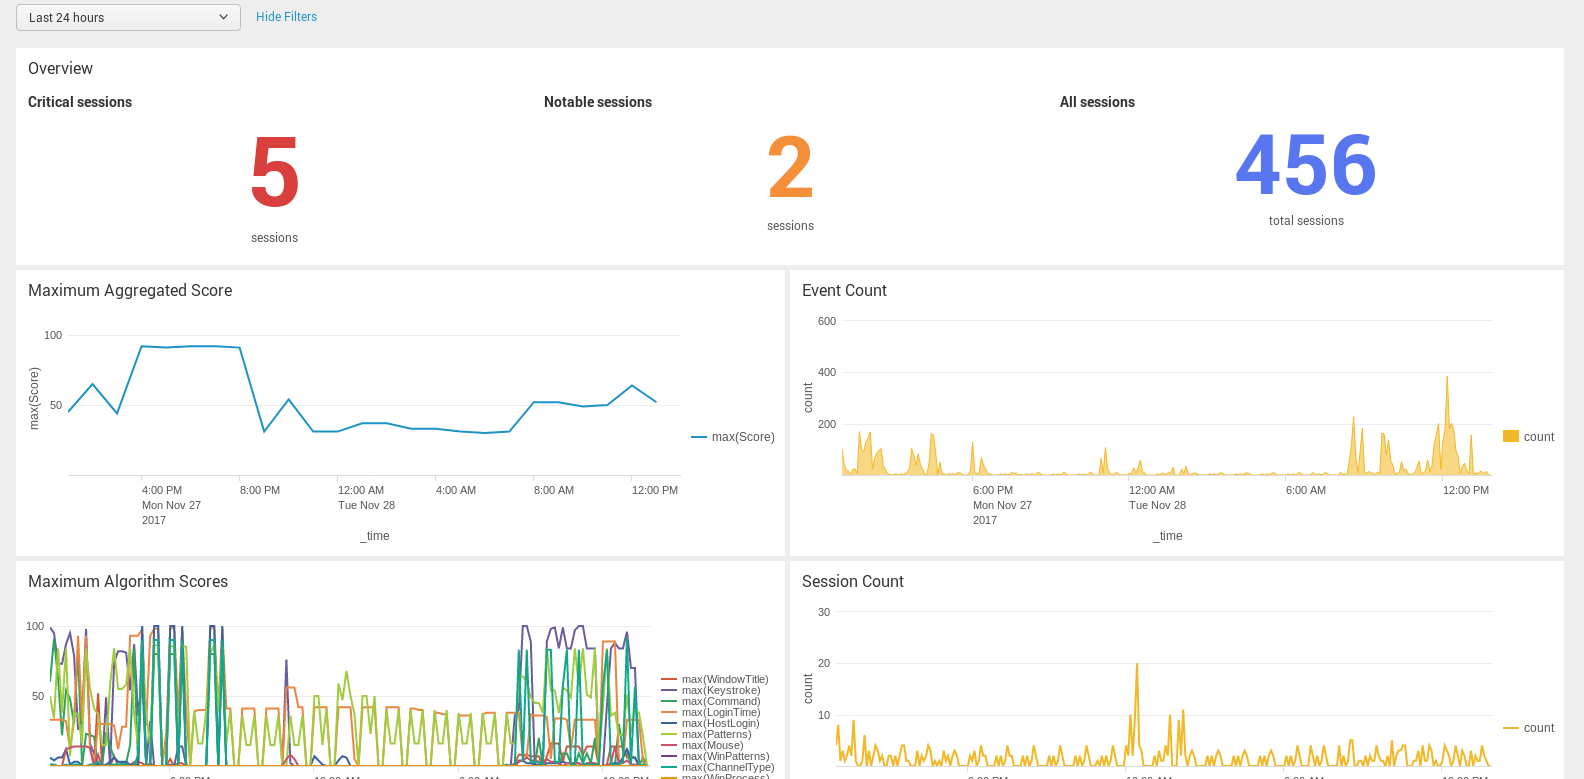
Forwarding data from SPS to Splunk has been greatly simplified, now you can configure SPS on the web interface to do so. Also, the amount of data forwarded to Splunk has been optimized. For details, "Using the Splunk forwarder" in the Administration Guide.
Figure 5: Basic Settings > Management > Splunk forwarder — Sending session data to Splunk
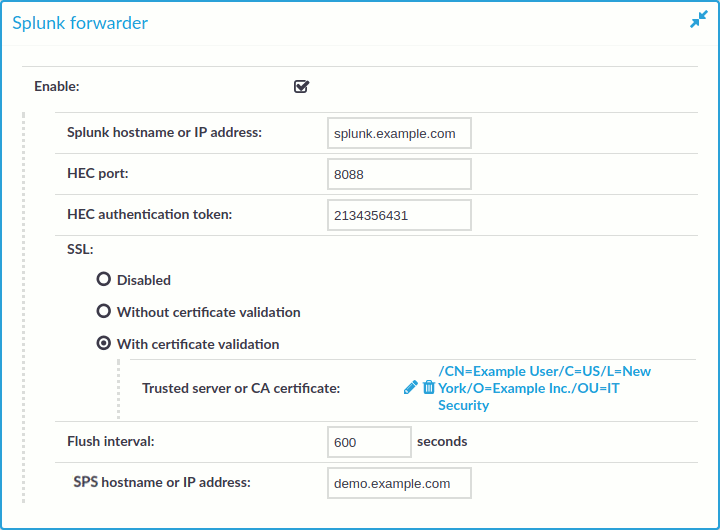
Figure 6: The One Identity Safeguard for Privileged Sessions App for Splunk
New Authentication and Authorization plugins
SPS acts as a central authentication gateway, enforcing strong authentication before users access sensitive IT assets. SPS can integrate with remote user directories to resolve the group memberships of users who access nonpublic information. Credentials for accessing information systems can be retrieved transparently from SPS's local credential store or a third-party password management system. This method protects the confidentiality of passwords as users can never access them. When used together with a multi-factor authentication provider, SPS directs all connections to the authentication tool, and upon successful authentication, it permits the user to access the information system.
SPS can interact with your third-party multi-factor authentication account and can automatically request strong multi-factor authentication for your privileged users who are accessing the servers and services protected by PSM. When used together with a third-party multi-factor authentication, SPS directs all connections to the tool, and upon successful authentication, it permits the user to access the information system.
The integration adds an additional security layer to the gateway authentication performed on SPS.
Multi-factor authentication plugins are available for the following products:
-
Duo
For an overview, see:
For detailed tutorial and configuration instructions, see: Duo Multi-Factor Authentication - Tutorial
-
inWebo
For an overview, see:
For detailed tutorial and configuration instructions, see: inWebo Multi-Factor Authentication - Tutorial
-
Okta
For an overview, see:
For detailed tutorial and configuration instructions, see: Okta Multi-Factor Authentication - Tutorial
-
RSA
For an overview, see:
For detailed tutorial and configuration instructions, see:
-
Starling
For an overview, see:
For detailed tutorial and configuration instructions, see: Starling Two-Factor Authentication- Tutorial
-
YubiKey
For an overview, see:
For detailed tutorial and configuration instructions, see: YubiKey Multi-Factor Authentication - Tutorial
Other changes
-
Plugin configuration files in debug bundle: When creating debug bundles for troubleshooting purposes (for details, see "Collecting logs and system information for error reporting" in the Administration Guide), SPS now includes the configuration files of any plugins installed. Note that depending on the plugin, these configuration files can contain sensitive information, such as passwords or API keys. In this case, edit the plugin-related files in the plugins directory of the debug bundle and delete the sensitive information.

