
Configuring advanced routing on Cisco routers
The following describes how to configure a Cisco router to redirect selected traffic to One Identity Safeguard for Privileged Sessions (SPS) instead of its original destination. This procedure should work on most modern Cisco IOS releases but was specifically tested on IOS version 12.3.
To configure a Cisco router to redirect selected traffic to SPS instead of its original destination
-
Create an ACL (Access Control List) entry that matches the client and server subnets and the to-be-audited port. Keep in mind that whatever is permitted by this ACL is what will be matched, so make sure that the scope of the ACL entry is narrowed down as much as possible.
#(config) ip access-list extended ssh-inbound
#(config-ext-nacl) permit tcp <src net> <src mask> <dst net> <dst mask> eq <dst port>
Example: Configuring an ACL entry for Cisco policy routing
For example, if the clients are in the 192.168.0.0/24 subnet, the servers are located in the 10.0.0.0/24 subnet, and the clients access the servers using port 22 (the default port of the SSH protocol), then the permit clause should be:
#(config-ext-nacl) permit tcp 192.168.0.0 0.0.0.255 10.0.0.0 0.0.0.255 eq 22
TIP: Cisco ACLs use inverse netmasks for defining network addresses. To calculate an inverse mask given a subnet mask, simply subtract each octet value from 255.
-
Create an ACL entry that matches the reply packets coming from the server zone and targeted at the client zone to make sure that replies are reaching the SPS.
#(config) ip access-list extended ssh-outbound
#(config-ext-nacl) permit tcp <dst net> <dst mask> eq <dst port> <src net> <src mask>
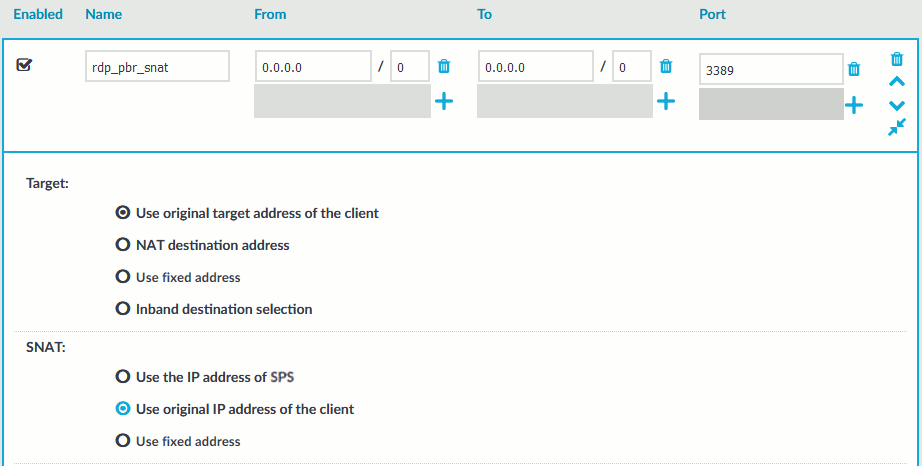
NOTE: This step is only required if you want to use Source NAT (IP Spoofing) instead of SPS’s address towards the monitored servers.
Figure 307: Control > Connections — Using SNAT
Example: Configuring an ACL entry for reply packets with Cisco policy routing
In case of the example in step 1, the permit clause should be:
#(config-ext-nacl) permit tcp 10.0.0.0 0.0.0.255 eq 22 192.168.0.0 0.0.0.255
-
Create a route-map entry. It controls which packets are affected by policy routing and where they should be forwarded to. The match commands specify the conditions under which policy routing occurs. The set commands specify the routing actions to perform if the criteria enforced by the match commands are met. A new route-map can be defined as follows:
#(config) route-map scb-inbound
-
Set your route-map to match the traffic in ACL ssh-inbound:
#(config-route-map) match ip address ssh-inbound
-
Set an action on the matching traffic. Define a next-hop entry to redirect the traffic to the SPS.
#(config-route-map) set ip next-hop <SPS IP address>
-
-
Create another route-map that controls the reply packet flow.
#(config) route-map scb-outbound
#(config-route-map) match ip address ssh-outbound
#(config-route-map) set ip next-hop <SPS IP address>
NOTE: This step is only required if you want to use Source NAT (IP Spoofing) instead of SPS’s address towards the monitored servers.
Figure 308: Control > Connections — Using SNAT
-
Apply the route-map to the appropriate interfaces.
-
First, add the ssh-inbound route-map entry to the interface facing the clients:
#(config) interface <interface-facing-the-clients>
#(config-if) ip policy route-map scb-inbound
-
Then add the ssh-outbound route-map entry to the interface facing the servers:
#(config) interface <interface-facing-the-servers>
#(config-if) ip policy route-map scb-outbound
Expected result:
The traffic from the clients targeting the specified port of the servers is redirected to SPS. Therefore, SPS can be configured to control and audit this traffic.
The full configuration for the above topology:
! interface facing the clients
interface FastEthernet0/0
 ip address 192.168.0.254 255.255.255.0
 ip policy route-map scb-inbound
 duplex full
 speed auto
 no mop enabled

! interface facing the SCB
interface FastEthernet0/1
 ip address 172.16.0.254 255.255.255.0
 duplex full
 speed auto
 no mop enabled

! interface facing the servers
interface FastEthernet1/0
 ip address 10.0.0.254 255.255.255.0
 ip policy route-map scb-outbound
 duplex full
 speed auto
 no mop enabled

! access lists matching the server and client subnets and the SSH port - incoming packets
ip access-list extended ssh-inbound
 permit tcp 192.168.0.0 0.0.0.255 10.0.0.0 0.0.0.255 eq 22
! access lists matching the server and client subnets and the SSH port - reply packets
ip access-list extended ssh-outbound
 permit tcp 10.0.0.0 0.0.0.255 eq 22 192.168.0.0 0.0.0.255

! policy routing entry matching on the incoming SSH connections and
! redirecting them to the SCB external interface
route-map scb-inbound permit 10
 match ip address ssh-inbound
 set ip next-hop 172.16.0.1

! the following part is only required for SNAT-based SCB configuration
! policy routing entry matching on the SSH reply packets and
! redirecting them to the SCB external interface
route-map scb-outbound permit 10
 match ip address ssh-outbound
 set ip next-hop 172.16.0.1
-

Configuring advanced routing on Sophos UTM (formerly Astaro Security Gateway) firewalls
The following describes how to configure a Sophos UTM firewall to redirect selected traffic to One Identity Safeguard for Privileged Sessions (SPS) instead of its original destination. Interface 1 will be referred to as 'Internal' and Interface 2 will be referred to as 'ServerFarm'.
To configure a Sophos UTM firewall to redirect selected traffic to SPS instead of its original destination
-
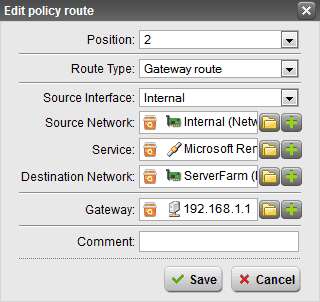
On the Policy Routes tab of the Sophos UTM firewall, click New Policy Route.
-
Figure 309: New Policy Route
In the dialog box, enter the following settings:
-
Position: Set the position number, defining the priority of the policy route. Lower numbers have higher priority. Routes are matched in ascending order. Once a route has been matched, routes with a higher number will not be evaluated anymore.
-
Route Type: Select Gateway route. Packets will be sent to a particular host (gateway).
-
Source Interface: Select Internal. This is the interface where the data packet to be routed arrives from.
-
Source Network: Select Internal (Network). This is the source network of the data packets to be routed.
-
Service: Select Microsoft Remote Desktop Protocol. This is the service definition that matches the data packet to be routed.
-
Destination Network: Select ServerFarm (Network). This is the destination network of the data packets to be routed.
-
Gateway: Select the IP address of SPS. This is the router where the gateway will forward data packets to.
-
Comment: Optionally, enter a description or other information.
-
-
Click Save.
-
Click the status icon to activate the route.
-
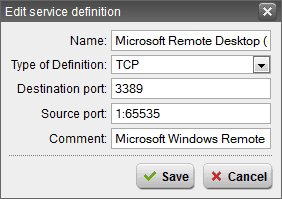
Navigate to Definitions & Users > Service Definitions and click New Service Definition.
-
Figure 310: New Service Definition
In the dialog box, enter the following settings. It will ensure that the policy will apply to all TCP/3389:
-
Name: Enter a descriptive name for the definition (for example Microsoft Remote Desktop Protocol).
-
Type of Definition: Select TCP. This is the service type.
NOTE: The definition type cannot be changed after saving the definition. To change the definition type, delete the service definition and create a new one with the desired settings.
-
Destination port: Enter 3389. This is the destination port that can either be entered as a single port number (for example 80), or as a port range, using a colon as delimiter (for example 1024:64000).
-
Source port: Enter 1:65535. This is the source port that can either be entered as a single port number (for example 80), or as a port range, using a colon as delimiter (for example 1024:64000).
-
Comment: Optionally, enter a description or other information.
-
-
Click Save. The new definition appears in the service definition list.
With this step, the client-server routing is configured.
-
To configure the server-client routing, create another policy route, and In the dialog box, enter the following settings:
-
Position: Set the position number, defining the priority of the policy route. Lower numbers have higher priority. Routes are matched in ascending order. Once a route has been matched, routes with a higher number will not be evaluated anymore.
-
Route Type: Select Gateway route. Packets will be sent to a particular host (gateway).
-
Source Interface: Select ServerFarm. This is the interface where the data packet to be routed arrives from.
-
Source Network: Select ServerFarm (Network). This is the source network of the data packets to be routed.
-
Service: Select 3389. This is the service definition that matches the data packet to be routed.
-
Destination Network: Select Internal (Network). This is the destination network of the data packets to be routed.
-
Gateway: Select the IP address of SPS. This is the router where the gateway will forward data packets to.
-
Comment: Optionally, enter a description or other information.
-
Using SCP with agent-forwarding
When the client uses SSH to access a target server via One Identity Safeguard for Privileged Sessions (SPS) and authenticates with the public keys, the SPS Authentication Policy has Public key > Agent configured on the server-side. If the client supports agent-forwarding, this works well. However, scp does not: it always adds the -a option to the command-line to disable agent-forwarding. Explicitly allowing agent-forwarding with the -A or the -oForwardAgent yes command-line option, or writing ForwardAgent yes into the configuration has no effect, because the implicit -a at the end of the command-line takes precedence.
Solution 1: Use a wrapper script
The scp application can be started with the -S option to use an external application to create the encrypted connection. On Linux and UNIX platforms, this external application can be, for example, the following script that removes the unnecessary option from the scp command line.
#!/usr/bin/perl
exec '/usr/bin/ssh', '-A', map {$_ eq '-oForwardAgent=no' ? ( ) : $_} @ARGV
If you want your clients to use this script transparently, you can create an alias for it with the following command:
alias scp='scp -S <path-to-the-script-on-the-client>'
Solution 2: Use ssh master-channels
This solution relies on sending scp through an SSH master-control channel. In this case, scp does not need agent-forwarding, because it is already performed during the ControlMaster setup. The advantage of this solution is that the scp connection is setup quickly, because no authentication is needed, since the connection is already open. The disadvantage is that first a ControlMaster connection must be opened to the target host using the following command:
ssh -M -S /tmp/<address-of-the-target-server> <address-of-the-target-server>
When staring scp, reference the control path created with the previous command:
scp -oControlPath=/tmp/<address-of-the-target-server> [[user@]host1:]file1 ... [[user@]host2:]file2
Solution 3: Patch the scp source
You can simply patch the scp source to overcome the problem, but then you need to recompile and re-install scp on every platform you use in your environment. The following is a sample patch for openssh-5.6p1:
--- scp-org.c    2010-07-02 05:37:33.000000000 +0200
+++ scp-new.c    2010-09-08 17:56:33.000000000 +0200
@@ -339,7 +339,6 @@
     args.list = NULL;
     addargs(&args, "%s", ssh_program);
     addargs(&args, "-x");
-    addargs(&args, "-oForwardAgent no");
     addargs(&args, "-oPermitLocalCommand no");
     addargs(&args, "-oClearAllForwardings yes");
Solution 4: Use fix or mapped keys on server-side
This is not agent-forwarding anymore, but scp still can use keys. Instead of passing the user-keys to the target server, SPS can authenticate on the server using a fix key, or a separate key for every user. Setting the server-side keys on SPS (or fetching them from LDAP), has the following advantages:
-
The user cannot bypass SPS and directly connect to the target server
-
Key-handling in the server environment becomes much simpler, because you do not have to import the user-keys to every host (if this is done locally, without a central identity management system)
For details on configuring server-side keys on SPS, see Relayed authentication methods.
Solution 5: WinSCP and agent-forwarding
WinSCP is a common tool for Windows to transfer files using SFTP/SCP. To use agent-forwarding in WinSCP, enable it in the SSH > Authentication options and load your keys.
Security checklist for configuring One Identity Safeguard for Privileged Sessions (SPS)
The following checklist is a set of recommendations and configuration best practices to ensure that your One Identity Safeguard for Privileged Sessions (SPS) is configured securely.