Configuring connections: RDP
The following procedures will provide a skeleton of configuring RDP connections in SPS. If you want to have a deeper understanding, see the in-depth detailed procedure in Configuring connections.
Configure an RDP connection with fixed destination IP
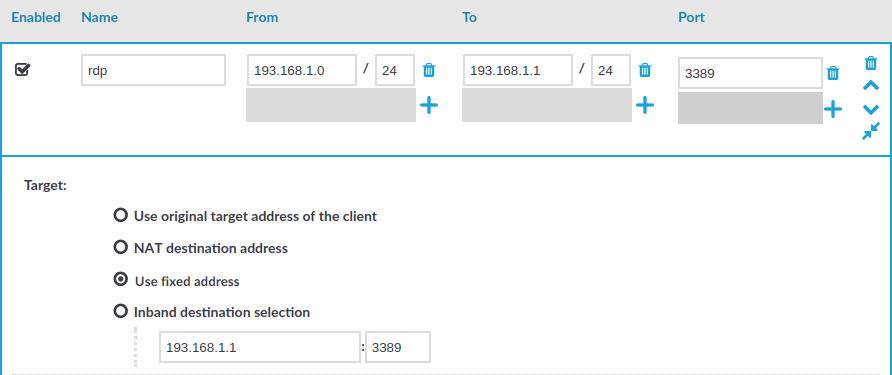
The following describes how to configure a basic Remote Desktop (RDP) connection in SPS. This Connection Policy uses a fixed destination IP, that is, it receives connections on an IP address of SPS (on the default RDP port 3389), and forwards them to a server explicitly set in the policy.
The destination address is the address of the server where the clients finally connect to. To modify the destination address of a connection, complete the following steps.
Prerequisites:
-
A SPS appliance where you have already completed the Welcome Wizard.
-
A computer that accepts Remote Desktop connections (and RDP server). SPS must be able to access the network of the RDP server (adjust any routing and firewall settings in your network to permit this connection).
To configure a basic RDP connection in SPS
-
Navigate to RDP Control > Connections.
-
Click
to define a new connection and enter a name that will identify the connection (for example admin_mainserver).
TIP: It is recommended to use descriptive names that give information about the connection, for example refer to the name of the accessible server, the allowed clients, and so on.
-
Enter the IP address of the client that will be permitted to access the server into the From field. Click
to list additional clients.
-
Enter the IP address that the clients will request into the To field. To test SPS the easiest is to use the IP address of SPS, meaning that the connection will be non-transparent. (To test transparent connections, you must place SPS into the network between the client and the server, or route the traffic that way.)
Figure 11: Configuring fixed IP destination selection for RDP
-
The Target section allows you to configure Network Address Translation (NAT) on the server side of SPS. Destination NAT determines the target IP address of the server-side connection. You can set the destination address as required for your environment. For this example non-transparent connection, select Use fixed address.
-
Enter the IP address and port number of the server. SPS will connect all incoming client-side connections to this server.
You can also enter a hostname instead of the IP address, and SPS automatically resolves the hostname to IP address. Note the following limitations:
-
SPS uses the Domain Name Servers set Basic Settings > Network > Naming > Primary DNS server and Secondary DNS server fields to resolve the hostnames.
-
Only IPv4 addresses are supported.
-
If the Domain Name Server returns multiple IP addresses, SPS selects randomly from the list.
-
-
Click
to save the connection.
This connection allows any user from the client machine to connect to the specified server, but permits only Desktop sessions — other RDP channels like disk redirection are disabled.
-
Test the new configuration: try to initiate an RDP connection from the client (your computer) to the server.
-
After successfully connecting to the server, do something in the connection, then disconnect from the server.
-
Navigate to Search on the SPS web interface. Your sessions are displayed in the list of connections. Note that for the transparent connection, the client addresses the target server, while the non-transparent connection addresses SPS.
-
Click the
icon. A summary will be displayed about the connection.

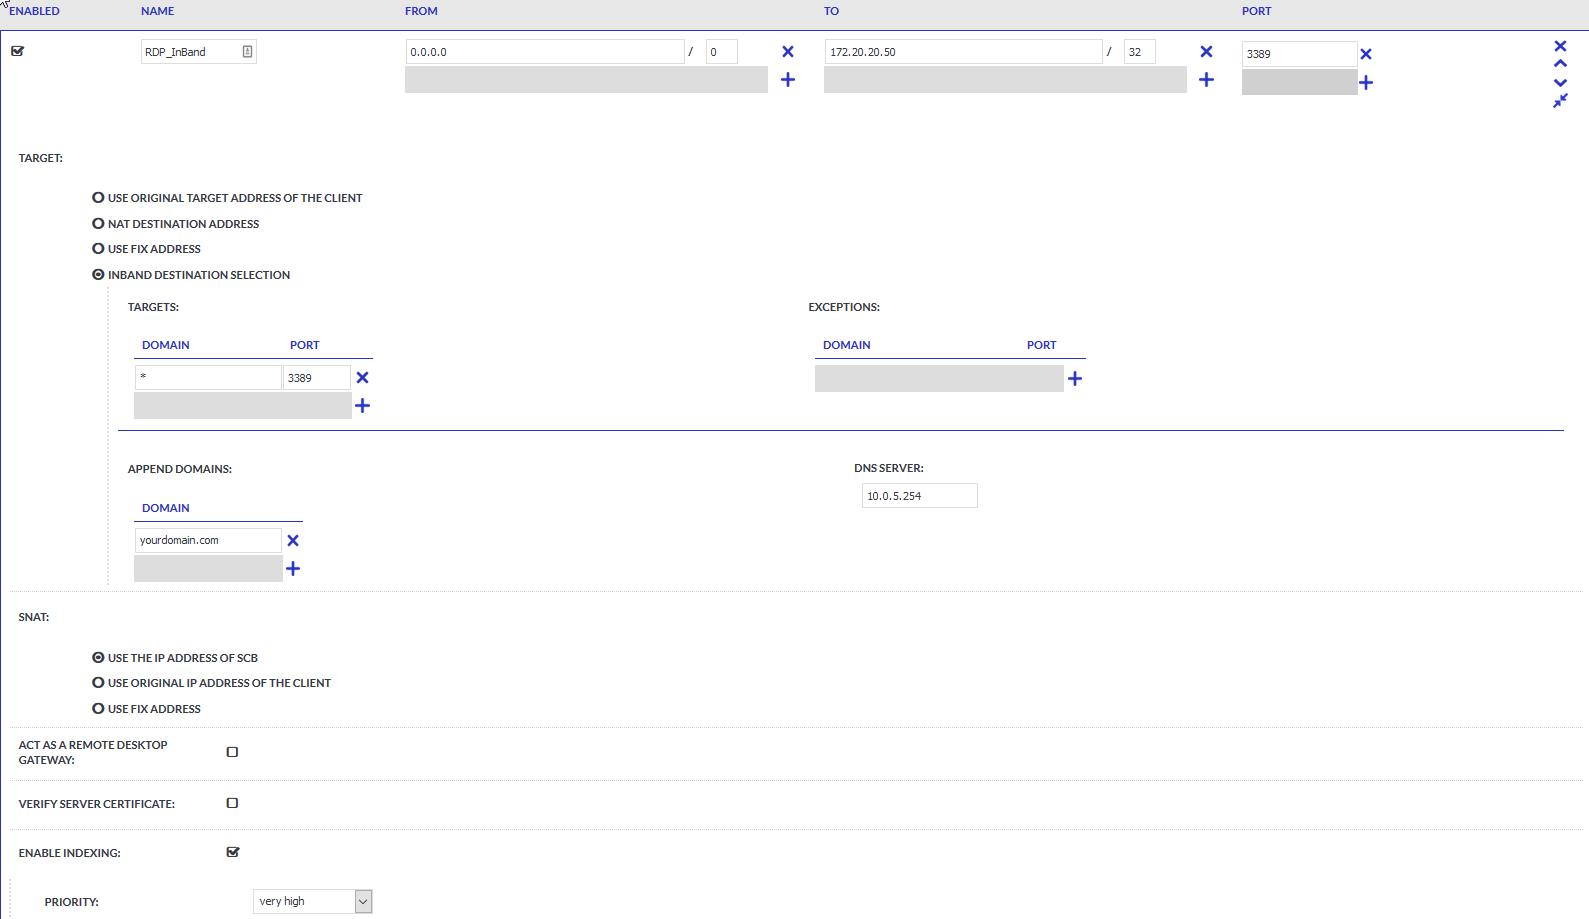
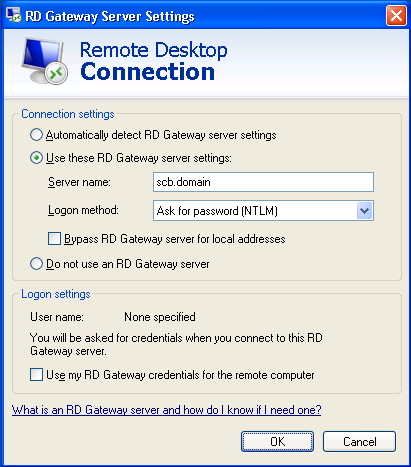
Inband destination selection with Remote Desktop Gateway
Non-transparent operation with inband destination selection in RDP is supported with the implementation of the Remote Desktop Gateway protocol. When it is enabled, end-users configure their MSTSC client to use SPS as an RDP proxy/gateway and keep specifying target server addresses on the General tab the way they are used to.
Figure 12: Inband destination selection via RDP with RD Gateway
Configuring inband destination selection without RD Gateway
The following describes how to configure a Connection Policy to extract the address of the server from the username.
To configure a Connection Policy to extract the address of the server from the username
-
Navigate to the Connection policy you want to modify, for example, to RDP Control > Connections.
-
Select Inband destination selection.
Figure 13: Configuring inband destination selection for Windows connections
-
Enter the addresses of the servers that the users are permitted to access into the Targets field.
-
If the clients can access only a specified port on the server, enter it into the Port field. If the Port is not set, the clients may access any port on the server.
-
If there are any servers that the users cannot target using inband destination selection, add them to the Exceptions field.
-
To use inband destination selection with RDP connections without using SPS as a Remote Desktop Gateway, you must use SSL-encrypted RDP connections.
For details, see Using TLS-encrypted RDP connections.
-
Click
-
Start an RDP session from a Windows machine to SPS.
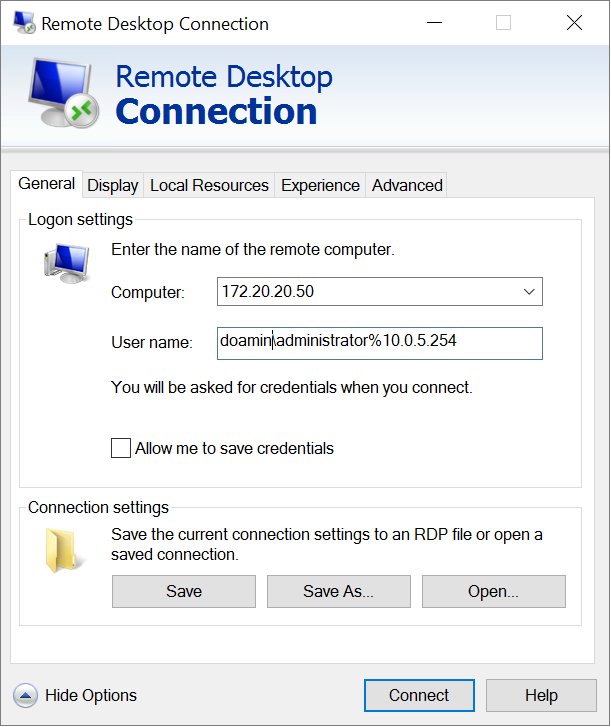
Also, your users have the option to encode the address of the destination server in their username, in the username field of their client application. Note that SPS automatically displays a login screen if it cannot determine the username used in the connection, or you have not encoded a destination server in the username field. You can specify the destination address in the login screen when prompted.
When encoding the address of the destination server in the username, there are a few points to keep in mind. Since most RDP client applications limit which special characters can be used in usernames, this is not always intuitive. For the Microsoft Remote Desktop application (mstsc) and the login screen that SPS displays, note the following points:
-
Use % character to separate the fields, for example: username%my-targetserver
-
To specify the port number of the server (if it does not use the default port), use the caret ^ character, for example: username%my-targetserver^6464
-
To specify an IPv6 address, replace the colons with carets, and enclose the address in parentheses. For example, to target the ::1 IP address, use username%(^^1). To target port 6464 of the same server, use username%(^^1)^6464.
In the following example, a % symbol is passing the destination IP address to SPS, which redirects the connection to the proper client.
Figure 14: Configuring inband destination selection for Windows connections
-