
Creating a simple scenario
-
Connect to SPS.
The SPS virtual machine acquires an IP address from your DHCP server accessible in the virtual environment. After SPS has booted up, the console displays the IP address of the SPS web interface at login prompt. To connect to SPS, use this IP address. For details, or tips if SPS cannot receive an IP address, see "The initial connection to One Identity Safeguard for Privileged Sessions (SPS)" in the Administration Guide.
-
Complete the Welcome Wizard as described in "Configuring One Identity Safeguard for Privileged Sessions (SPS) with the Welcome Wizard" in the Administration Guide. Upload the evaluation license file you have downloaded with your support portal account.
-
Configure a server: set up a host that is on the same subnet as SPS, and enable Remote Desktop (RDP) or Secure Shell (SSH) access to it.
-
Configure a connection on SPS to forward the incoming RDP or Secure Shell (SSH) connection to the host and establish a connection to the host. See "Logging in to One Identity Safeguard for Privileged Sessions (SPS) and configuring the first connection" in the Administration Guide for details.
-
Replay your session in the browser. See "Replaying audit trails in your browser in Search (classic)" in the Administration Guide for details.
In case you have questions about SPS, or need assistance, contact your One Identity representative.
General connection settings
SPS supports transparent and non-transparent proxy operation modes to make deployments in existing network infrastructures as easy as possible. SPS will automatically handle non-transparent and transparent connections simultaneously.
For details, see Modes of operation.
Modes of operation
The following operation modes are possible:
-
Non-transparent proxy operation: This guide will focus on this operation mode.
-
Transparent mode: If you configure SPS proxies in transparent mode, the client usually addresses the target server directly. Therefore, you have to configure the connection policies in SPS accordingly.
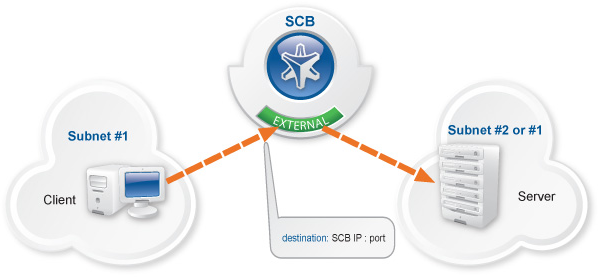
Non-transparent proxy operation
This guide focuses on non-transparent proxy operation, which is the easiest to implement. In this configuration, clients connect to a server through SPS. That is, end-users address SPS explicitly, which then forwards connections to target systems based on various parameters depending on what destination selection method you select.
Figure 1: SPS in non-transparent mode
For an illustration of what happens when a client connects a server through SPS and how the different configuration options and policies of SPS affect this process, see:
Configuring the destination selection method
To configure the destination selection method, navigate to for example SSH Control > Connections (or the respective protocol control that you want to configure), and in the Target section, select the preferred method:
-
Use the original target address of the client: Connect to the IP address targeted by the client. This is the default behavior in transparent mode.
-
NAT destination address: Perform a network address translation on the target address.
-
Use fixed address: The connection will connect always to this address, redirecting the clients to the server.
-
Inband destination selection: Extract the address of the server from the username.
For details, see "Modifying the destination address" in the Administration Guide.