
Listener Configuration
Each listener must be configured with a unique name. This name is set when the listener is created, but can be changed within the configuration panel. If you attempt to create a listener with an existing name, a warning dialog will pop up and you will be prevented from creating the listener.
The listener configuration panel is split into several parts indicated using tabs. The first tab is used to define the main configuration of listener-specific parameters. The second (optional) tab is used for the definition of the SSL parameters that the listener will use for listeners using a TLS (LDAPS and HTTPS) layer. The third tab (optional) will allow you to enable SASL/GSSAPI support on the listener interface. The fourth tab allows you to list processing stages that packets can be routed to before going out to a server group. And finally, a fifth tab is used to configure options specific to the use of Virtual Trees.
Main Listener Properties
In the first tab, entitled "Main Listener Properties", you will need to set the properties that describe the listener, such as the protocol, the port, and a number of other options that control the listener's behavior.
Fig-31: Main Listener Properties

Protocol
Select the protocol that the listener should support from the combo box. Some protocols will disable some of the other required configuration parameters in this panel, as they will no longer be relevant. For instance, for protocols not using SSL, such as 'LDAP' or 'HTTP', the SSL tab will not be available.
Listen port
This configures the TCP/UDP port that this listener will use to receive protocol requests from clients. As the name implies, a listener will "listen" on the port that you specify here for traffic coming from client applications. A valid port number must be entered here. Port numbers can in theory be between 1-65534, however there are some limitations, depending on your operating system. Many port numbers may already be reserved for other applications that actively use them. For example, if you already have an LDAP server running on your system, this server will probably be already running on port 389. If you specify "389" here as well, there will be a conflict, and the application started last (which may be, in this case, VDS) will not work as expected. On UNIX systems VDS will not be allowed to open the port, and the instance will just fail to start. On Windows systems, however, the instance will seem to start normally, but requests sent to the conflicting port will be accepted by the application that is already bound and listening on the specified port. As a result, VDS will not receive anything until the fist application "frees" the port or stops running.
Another limitation, on UNIX systems, is that only the super-user (root) is allowed to listen on ports below 1024. If you are starting VDS as a non-root user, you will have to use ports higher than 1024 or the instance of VDS will not run.
Finally, if you are going to create multiple listeners in an instance of VDS, they will either need the port number to be different in each case, or the Listen Address will need to be specified as a differing IP address for each listener.
An important thing to note here, is that if you have multiple configurations open and listeners have been set up for each configuration using the same port numbers, you will only be able to run one configuration at a time, as the ports will conflict.
Listen Address
By default, VDS listens on the port specified in the Listen Port Field on all IP addresses used for your system. If your system has multiple IP addresses, any of these IP addresses can be used to connect to the listening port.
On some systems, this is not desirable. If you want to listen only on a specific IP address, you can specify this address in this field, and VDS will only listen on the IP address entered here. If you want to selectively listen on some IP addresses, but not on others, you will need to create multiple listeners - each of them listening to the same port but on a different IP address.
This parameter is optional. If you leave this field blank, or enter "0.0.0.0" in this field, the behavior will be for VDS to listen on all IP addresses for this port.
Client Address / Mask
By default, VDS will accept all client connections arriving on the listener port and address. However, if needed, the range of IP addresses from which incoming requests will be accepted can be filtered using these two configuration parameters.
These parameters work as any other IP address / mask combination, so if for example you want to accept only queries that arrive from IP addresses between 192.168.1.0 and 192.168.1.255 you should have 192.168.1.1 configured as the Client Address and 255.255.255.0 as the Client Mask.
These two parameters are optional, so if you leave them blank, the listener will accept incoming requests from everywhere.
TCP Back Log
The "TCP Back Log" parameter is only used for connection-type protocols that make use of TCP (Transmission Control Protocol), which is the underlying protocol for LDAP and HTTP, including their SSL-enabled versions. Other protocols such as Radius and SNMP are connection-less, in that they do not require a client to "connect" per se, but instead just send and receive packets without requiring a connection to be maintained. These connection-less protocols are based on UDP (User Datagram Protocol), which like TCP is part of the TCP / IP protocol suite used in the Internet. This parameter is optional. If you do not fill it out, the system defaults for the TCP Back Log will apply. This parameter, as described above, only has a meaning for connection-type protocols (LDAP, LDAPS, HTTP, HTTPS, etc). If you are not using a connection-type protocol, the parameter will be ignored.
The backlog parameter defines the maximum length that the queue of still unanswered (pending) connections may grow to. If a connection request arrives while the queue is full, the client may receive an error. Since VDS is typically very efficient accepting new connections, this is usually not a parameter to be overly worried about. However, if you find that occasionally clients send a very high number of new connection requests in bursts, you may want to set this value higher than its default of 100. Be aware that increasing the value for this parameter will make VDS somewhat more susceptible to denial-of-service type attacks.
FE Timeout
If "Use Default FE Timeout" is selected, this will cause the Listener to make use of the Default FE Timeout options specified in the Global Parameters for the configuration. If these are disabled in the Global Parameters, no timeout will be applied to the Listener.
By selecting the "Use FE Timeout of" option, you are able to specify the period after which an idle frontend connection will be dropped, this is controlled by providing a value in the Seconds field.
Routing Information
In this section you will be able to choose how traffic should be routed by default (i.e. where no processing directive specifies an alternative routing option). There are two options here, and they are mutually exclusive. You may either route traffic to a default DataSource, or you may route it to a predefined "Virtual Tree". Note that for the second option to work, you will need to define at least a Virtual Tree Root Node.
Default DataSource This parameter specifies which back-end DataSource should be the default for traffic coming from this listener. Note that it is possible for processing that happens in the stages to override the back-end for any request, so this setting only specifies a default back-end to be used if nothing else is specified by special stage processing attached to the listener.
In order to make a valid selection here, you will need to have at least one DataSource defined under the Output node of the configuration. Remember that DataSources contain at least one or more servers that are assumed to be equivalent. You can read more about DataSources in the OUTPUT chapter.
Virtual Tree VDS supports the ability to define a Virtual Tree for any listener. This allows you to design a completely virtual directory that will be presented to any client connecting to the listener. This facility allows you to completely abstract the data stored in any backend DataSources so that a client is only aware of the directory information that you have set out to present. In general this facility would only be used for listeners that have been configured for the LDAP/S protocol. Although it might be possible to use a Virtual Tree with an alternate protocol such as HTTP (if building an HTTP to LDAP bridge) if you perform the appropriate processing in a stage before the Virtual Tree is implemented (see the section Attached Stages ). However, the complexity of such a solution would be an advanced topic and may require support.
In order to use this facility, you will need to create a Virtual Root for your tree and then construct virtual nodes as you require. Finally, if you wish to include data stored within external repositories, you will need to create virtual mountpoints, that can be used to import the data into your Virtual Tree. The 'New Virtual Root' button can be used to start constructing your virtual tree. The 'New Virtual Mount Point Root' button can be used to create a virtual root that maps directly onto a DN within a particular DataSource.
Please see the section How To Use Virtual Trees for more information.
Canonicalization
This tab is only meaningful when the LDAP or LDAPS protocol is defined for this listener. Otherwise, this section will be inactive and unused. It is possible for VDS to canonicalize entries coming into VDS. Canonicalization basically means:
-
Trimming spurious whitespaces (i.e. removing whitespaces between DN elements and the commas separating them)
-
Converting attribute names into lowercase
Canonicalization can be very helpful when processing entries. The LDAP model specifies that all LDAP attribute names are to be treated in a case-insensitive way. Well-behaved LDAP clients will have no problem with canonicalization, although there are a few LDAP clients out there who, contrary to the standard, will not recognize LDAP attributes in a case-insensitive way. If problems arise with your client applications that point to this type of behavior, you may want to disable canonicalization or alternatively you can select the check-box which allows you to 'Canonicalize DN only for processing stages'. If this option is checked, the DN in each PDU will only be canonicalized as it moves through the processing engine, and will be converted back to its original form before it is sent either to the DataSource or client that it is destined for. While the PDU moves through the processing engine, the original DN will be stored within the PDU hash for use later.
Fig-32: Canonicalization Options

Canonicalization of Attribute Names
Several check boxes exist in this section to allow you to switch on canonicalization of attribute names for certain requests, and optionally in search filters or distinguished names (DNs).
Remember that canonicalization of attribute names is considered safe by the data model, however there may be applications that are not prepared for this.
Canonicalization of Attribute Values
Canonicalization of attribute values is not necessarily safe, because the LDAP data model mandates case insensitivity only for attribute names (aka "attribute types"), and not for attribute values. However, under certain circumstances you may want to enable canonicalization for attribute values in search filters and distinguished names (DNs) as well. The left side of the canonicalization panel allows you to configure this.
Clear Canonicalization Button
By clicking on the "Clear Canonicalization" Button you will remove all selected canonicalization options.
SSL Parameters
Please also refer to the Dell One Identity Virtual Directory Server SSL Guide for more information on configuring TLS/SSL. This guide will help to provide you with a better understanding of TLS/SSL and the options that are available to you.
Fig-33: Listener SSL options

This tab is used to define all parameters regarding SSL, should you have selected a protocol that uses SSL-type encryption, such as LDAPS or HTTPS. The following parameters can be configured for SSL:
SSL Certificate
The SSL certificate path only needs to be filled in if you have selected an SSL-type protocol (i.e. LDAPS, HTTPS, etc.). For configuring SSL-type protocols, you must select a file that contains both the certificate and the private key concatenated into one file. Both must be in PEM format (i.e. base64 encoded). The private key must not be encrypted as there will not be any opportunity to supply a password when the server starts. You should use file system permissions to protect the privacy of the private key. If your private key is encrypted, you can remove the encryption using the following UNIX commands:
  openssl rsa -in key.pem -out keyout.pem
  chmod a-w key.pem
  chmod -r ...
If you do not have a certificate you should obtain one from a certificate authority. Ask them to supply it in format suitable for Apache or OpenSSL (i.e. the PEM format). If, for some reason, it is supplied to you in some other format, you may be able to convert it to the correct format using OpenSSL. Please read the openssl manual pages for details.
For testing purposes, you can also generate your own self signed certificate, on UNIX systems, with the following commands:
  openssl req -new -x509 -nodes -keyout pkey.pem -out cert.pem
  cat cert.pem pkey.pem >certpkey.pem
If you are a Windows user, the OpenSSL Project does provide a link (http://www.openssl.org/related/binaries.html) to a binary installer of the openssl software for Windows. You may find that you are able to use this software to perform the tasks mentioned above on a Windows based operating system.
There is a small information icon to the right of the text area that displays a new window with a partial text description of the certificate information (Subject, Issuer, Validity Times and Usage). This information might be useful for troubleshooting SSL related issues. (Note: This action may not be available when working with remote configurations)
CA Certificate
The path to the CA (certification authorities) certificates file that will be used to validated certificated presented to the listener. This should also be in PEM format.
There is a small information icon to the right of the text area that displays a new window with a partial text description of the certificate information (Subject, Issuer, Validity Times and Usage). This information might be useful to troubleshoot SSL related issues. (Note: This action may not be available when working with remote configurations). For the CA certificate, the area contains the information for the certificates of each of the certificate authorities that are contained in the CA file.
Supported Ciphers
Since VDS uses OpenSSL, you can use this parameter to specify a list of specific ciphers that OpenSSL should use. In order to find out about the ciphers supported by OpenSSL, you can type the following command:
openssl ciphers -v
By default, this field is empty. You need only use it if you need to specifically restrict the ciphers used.
SSL Version
By default, VDS will allow connections to use SSL version 2 and 3, and TLS version 1. You can override this behavior by specifying the allowed SSL or TLS versions using the radio buttons.
Client certificate validation
Controls the behavior of the listener regarding the client certificate. There are four different possible values for this field:
- none
-
No client certificate is requested, and mutual/bilateral authentication is disabled.
- fail
-
The client certificated is requested. If the client presents a certificate, the certificate is validated. If the certificate is not valid, the errors are logged and the connection is terminated.
- present
-
The client certificate is requested. If the client does not present a certificate, or the certificate is not valid, the connection will be terminated, and the reason logged.
SASL Parameters
It is important that you are aware that in order for the SASL interface to work, you should have the appropriate Kerberos libraries installed and properly configured. Please refer to the Dell One Identity Virtual Directory Server Guide to SASL, GSSAPI and Kerberos, for more information on configuring SASL. This guide will help to provide you with a better understanding of SASL, GSSAPI and Kerberos, and the options that are available to you.
When a SASL bind is completed, one important parameter is obtained. It is the Client Name, which is the Principal that sent the operation as client. This information is stored in the BIND_DN entry of subsequent pdus to allow access control.
Fig-34: Listener SASL Options

This tab is used to define all parameters to configure SASL/GSSAPI support on a Listener interface. Options presented here include:
- Quality of Protection
-
With this setting it is possible to specify the desired Quality of Protection of the communication. There are four values to choose from:
-
Negotiate: All options (Privacy, Integrity or Auth-Only) will be accepted. This is the default setting.
-
Privacy: Only Privacy will be offered and accepted.
-
Integrity: Only Integrity will be offered and accepted.
-
Auth Only: Only Authentication will be offered and accepted.
-
- Acquire client delegated credentials
-
With this option selected, whenever an incoming SASL connection is processed, VDS will try to obtain delegated SASL credentials sent by the client. These credentials are stored in the session and can be used later to open a SASL connection to the backend (provided the Enable client delegation option is active)
- Enable NTLM
-
This option allows incoming NTLM messages to be processed. Only available in the Windows version of the product.
SPNEGO Parameters
The SPNEGO Parameters are to HTTP what the SASL Parameters are to LDAP: The place where a listener can be configured to support SPNEGO(Negotiate)/GSSAPI/Kerberos communication. However the Kerberos support at HTTP listeners is simpler, since it is used just as an authentication method, while in LDAP it is also used to cipher the operations.
This support for Kerberos authentication in an Active Directory environment is often referred to as "Integrated Windows Authentication" (IWA).
As before, it is important that you are aware that in order for the Kerberos interface to work, you should have the appropriate Kerberos libraries installed and properly configured. For Windows systems, we recommend that you also install MIT's Kerberos for Windows. For Linux systems, you must install MIT's Kerberos Libraries and tools, to ensure that your system is capable of using Kerberos. Please also refer to the Dell One Identity Virtual Directory Server Guide to SASL, GSSAPI and Kerberos, for more information on configuring Kerberos. This guide will help to provide you with a better understanding of SASL, GSSAPI and Kerberos, and the options that are available to you.
An important difference is that while in LDAP the Kerberos support is an extended capability of the listener, in the sense that it can still receive and process simple LDAP operations, in HTTP when Kerberos is activated it will be required and if the authentication is not successful, the operation will be rejected.
This tab will be used to define all parameters to configure SPNEGO/Kerberos support on a HTTP Listener interface.
When a SPNEGO authentication is completed, one important parameter is obtained. It is the Client Name, which is the Principal that sent the operation as client. This information is stored in the CLNAME entry of the pdu to allow access control.
Stages attached to this Listener
By selecting the tab called "Attached stages" you are able to attach different processing stages that you have defined to the current listener. The layout of this tab will depend on which Routing option you have selected for the listener. If you have selected to make use of a Default DataSource you will see a table of stages that will be processed for each and every packet received by this listener. Packets will be processed by stages in the order that they were received, and the stages will be applied in the order that they are listed. Note that once a stage has been attached to a listener, all packets received by the listener will be passed on to the stage to be processed. If there are particular packets that you do not want processed, you will need to filter these using the condition options within each attached processing plugin or hook.
Fig-35: Stages attached to this Listener for a Default DataSource

If you have selected to make use of Virtual Trees, this tab will display two separate tables. These tables allow you to define where processing takes place on either side of the Virtual Tree. That is to say, you can either select to attach a processing stage that occurs on the client-side of the Virtual Tree; or you can attach a processing stage that occurs on the server-side of the Virtual Tree. The rules for these tables are essentially the same in that each processing stage is handled sequentially (unless a processing directive or filter determines that some other action should take place). When designing your solution and in determining how processing should be ordered, it may be useful to think of the Virtual Tree as a processing stage in itself. You can then visualize at which stage the processing to create the Virtual Tree would take place in relation to other processing stages that you may define. For example, if you have a processing stage that logs incoming requests, you are likely to place this stage before the Virtual Tree. On the other hand, if you have created a processing stage which performs some form of attribute mapping for requests to a particular DataSource you would most likely place this stage after the Virtual Tree.
Fig-36: Stages attached to this Listener for a Virtual Tree

In order to attach a processing stages to a listener, you need to have created the stage in the processing section of the configuration already. If you have not done this yet, create new processing stages following the instructions in the PROCESSING chapter, and then revisit this configuration panel later to attach them to your listener.
By default, any tables in this tab will be empty as no stages have been attached to the listener. The tables that you see will only have one field entitled "double-click to define". By double-clicking into the field, a combo-box will pop up allowing you to select the stage that you want to attach. As soon as you've attached a stage, this will be reflected in the table.
The option to attach a new stage is always available at the bottom of the table. If you have incorrectly selected a stage, you can change it by double-clicking on it and selecting a different one from the list.
Processing stages that have not been attached to any listener within a configuration will be highlighted in red under the Processing section of the configuration within the configuration Navigator. This should help to quickly identify any pieces of configured functionality that will be inactive within a running configuration.
Deleting a stage from the list
If you want to delete a stage, click the right mouse button over it. A pop-up menu will appear. Select "Delete Stage". The stage is then deleted from the table. Keep in mind that this will not delete the actual stage itself - it will merely detach the stage from your listener.
Inserting a stage in the middle
If you want to attach a stage at a particular point in the table, you can use the pop-up menu to insert a blank field before or after a specific stage. Right click on a stage in the list, and then select "Insert Before" or "Insert After" from the pop-up menu. Once you have done this, an empty stage will appear as specified. You can double click on this row in the table to select the appropriate stage to be used here.
Virtual Tree
Fig-37: Virtual Tree Properties

The Virtual Tree tab can be used to set the debug level for the Virtual Tree functionality, and to define exceptions where the Virtual Tree functionality will not be used if it is enabled.
The following parameters can be configured in this section:
- Debug Level
-
can be set for this plugin by dragging the slider to the level of verbosity that you require.
- Skip PDU with destination
-
for PDUs that have a _DSOURCE_ or _BACKEND_ type magic key defined in the PDU hash, usually due to some previous processing by a scriptlet. If this option is not checked, the PDU will be processed by the Virtual Tree and if the destination is not resolved, the PDU will not be delivered to the intended DataSource and an error will be returned.
- Store frontend credentials
-
will allow the Virtual Tree to store credentials used to connect to the frontend for a BIND request. While Virtual Trees support BIND operations, the credentials that are stored for a session can either be the credentials used to authenticate against a backend, or the credentials that are used to connect to the Virtual Tree (by the client application). This is particularly useful when defining ACL rules, as you may wish to control access using the virtual DN that is used to perform a BIND via the Virtual Tree.
- Propagate controls
-
Certain LDAP Controls may not make sense when using a Virtual Tree and they can be disabled by unselecting this checkbox. Note that Pagination works through one of this Controls (Simple Paged Results) and it requires it enabled.
- Support Pagination
-
With this option selected, the Virtual Tree functionality will handle Pagination both from the clients and to the backend. The following Pagination Options section will be enabled.
- Disable Partial Results
-
When a search involves several mountpoints and one of them returns an error, the Virtual Tree returns "Partial Results" as final error code, to state that the search was not fully completed. This however confuses some applications into thinking that the operation totally failed. By selecting this option, Virtual Tree will return a normal error code instead (Success / No Such Object).
- Default BE Page Size
-
Size of the pages requested to the backends.
- Enable Hide Page
-
It refers to the part of the Pagination functionality similar to the HidePage plugin, which adds Pagination to operations coming from the client that did not request it. This can be disabled by unselecting this checkbox.
- Hide Page Timing
-
This setting has been added for cases where the speed with which the multiple backends return entries is more than the client can handle. It can be set to a lapse of seconds between operations that should avoid an increase of the amount of memory used by the process due to buffering.
- Password attribute for virtual entries
-
allows you to define which attribute should be used to validate a BIND request for an entry within a Virtual Tree. This attribute applies to all entries within the Virtual Tree, so you can only select one attribute across the tree to store the password.
- Hide password on responses
-
will prevent the specified password attribute from being returned in the results for any search request.
- Entry Exceptions
-
are defined by providing the credential DN or entry DN and the DataSource to which the request should be forwarded. You may need this if particular credentials (such as your administrator credentials) are stored outside of the tree offered by your server. Moreover, it is recommended that at minimum, you provide an entry here for searches on empty bases. To do this, simply leave the Base DN field empty and provide a default DataSource to forward the request to. This means that queries on the rootDSE will be forwarded to a particular DataSource and will be handled by that DataSource. Alternatively, you could resolve searches on an empty base by making use of a processing stage invoked before the Virtual Tree and including processing functionality to handle rootDSE searches, such as the RootDSE Plugin.
- Branch Exceptions
-
are defined by providing the branch DN and the DataSource that should be used to forward the requests that match this suffix. For example, if you still want requests to go to your original tree structure you will need to create at exception for your original domain name.
- Route Domain
-
is also provided to maintain compatibility with requests that use original domain names, in this case for Bind requests using "User@Domain" or "Domain" format. This functionality can equally be achieved with the RouteOnBind plugin.
How To Use Virtual Trees
While VDS supports the ability to define a Virtual Tree for any listener, it is not compulsory to make use of this facility when defining a configuration. In fact, a large number of configurations will not use this facility and will simply make use of the routing capabilities built into the core engine and defined within customized scripts within the processing layer to handle how requests and responses move through the system. However, Virtual Trees can significantly reduce frustration when attempting to create a solution that presents a virtual view of data stored across a multitude of repositories.
The facility is essentially provided by a built-in plugin that functions in such a way as to allow you to completely abstract the data stored in any backend DataSources so that a client is only aware of the directory information that you set out to present. Technically, it is possible to create a working configuration that only makes use of a listener and a Virtual Tree, and does not present any data stored within a directory in a DataSource. However the functionality of such a configuration would be exceedingly limited and would serve little purpose. In most cases, the plugin will be configured to present a Virtual Tree structure that can be used to mount data structures stored within different directories.
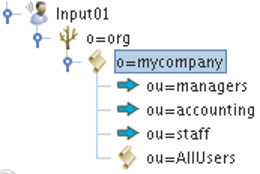
Fig-38: A Virtual Tree can be constructed to represent an organizational unity.

In the figure presented here, the Virtual Tree is constructed to represent an organizational unity. Directory trees stored on different DataSources can then be 'mounted' onto nodes within the Virtual Tree. In this example, the virtual node ou=org1,o=unitedorg maps onto ou=People,o=org1 in DataSource1, ou=org2,o=unitedorg maps onto ou=People,o=org2 in DataSource2 etc.
This facility is commonly used in environments where discrete entities or organizations may work together in some form of federation or unity. While each organization or entity may control their own servers and core data, all members of the federation or unity may want to access a central point that contains information for all members. In earlier versions of VDS, this was easily achieved using the Attach Trees plugin; however, this resulted in each attached tree appearing as a subsidiary of a Default DataSource. Using Virtual Trees you can now create a new Virtual Tree that all DataSource entities can belong to equally, effectively creating a new virtual directory containing entries populated from one or more directories.
Building a tree on a listener
In order to define a Virtual Tree for a listener within the DSGUI configurator, go to the Main Listener Properties tab within the Listener configuration panel and select the 'Virtual Tree' option in the Routing Information box, then click on the 'New Virtual Root' button. Alternatively, you can right click on the listener entry in the navigator tree and select the option to create a 'New Virtual Root', but you will need to ensure that the Routing Information option is set to use a Virtual Tree. A dialog box will appear which will allow you to specify the root DN for your Virtual Tree. Once you have entered this detail, the root DN will be listed within the navigator tree beneath the specified listener. You will need to edit this entry to provide basic ObjectClass attribute values, the Naming Attribute for the RDN pair, and any other attributes that may be specific to the schema that your client applications may expect.
Once a Virtual Root has been defined in your configuration, you can add a new virtual entry by right clicking on the virtual root that you have created and selecting the option to create a 'New Virtual Entry'. For each virtual entry that you create you will need to also define an attribute for the Naming Attribute of the RDN and the ObjectClass.
Fig-39: A Virtual Tree is attached to a listener and includes a Virtual Entry as well as a number of Mount Points.
Using these tools, you will be able to create an LDAP tree within which you will be able to present particular data stored within your backend repositories. Additionally, you can create static entries within your Virtual Tree as you require.
It may be useful to note, at this point, that canonicalization is automatically applied to all Virtual Tree nodes, so that all requests are automatically converted to lower case, essentially rendering the Virtual Tree as case-insensitive.
Once you have set up your backend DataSources, you will be able to create "Mount Points" within your tree. Each Mount Point must map onto an available DN within a predefined DataSource. To create a mount point, simply right click on a virtual entry and select the option to create a 'New mount point'. You will need to specify an RDN for your mount point. Once you have created a mount point, you will need to specify the DataSource that should be used for the mapping, and the DN that should be queried within that DataSource.
As incoming LDAP requests are intercepted by the listener, they are decoded and the DN for each request is read directly from the PDU. If a search request contains a mount point, a subquery is generated to retrieve the data from the appropriate DN on the appropriate DataSource. These responses are then manipulated so that they appear to conform to the structure of the Virtual Tree. The responses are finally returned to the client.
Mount Point Roots
An alternate approach to building a Virtual Tree can be taken by creating a Mount Point Root. This approach allows you to build a Virtual Tree structure using one of your backend servers as the core of the Virtual Tree. A Mount Point Root can be created in a similar way to a Virtual Root, with the difference that it allows you to specify the backend server and base DN that will be used to create the Virtual Tree. Once configured, any query on the Virtual Tree will be transformed into a query within the DIT structure on the backend server. The advantage is that you can quickly add other Mount Points and Virtual Entries to the Virtual Tree, allowing you to easily integrate data from other backend servers or branches within the directory. You are also able to use plugins within processing stages, either in front of the Virtual Tree, or behind it, to further manipulate how data is presented and how requests and responses are handled.
This approach is similar to specifying a Default DataSource and then using a set of processing stages to achieve the functionality that you require. Certainly building a Virtual Tree around a Mount Point Root is no different to creating a Listener with a default DataSource and then implementing processing stages that use the Attach Trees and Add Entries plugins. However, by creating a Virtual Tree around a Mount Point Root you can achieve much of this functionality in a single point within your configuration and without using a collection of plugins to achieve the blueprint against which you want to add more complex processing functionalities.
Mount Points and Virtual Entries inside of existing Mount Points
It is possible to create a Virtual Entry or to add a Mount Point as a child node within a Mount Point that you have already created. This is a very powerful feature but is not without its own drawbacks. Depending on the data stored below the parent Mount Point, you may need to add a Manual Processing stage to intercept redundant searches that could cause one of the Backend systems to return an untruthful error message, since the Backend system used by the parent Mount Point will be unaware of the virtual contents contained within the virtual branch.
How searches below the root base are treated
An interesting behavior that results from the use of a Virtual Tree is the manner in which searches below the root base are treated. Consider a Virtual Tree with its virtual root set to "dc=onecorp,dc=com". In the case of a level one search on the base DN "dc=com", VDS will return a result populated with "dc=onecorp,dc=com". In the case of a subtree search on the base DN "dc=com", the search will be propagated to the root and all of the results from "dc=onecorp,dc=com" will be returned.
This behavior is different from most LDAP servers in that usually a search below the root base or namingContexts will result in an error code 32, with a message like "No such object".
How to handle searches on the Root DSE
It is possible that an LDAP application might perform a search on the Root DSE. This is certainly true of many LDAP clients. Unfortunately, in the case of a Virtual Tree, the contents of the tree are virtually constructed based on various LDAP mount points. This makes it difficult to automatically determine what information should be returned for these search requests, as the attributes for the Root DSE entry may vary depending on the servers within your different DataSources. As a result, a search on the Root DSE, for a Virtual Tree, will return an error response: "No such object".
There are a variety of ways to overcome this problem. The first option, is relatively simple as long as the tree structure (and naming contexts) of an LDAP server within one of your configured DataSources matches the base of your Virtual Tree. In this situation, you can simply re-route Root DSE requests directly to the DataSource. To do this, you can go to the "Virtual Tree" tab within the listener, and configure a Search Request Exception. The 'Base (DN)' for the entry should remain blank, and the DataSource that the request should be forwarded to should be selected.
An alternative approach, which is possibly more suited to more complex scenarios, would be to make use of the RootDSE plugin, included with the product. This plugin allows you to specifically define the result that will be returned for a search request on the Root DSE. To use the plugin, you will need to define an automatic processing stage and attach the plugin to this stage. The stage can then be attached to the listener on the "Attached Stages" tab of the listener configuration. Of course, as this processing activity will take place on the client side of the Virtual Tree, you should attach the processing stage in the "Pre Virtual Tree Stages" table.
Of course, it is also possible to design your own solution to handle Root DSE searches, using a manual processing stage and a custom developed script. However, this is a fairly advanced topic and we would recommend that you make use of the already available functionality.
Dealing with BIND requests
There are frequently instances where a particular BIND DN is stored outside of the regular tree presented by an LDAP server. Furthermore, in particular situations you may wish for certain BIND requests to be handled by a particular DataSource. In these situations, it is simple to add an exception under the "Virtual Tree" tab for the listener. In the "Entry Exceptions" or "Branch Exceptions" tables, simply list the BIND DN or the BIND DN suffix and the DataSource to which the request should be forwarded. The "Route Domain" table is meant for BIND DNs with format "User@Domain" or "Domain".
Naturally the Virtual Tree plugin is not aware of how you might intend to treat anonymous requests. As a result, anonymous requests will be presented with an "Invalid Credentials" error message. A quick method of circumventing this and using the settings available on a particular server is to add a Bind Request Exception for an empty Bind DN, forwarding these requests to a particular DataSource. Alternatively, the Add Credentials plugin included with the product, can be used to force anonymous requests to authenticate as a designated user.
Once again, it is always possible to define a custom script in a manual processing stage that will assign a DATASOURCE destination to the incoming request PDU if it has not been allocated a Bind DN. The 'Skip PDU with destination' checkbox can then be checked in the Virtual Tree tab of the listener configuration to re-route PDUs that are using an anonymous BIND. This is an advanced approach to the problem that may require you to refer to the Dell One Identity Virtual Directory Server Developer's Reference Manual for further scripting support.
Virtual Tree Pagination
When searching for all contents of a virtual branch, Virtual Tree may return entries from several different data sources. This can create problems when Pagination is involved.
Firstly, if a client requests data to be returned in pages of a certain size, Virtual Tree should make sure the client gets the requested amount of data, taking into account that each data source will probably contribute a different number of entries. Secondly, some data sources only return a certain amount of entries, for example Active Directory has a default of 1000. As a consequence Pagination should be used if all the contents of the branch are to be returned.
In the past the solution was to have a ShowPage plugin at the front-end and a HidePage at the back-end, however this has important memory requirements that only make it feasible for environments with a limited amount of entries.
You can select 'Support Pagination' in the Virtual Tree options; this functionality is more efficient at handling Pagination from both the clients and the backend. As a result, no other pagination plugins should be used.
Note: Pagination Support can be disabled in the event the directory does not support Simple Paged Results Control, or for any other reason. Other plugins that alter the number of entries (such as AddEntries), or that affect LDAP Controls, may also alter the functionality.
Virtual Tree Sample
VDS includes a sample configuration that is used to demonstrate how Virtual Trees can be used within an actual configuration. In order to make use of the sample configuration, you will need to set up a demonstration environment capable of working with the sample configuration. Please see the Samples section in the Plugins and Samples chapter of the User Manual for more information.
Plugins
The sample configuration makes use of the Virtual Tree component along with the Naming Context plugin. Details for the Naming Context plugin can be viewed by clicking on the Help button in the configuration panel for this plugin.
Location
The sample configuration will be accessible within DSGUI in the Open Config dialog, by clicking on the drop-down selector at the top of the dialog window, and changing the value from 'confs' to 'samples'. The sample configuration is named:
sample.virtualtree
If you wish to view the actual LDIF file that makes up this configuration it is located in the samples folder at the root of your installation.
samples/sample.virtualtree
Objective
The scenario presented in this sample shows the definition of a Virtual Tree and its potential. It also includes a sample of the Naming Context plugin which is very convenient to use with a virtual tree to define its virtual naming contexts.
Virtual Trees are often used as a means to unify data stored across several different repositories in a manner that appears seamless and that provides a presentation layer where all component repositories are treated equally. Another advantage to making use of a Virtual Tree is that you are able to present data in a tree that potentially uses a different structure to those used by any particular component repository.
Configuration
To configure a Virtual Tree the different nodes, virtual roots and virtual entries are attached to the listener that will be responsible for serving the Virtual Tree. In the sample we have created a very simple Virtual Tree with a virtual root entry as 'dc=onecorp,dc=com'. Attached to the root is the virtual entry 'ou=ComercialDepartment,dc=onecorp,dc=com'. Within this virtual entry, two virtual mount points have been created. The first mount point, 'ou=clients,ou=ComercialDepartment,dc=onecorp,dc=com', will be used to attach the data stored in the DN 'ou=clients,dc=twocorp,dc=com', available from the DataSource 'sgTwoCorp'. The second virtual mount point or node, 'ou=sales,ou=ComercialDepartment,dc=onecorp,dc=com', will be used to attach the data stored in the DN 'ou=sales,dc=onecorp,dc=com', available from the DataSource 'sgOneCorp'.
In the Virtual Tree tab you can configure bind and search exceptions for cases that are not contemplated in the virtual nodes. In this sample we have defined a bind exception that will allow you to bind to the Virtual Tree with the credentials cn=dirmanager routing the bind request directly to sgOneCorp. You need to change this field to match the credential you will be authenticating with unless your server allows anonymous binds in which case you can leave it blank and just select the appropriate server on the right column. There is also a search exception that takes care of the rootDSE entry routing it to the server sgOneCorp.
In the Processing section you can find an Automatic Stage which holds the Naming Context plugin, the configuration of this plugin requires that you list the Naming Context and select whether you want them to be appended or overwritten.
Note that in the Attach Stages tab you can specify if the Naming Context Stage is attached to the listener before the virtual tree is implemented, or after it. In this case, it doesn't really matter on which side of the Virtual Tree the Naming Context Stage appears, as it will intercept RootDSE responses and overwrite them regardless of which side of the Virtual Tree the plugin appears. If, on the other hand, you decided not to make exceptions for RootDSE queries and implemented the RootDSE plugin instead, this would need to be attached before the Virtual Tree was implemented in order to work properly.
Test
To test this sample you can perform any LDAP request to any of the virtual nodes. To test the naming context functionality you just need to query the root DSE entry by doing a base-level search with a null BaseDN, with filter (if present) objectClass=* and attribute namingcontexts. You will received dc=onecorp,dc=com as the Virtual Tree naming context.
OUTPUT
The Output part of the configuration is used to define the connections to backend systems within your solution. Within the Output configuration, you are able to define different DataSources that are used to group together repositories that contain the same data (i.e. replica LDAP repositories). DataSources provide built-in health-checking, load-balancing and connection pooling functionality.
DataSources allow you to group multiple identical repositories, to take advantage of load-balancing and failover services. The underlying proxy engine will take care of the routing of all of your backend traffic depending on the algorithms that you choose to make use of.
Usually, you will define a default DataSource within the Input Listener configuration, to define where traffic should be routed by default. Alternatively, if you choose to make use of a Virtual Tree, you may attach particular branches from any of your backend DataSources as virtual mountpoints within your Virtual Tree.
Finally, particular Processing directives may control the routing of requests to a particular DataSource that you have defined. For instance, the Route On Filter, Join Entries and Merge Trees plugins will all impact on the routing of requests, so that you may require multiple DataSources to be configured to achieve a particular solution.
What is a DataSource
The Output section of a configuration defines how VDS will interact with back-end data repositories. VDS essentially sits between client applications and one or more back-end servers. The connections between VDS and individual servers, are referred to as Output connections. As VDS may be configured to perform a variety of processing stages on data requests, and also on responses, it is useful to provide a level of abstraction to the processing stages. This abstraction is provided by defining a DataSource.
Fig-40: VDS Output
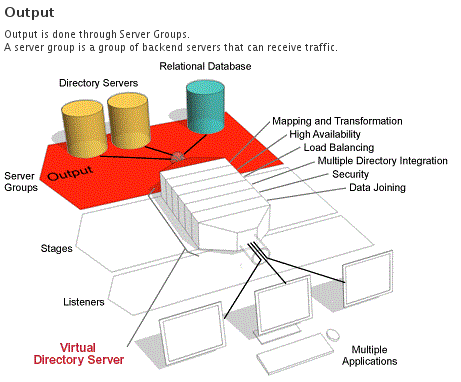
Output channels in VDS are defined by DataSources, and all data repositories (RDB servers, LDAP Directories, Web servers, etc) that a configuration will use must belong to one of these DataSources.
A DataSource is essentially a group of servers that share the same data and communicate using the same protocol, such as all of the replicas in an LDAP environment, or all of the Masters in a Multi-Master LDAP environment. Equally, if you have replicated servers that make use of one of the other supported service protocols (such as HTTP, Radius, etc.), these should belong to their own DataSources.