
Why use DataSources
DataSources provide an abstraction layer between the scripts and plugins used in the processing section of the configuration and the data repositories themselves. The DataSource provides a single trivial reference point that will take care of the protocol type and the various servers for which processing should take place.
The main advantage to this approach, is that when choosing a destination for a request or functionality, all that a script needs to do is send packets to the appropriate DataSource, and VDS will take care of all the functionality attached to how the information is physically deployed. This means that VDS will deal with data replication, retrying a request in the case of a failure, etc.
Additionally, by logically grouping servers together, VDS can manage load-balancing and failover facilities for any particular DataSource. Furthermore, connection pooling can be enabled for any DataSource to efficiently manage the number of connections that are opened to back-end servers.
In the INPUT chapter, we explained that every listener can have a default dsource configured in the listener configuration panel (see Listener Properties ). If this is configured for a listener, all traffic received by this listener is sent to this server group, unless a script or plugin, in the stage processing configuration, sets a different server group for specific requests.
If you choose to make use of a Virtual Tree within a listener, you will not have configured a default DataSource, as the Virtual Tree will attempt to resolve the routing of incoming PDUs to the appropriate DataSources that are mapped onto different mountpoints within the tree. In this way, the Virtual Tree can be seen as a connector between the Input and Output layer of the configuration. Nonetheless, the configuration of a Virtual Tree is able to use DataSources to easily reference particular repositories and to route traffic to them with ease.
Creating a DataSource
We will provide further detail on how to configure a DataSource presently, but first, to create a new DataSource, click on the New DataSource button or, alternatively, select the "Output" node, right-click on it, and in the navigator select New DataSource. It is also possible to create a new DataSource by selecting the "Output" node, and then choosing New DataSource from the Entry menu.
A pop-up dialog will request the name to be used to represent the new server group. DataSources require unique names, and you will not be able to enter a name that is already in use. DataSource names can be changed once the group has been created. Once you have created your server group, it will be listed as a node beneath the Output node in the navigation tree. Select it to load the configuration panel on the right-hand side of the GUI.
DataSources
DataSources are used to configure back-ends for VDS. You can set up multiple DataSources, and then configure VDS to send traffic to, and fetch information from these DataSources.
DataSources come with a variety of built-in features, namely:
-
Load-Balancing & Fail-Over (Support available for LDAP and HTTP DataSources)
-
SSL Support (available for LDAP and HTTP DataSources)
-
SASL/GSSAPI Support (Offered only for LDAP, enables GSSAPI to access LDAP servers using Kerberos)
-
Database Access (Offered only for relational database types)
-
Connection Pooling (Offered only for LDAP. HTTP is not a connection based protocol and therefore does not require this facility)
-
Session server affinity (Offered only for HTTP, where the concept of cookie-based session make sense)
-
Health Checking (Support available for LDAP and HTTP DataSources)
-
Pool Monitoring (Offered when Connection Pooling selected).
-
Keep Alive (Offered when Connection Pooling selected).
When configuring DataSources, you must first define a name and a protocol. The name field should already be populated with the name that you specified when the DataSource was created, however, if required, you are able to change it here in the future. The protocol specifies what type of backend service the DataSource actually contains: LDAP, HTTP, Relational Database, Radius or MM1. The parameters that are available for configuration within this configuration panel will change depending on which protocol you select here.
Servers Tab
By selecting the tab entitled Servers you can define a list of servers that should be used in the DataSource. You must configure at least one, and when you configure more than one server, you will be able to make use of the built-in load-balancing or fail-over facilities, and should enable and configure Health Monitoring.
It is possible to set up servers individually by selecting them on the tree at the left. By default they are configured to inherit all Security and Health Check settings from their DataSource, but with this panel it is possible to specify their settings independently.
Remember that all servers in the DataSource must be equivalent, i.e. must contain the same data and communicate using the same protocol. This means that in typical LDAP scenarios, you must enable replication between your LDAP servers. Configuring LDAP replication is beyond the scope of this document and you will need to refer to the documentation provided with your LDAP server software for instruction on how to do this.
Fig-41: List of servers configuration tab
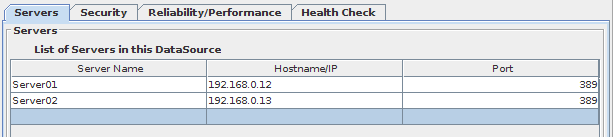
To edit the list of servers within your DataSource, you can simply right click over the DataSource name in the tree and choose New Server. You can also right click on the Server / Host name / Port table and insert a new Server. Take into account that the order of the Servers (from top to bottom) is their priority over the DataSource.
If you make use of the weighted load-balancing algorithm, discussed later in this section, an additional column will be added to the server-list table called Weight. You will need to specify the "weight" of each server in the list to control the fraction of the traffic that the server will receive. Mulsite will also add a column to specify the name of the site.
If you make use of SASL authentication for LDAP servers, discussed later in this section, an extra column will be added to the server-list table called SPN. You may leave these fields blank to use the default setting, or you may specify a particular SPN for a given server in the DataSource.
Security Tab
In this tab you can set up a Service Account and choose the Authentication Type.
Service Account
This assigns to the DataSource a fixed, static credential. All requests regardless of how the LDAP client has bound, are sent to the backend using the predefined credentials. Effectively this means that, for example, if you establish the fixed credentials cn=ldapuser,dc=onecorp,dc=com, every request from the LDAP client to VDS that is sent on to the backend servers will run under the credentials cn=ldapuser,dc=onecorp,dc=com.
This mechanism will defeat the standard authorization model for Directory Servers. If you choose to use it, you must be aware of the implications: you effectively by-pass an important security model of your backend servers. If you need to enforce access control based on client credentials, you should use the Access Control plugin included with the product to enforce your access rules or use the Proxy Auth method explained below.
In order to test that you have correctly set up your Service Account, always use the 'Test Connection' button to establish a connection using the credentials and configuration options that you have provided. If you are unable to establish a connection using these options and you have Service Account enabled, you will have trouble using VDS once it is running. (Note: This action may not be available when working with remote configurations)
Simple Authentication
This is the default Authentication Type. Operations will be sent to the DataSource using simple LDAP or HTTP (no SSL or SASL).
SSL Authentication
Please also refer to the Dell One Identity Virtual Directory Server SSL Guide for more information on configuring TLS/SSL. This guide will help to provide you with a better understanding of TLS/SSL and the options that are available to you.
Fig-42: SSL Certificates configuration tab

If your DataSource is going to consist of servers running LDAPS (LDAP using SSL), or HTTPS (HTTP with SSL enabled), once you select SSL as Authentication Type, the options on the SSL Certificates tab will become available to you. You will have the option to configure the path to a client certificate that will be used to connect to the backend servers. This setting is optional.
There is a small information icon, to the right of the text area that will display a new window with a partial text description of the certificate information (Subject, Issuer, Validity Times and Usage). This information might be useful for troubleshooting SSL related issues. (Note: This action may not be available when working with remote configurations). For the CA certificate, the area contains information for the certificates of all of the certificate authorities that are contained in the CA file.
You will also be able to optionally specify the path to the certificate of a CA (Certification Authority). If you choose to do this, VDS will attempt to verify whether the certificate presented by the backend server has been signed by the CA using the public certificate, specified in the "CA Certificate Path" field. If the verification fails, the connection to the backend server will fail. However, if you leave this field blank, VDS will blindly trust any certificate presented by any server in the DataSource and communications will be encrypted against this certificate.
The exact behavior of the VDS for server certificate validation can be controlled with the "Server certificate validation" option, whose possible values are:
- none
-
The certificate presented by the server is blindly trusted and communications will be encrypted using the certificate presented, regardless of whether it can be validated against a CA or not. This is useful if you are using self-signed certificates.
- log
-
Like none, but the engine will write an error log if the verification process fails.
- fail
-
If the certificate verification process fails, then the connection is closed.
- match
-
Line fail, but the subject of the certificate is also checked, closing the connection if it does not match.
IMPORTANT!
SSL Certificates issued by a Windows Certificate Authority (the common way to create an SSL certificate for a Domain Controller) are made with the hostname in uppercase inside the Subject of the certificate. For example, the hostname will appear as follows:
CN=W2K3DCQA.onecorp.com
When working with Windows certificates, it is very important that you check how the hostname is stored within the certificate, as the certificate validation process within the core engine treats this data in a case-sensitive manner.
Therefore, when using SSL for backend connections, if you decide to use the match validation option, you should enter the server hostname into the "Hostname/IP Address" field on the Servers tab of a DataSource, EXACTLY as it appears within the certificate. So, in this example case, you would enter the hostname as:
W2K3DCQA.onecorp.com
This is very important, or the certificate will not validate due to the hostname match failure. In general, it is better to ensure that the hostname matches identically anyway, in case you decide to change your validation options in the future.
It is also important to understand that while Windows does not generally treat hostnames in a case-sensitive manner, Linux and Unix systems do. This means that if you are running your VDS instance on a Linux or Unix system, you should ensure that the hostname specified in this way can actually be resolved. If not, you may need to edit your hosts file in /etc/hosts.
SASL Authentication
This option is only available for LDAP. With SASL selected as Authentication Type, you can configure the GSSAPI parameters used when a connection is opened to backend servers within a DataSource.
It is important that you are aware that in order for the SASL interface to work, you should have the appropriate Kerberos libraries installed and properly configured. Additionally, a Kerberos session will need to have already been established (i.e. the user that VDS is running as, will need to have been authenticated and should have obtained a Ticket Granting Ticket to establish authenticated connections to the servers).
For more information on SASL, GSSAPI and Kerberos and how it should be configured on the different systems that make up your infrastructure, please refer to the Dell One Identity Virtual Directory Server Guide to SASL, GSSAPI and Kerberos document included in the docs folder of your installation.
Fig-43: SASL configuration tab
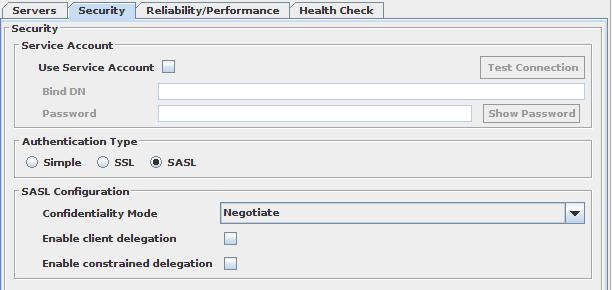
Note that enabling SASL will add an extra column to the table of servers listed on the Server tab, the SPN column. This will allow you to specify the Service Principal Name for which tickets will be requested when initiating a security context with the backend. If this field is left empty, the default "ldap@HOST" SPN will be used. An example SPN entry might look like this: ldap@master.mydomain.com
- Quality of Protection
-
Similar to a SASL Enabled listener, this option specifies the desired Quality of Protection of the communication towards the DataSource. There are four possible values to choose from:
-
Negotiate: All options (Privacy, Integrity or Auth-Only) are acceptable, in this order of preference. This is the default option.
-
Privacy: Only Privacy will be used and the communication will not be established if not possible.
-
Integrity: Only Integrity will be used and the communication will not be established if not possible.
-
Auth Only:: Only Authentication will be used and the communication will not be established if not possible.
-
- Enable client delegation
-
In configurations without Service Account, if the client sent credentials for delegation it is possible to use them to open connections to the backend. In order to do this, this option must be checked, as well as Acquire client delegated credentials in the corresponding listener
- Enable constrained delegation
-
In configurations without Service Account, this setting activates an alternative delegation method that makes use of the S4U protocol extensions to achieve delegation. The main difference is that in this case, the client does not need to forward its credentials for delegation to happen. When both delegation methods are active, the former one (client delegation) takes precedence
- Impersonation
-
When using a Service Account, you can select this setting to use impersonated credentials instead of the default ones available in the environment. The Bind DN field is used to specify the account to impersonate (Since GSSAPI authentication will be handled by the SASL library, you will not need to specify the password). SASL Impersonation relies on using Kerberos with S4U Extensions. In order for this to work, you will need to have configured your Kerberos so that the service has been trusted for delegation.
Reliability / Performance Tab
This tab provides the options to select fail-over load-balancing or multisite services for your DataSource. These settings are only relevant if you have more than one server configured in your DataSource. Using this tab you can also enable or disable connection pooling in LDAP. Connection pooling is described in more detail later in this section.
Fig-44: Reliability / Performance configuration tab
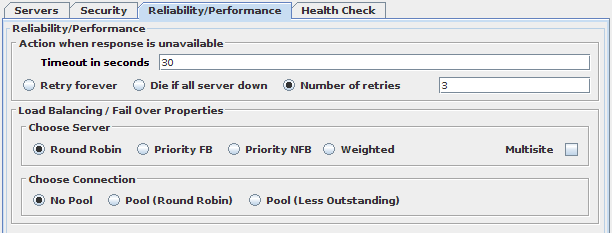
The Reliability and Performance tab is used to specify the behavior of VDS when accessing the servers within a DataSource. In particular, these settings will define how VDS behaves with regard to handling errors or timeouts sending requests to servers, as well as the distribution of requests and connections among them.
Action when response is unavailable
- Timeout in seconds
-
Number of seconds that the VDS instance will wait for a response from a backend server before generating an error.
- Retry Forever
-
If a request fails due to a server unavailability or any other connectivity problem, VDS will retry the PDU for all of the other servers in the DataSource, continually until an available server is found. Naturally, this option only makes sense if you are using a load-balancing algorithm.
- Die if all servers are down
-
If a request fails due to a server unavailability or any other connectivity problem, VDS will retry the PDU until it has exhausted all of the other servers in the DataSource. At this point, an error will be returned. This option really only makes sense if you are making use of a load-balancing algorithm. If you are making use of a failover option, you should set a PDU Retries value (mentioned below) instead.
- Number of retries
-
When a request fails due to server unavailability or any other connectivity problem, VDS will retry the PDU endlessly until it gets a response for it. This setting will tell the engine that the request should be retried for a specified number of times before generating an error response for it.
When a connection to a backend LDAP server is closed and the proxy receives traffic that should make use of that connection, the proxy will attempt to reopen the connection and will re-authenticate with the BIND credentials that were last used to successfully authenticate with that backend. This behaviour may occur where you are making use of Connection Pooling and a timeout has been configured within your environment to close connections that have been idle for a particular period of time. Where Connection Pooling is not used, you may equally find that this behaviour occurs where you have a client application that is designed to keep a single connection open for all requests.
Load Balancing / Fail Over Properties
DataSources allow you to choose among several combinations of algorithms for selecting the appropriate Server, which provides you with a huge combination of load balancing / fail-over configurations. This functionality is only relevant when you have more than one server specified within your server list for the DataSource.
Load balancing is a feature that allows you to increase throughput and overall performance by distributing requests over multiple servers. Therefore, overall throughput is no longer limited to what one backend server is capable of handling. Instead, the maximum load that you can achieve using load-balancing depends on the combined throughput capability of all backend servers, and on VDS itself.
VDS is very efficient, and in most cases faster than any LDAP Directory server alone. Keep in mind, however, that VDS has to handle double the traffic: from the client applications to VDS, and then from VDS to the backend servers. Therefore, if you choose to make use of the load-balancing facilities, to handle extremely heavy traffic, ensure that the machine that VDS is running on has sufficient resources in terms of CPU and network. As an example, it is possible that VDS's performance can be inhibited because it has saturated a 100 Mbit / sec Ethernet connection with traffic. Upgrading the connectivity to a 1 Gbit / sec Ethernet switched infrastructure will improve performance significantly.
Fail Over is a feature that provides an important fault tolerance functionality, so that in cases where you have an unexpected behaviour (or in any kind of Server DOWN situation), you can recover from it using the most appropriate Server in each case.
Choose Server Algorithms
To choose a server in the DataSource there are four algorithms to choose from:
- Round-Robin
-
This algorithm is selected by default and will alternate between all servers, sending each request to the next server in the list, and restarting at the first server once the end of the server list has been reached. Using this algorithm, you should expect to get an even distribution of requests between all servers configured in this DataSource.
- Priority, Fail Back
-
When the current server becomes unavailable, VDS will check the status of the next servers in the list until one is found that is marked as UP. That server is then designated as the new current server. Should the current server NOT be the first server, VDS will automatically switch back to the server closest to the first server as soon as it is marked as UP, until it is using the first server again. For example, with two servers in the DataSource (Server1 being the first and current server), if Server1 becomes unavailable traffic is automatically redirected to Server2. But as soon as VDS notices that Server1 has become available (through its health check mechanism) traffic will be redirected back to Server1.
- Priority, No Fail Back
-
This algorithm works like the former without the fail-back functionality: When the current server becomes unavailable, VDS will check the status of the next server in the list, then the following one, and so on until a server is found that is marked as UP. That server is then designated as the new current server.
- Weighted
-
In this algorithm the traffic is not distributed evenly among the servers within the DataSource. Instead, each server is assigned a "server priority" value (defined in the server list for the DataSource). The fraction of the amount of traffic that the server receives will be calculated using this value over the sum of priority values for all servers in the DataSource. So for example, if we have 3 servers in a DataSource, and we give them priorities of 100, 60 and 40, roughly 50% of the traffic will go to the first server, 30% will go to the second and 20% will go to the third. There is a certain amount of randomness in how connections are opened, which is important to bear in mind when using connection pooling, since the connections are opened less often. If you choose to use connection pooling, you should either ensure that your connections are refreshed often, or you should consider whether or not you really want to make use of the weighted algorithm at all. In general, using larger numbers to represent server priority weights, will improve the effectiveness of this algorithm.
Each algorithm can be combined with multisite:
- Multisite
-
Multisite takes into account the case where your servers are distributed geographically. This implies that some sites are easier to reach than others or are more important (primary or master sites, replicas, low or high-traffic sites ...) than others. Each server has a site name (several Servers could be on the same site) and a priority defined in the server list (the order in the list from top to bottom) for the DataSource. All servers with the same site name are considered to form a "logical site", and, as such, are considered equivalent. Multisite then implements both a fail-over algorithm among the different logical sites defined (using fail-back when one server in a site with higher precedence is detected as up) and a server-choosing algorithm (one of the former four) among the different servers in the same logical site.
Choose Connection Options
Fig-45: Connection Pool options
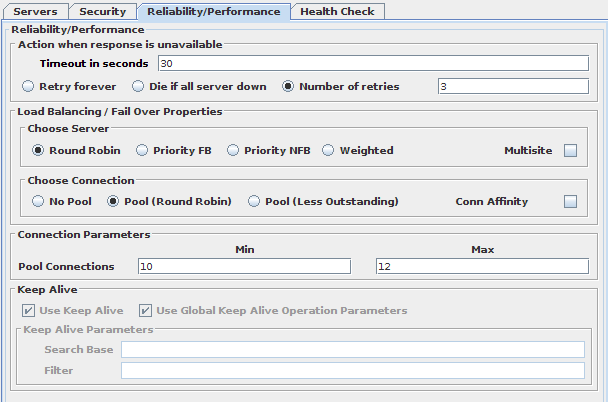
For LDAP DataSources it is possible in this section to set up connection pooling, a very useful feature that optimizes the efficiency of requests to backend LDAP servers by effectively decoupling frontend client connections from backend server connections. Without connection pooling, VDS opens a connection to the backend whenever an LDAP client connects to VDS. However, when connection pooling is used, VDS will open a predefined set of connections to the LDAP backend servers, so that when clients connect and send requests to VDS, the pre-established connections can be used to send requests on to the backend servers.
Connection Pooling requires special care when dealing with credentials. The LDAP protocol mandates that each and every connection is bound using the LDAP BIND request. Until a BIND request has been issued on a connection, the connection is authenticated anonymously. Once a BIND request has successfully completed, the connection is authenticated with the credentials of that BIND request. Each subsequent request on that connection will then be carried out using those credentials.
In addition to the number of connections specified in the Pool Connections field, VDS will additionally open a number of connections to the back-end servers (depending on the amount of simultaneous BINDs reaching the DataSource) for the exclusive purpose of sending LDAP BIND operations. The reason for this is that BIND requests change the credentials of a backend connections, and therefore reset the connection pool's default credentials. This is done automatically and is completely transparent to the LDAP clients.
Since a connection pool is pre-established, credentials must be treated in a special way, so that connections remain authenticated. In the Security tab you can set up a Service Account to be used, as well as the Authentication Type (Simple, SSL or SASL).
- Pool (Round Robin)
-
This connection pool algorithm chooses the connection in the pool cyclically.
- Pool (Less Outstanding)
-
This connection pool algorithm chooses the connection in the pool by the server that has less outstanding requests.
- Pool Connections
-
The number of connections in the pool is dynamic and depends on the load of traffic it must process. Here you can specify the valid range for the amount of connections.
- Use SASL buffer to authenticate connections
-
In connection pools with SASL Authentication, the simple LDAP BIND requests sent by the clients still need to be forwarded to the backends to validate the password. If sent through the SASL pool they would disrupt the security of the connection, so they need to be sent separately. By selecting this checkbox, instead of plain LDAP they will be sent using a newly created SASL buffer, which makes the process slower but protects the privacy.
- Connection Affinity
-
The default algorithm used when choosing to which connection in the pool the operations are sent is round robin. This means that when a client opens a connection to VDS and starts sending operations, each one will potentially be routed to a different connection established with the servers. This behaviour is usually correct and everything works as expected, but it can give problems in certain scenarios. For instance, when VDS has been configured to handle pagination, it's possible that each request to the backend is routed to a different server, resulting in errors due to the pagination cookie set by one server not being valid at a different one. To avoid these problems, Connection Affinity can be selected. This replaces the round robin algorithm by affinity, which makes VDS stick to a connection once it has been established. This is done on a per-frontend connection basis, so that different client connections can still go to different backends; but once they are established they will continue to use the same one until the client is finished.
- Session Server Affinity
-
For HTTP DataSources, at the Choose Connection options (in the Reliability /performance tab) there's a Server Affinity checkbox. This checkbox is used to define how load balancing should be handled by the proxy with regard to HTTP session information. A common problem encountered within HTTP DataSources that contain multiple servers is that it is possible that these servers do not share a common session infrastructure. In these situations, the proxy server should make sure that different requests within a session are always sent to the same server, regardless of the load-balancing/fail-over selection. This is achieved using the session-server affinity options presented on this tab. If your HTTP servers share session information, possibly via a backend database, there should be little problem in handling load-balancing or failover as any server should be capable of matching a client to the correct session data. In this case, you can leave this option unchecked. If the servers that comprise the DataSource do not have access to shared session data, you will need to define what actions should be taken should a server become unavailable once a client has established a session. These options will become available once you check the Activate Session Server Affinity checkbox.
- Cookie Timeout
-
If you choose to make use of the Session Server Affinity option, VDS will submit a cookie to the client application, containing a unique session identifier which will be used by the proxy engine to continue to route requests to that same backend server that the client application originally accessed. In this section, you are able to specify a timeout or expiry value for this cookie. The value is specified in seconds, and is set by default to '14400' or 4 hours. Setting this value to zero will ensure that the cookie never expires and the client will always be redirected to the same server on each subsequent connection. It is not recommended that this value is set to zero. It is important to note that session server affinity relies on cookies being enabled on the client application. If the client does not accept cookies, session server affinity will not work and each subsequent request by the client will be treated as a new client request and could be routed to any backend server. If you are unable to guarantee that client applications will have cookie support enabled, we highly recommend that you explore the option of sharing session data between your backend HTTP servers.
Health Check Tab
In this tab you can define specific health check parameters for each DataSource, if you do not wish to use the generic health check parameters defined under this tab in the Health Monitoring section of the configuration.
Fig-46: LDAP DataSource specific Health Check options
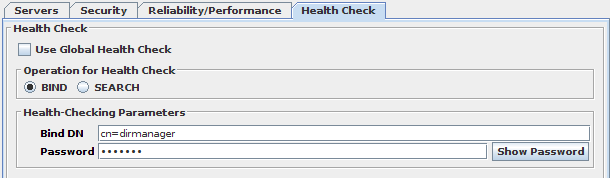
For LDAP, the final section in the configuration panel will change depending on whether you have selected BIND or SEARCH as the health check operation that will be used for the servers in this DataSource. If you have chosen BIND as operation, you will be required to provide authorization information (Bind DN and password). If you have chosen SEARCH instead, you will be required to provide the Search DN and Filter to be used in the request. SEARCH requests are anonymous and of scope 0 (Base).
Pool Monitoring Tab
In this tab you can define the timing for the Pool Monitoring cycle. In every "Pool Monitor" cycle it makes a refresh of the connections in the Pool so that the connections can be correctly balanced for long time periods. Due to temporary Server DOWN situations, if this feature was not enabled, all connections in the Pool would probably end up being established to only one of the Servers.
You can also configure the Keep Alive timing for cycles and its parameters. This is a feature that will send operations at each cycle to all the opened connections in the pool, so that the connections will remain open even if there's no traffic (note that this is very useful if you have Directory Servers with very low timeouts that close pool connections). This behaviour can be configured in a per-DataSource basis (see the Health Monitoring section of the configuration).
Relational Database Access
A DataSource can be configured to use a relational database (RDBMS) for data access as opposed to making use of LDAP or LDAPS. You can use this feature to connect to and treat tables or views within a relational database as if they were regular entries in an LDAP directory server. RDBMS DataSources work bi-directionally, i.e. for searching, modifying and deleting entries.
You can set up a DataSource for Relational Database Access manually for any new DataSource that you create. Alternatively you may use the configuration wizard that can be initialized by clicking on the "New Database Wizard" button in the Configuration Panel when you click on the Output node in the configuration Navigator. If you make use of the wizard, please continue to read the following sections which explain the various configuration components in more detail and will help you to further configure your DataSource. (Note: This action may not be available when working with remote configurations)
Configuration using the wizard
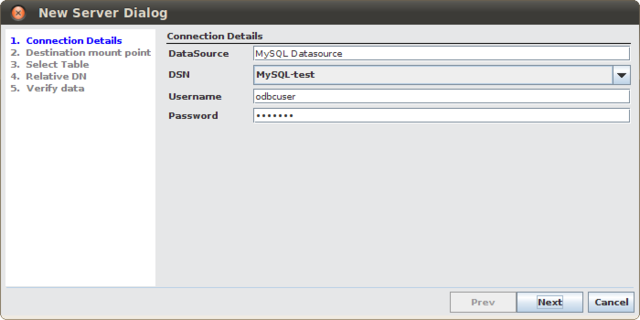
To create a new DataSource with a relational database server as a backend, you can click on the "New Database Wizard" button in the Configuration Panel when you click on the Output node in the configuration Navigator.
You will first need to specify a name for your DataSource and to specify the ODBC Data Source Name (DSN) you have already configured for your machine (select from list of detected DSNs). Also specify Name and password for accessing the DataSource.
Fig-47: Database connection information
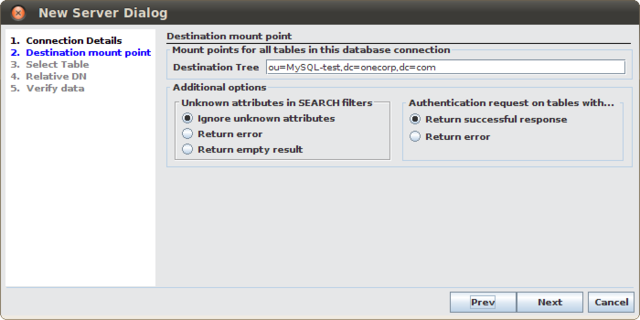
Once you have entered these details and clicked on the Next button, you will be presented with the destination mountpoint configuration options. These options define where data retrieved from the database will be mounted onto an LDAP tree. If you have already defined a DataSource, comprised of LDAP servers, you may wish to map this data onto a DN within the LDAP tree presented by this DataSource. Alternatively, if you have created a VirtualTree, you might specify a mountpoint that maps onto this tree. In the Destination Tree field, you should specify the full DN that will be used to access this data using an LDAP client. It is important that the DN that you choose to use as a mountpoint for this data is unique and not already used within your DIT structure.
On this screen, you also have options to control how particular requests are handled. You can determine how to handle unknown attributes in Search requests. You can optionally return an error message notifying the client that the attribute does not exist, or you can simply ignore any unknown attributes within a request, or you can return an empty result for any request that includes an unknown attribute.
You are also able to control how BIND requests should be handled if you have not specified a password attribute)") against which the request can be authenticated. In this case, you can simply ignore the request and return a successful response or you can return an error notifying the client that the BIND request failed.
against which the request can be authenticated. In this case, you can simply ignore the request and return a successful response or you can return an error notifying the client that the BIND request failed.
Fig-48: Defining a destination mountpoint
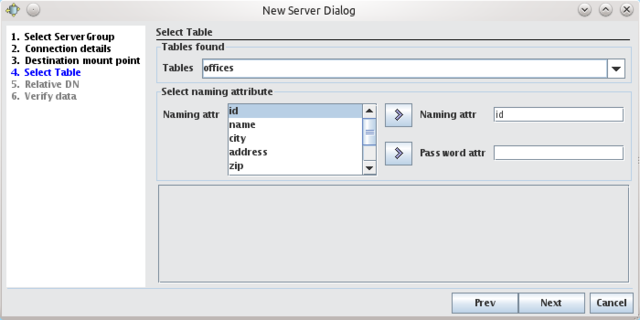
Once you have made your changes on this screen, click Next to continue with the configuration. The next screen allows you to select a table to attach to the LDAP tree. Select one of the tables in your database and you will be able to see the fields that are available for that table. You can select one field to use as the naming attribute for entries as they will appear in your LDAP tree. You may also optionally select an attribute to use as a 'password attribute'. The 'password attribute' is used to authenticate BIND requests for entries in this part of the LDAP tree. So, if your table contains a field called 'username' and a field called 'password', you may set 'username' to be your naming attribute and 'password' to be the password attribute. If your table is mapped to the DN 'ou=users,ou=webdb,dc=onecorp,dc=com', BIND requests for:
username=bob,ou=users,ou=webdb,dc=onecorp,dc=com
will be authenticated using the 'password' field in the database.
Fig-49: Mapping a table
Naturally, the password attribute is optional as many tables may not contain authentication type information. If you leave this option empty, BIND requests will not be serviced.
Although you can currently only map one table in the wizard, you will be able to attach more database tables to your LDAP tree later, by editing your configuration manually. See the Table Mapping section later in this chapter.
Once you have finished defining a table map, click on the Next button to configure the RDN where the table will map to. The RDN will define the mapping for each table that you attach. These RDNs will all be nodes within the mountpoint that you defined earlier.
Fig-50: Setting an RDN for the table
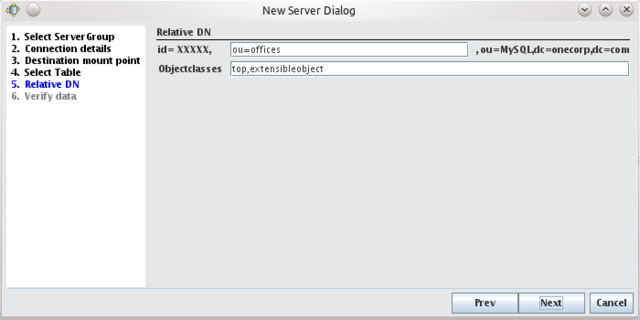
On this screen, you are also able to define an 'objectclass' for the table. Often it is rare that a database table will conform to your LDAP schema, and it is common to use the 'extensibleObject' objectclass for any database table.
The final step in the wizard will verify all of the configuration data that you have entered and will ensure that a syntactically correct configuration entry can be created with the data. If there are any errors, you will be notified here. You can use the 'Previous' button to navigate back through the wizard to correct any errors. If the configuration is usable, you will be able to click on the 'Last' button to complete the wizard. Your new DataSource will be created and you will be able to navigate to it in the configuration Navigator to edit it further.
Fig-51: Configuration verification

Configuration Panel
Any newly created DataSource can be set up for relational database access by setting the protocol option to database.
When the protocol has been set to 'Relational Database' you will be presented with two tabs, within the configuration panel, that present the various parameters that you will need to configure in order to facilitate RDBMS connectivity. The first tab is titled 'Database Info' and is concerned with providing the options that should be used to connect to a backend database. The second tab is titled 'LDAP Info' and is concerned with providing options that control how data stored in a backend database will be presented within an LDAP environment.
Database Info
Fig-52: Database Access Configuration

On the 'Database Info' tab, you will need to configure the various options that facilitate RDBMS connectivity. These options are as follows:
ODBC_Source is the DSN that you define in your User Data Sources for ODBC. Note that in order to use "User DSN" data sources in Windows, the VDS service must be run as the correct user. By default, the VDS instances run as the LocalSystem Account, which usually does not have the permissions to work with User DSN's created by other users. An alternative approach is to define a System Data Source accessible to all users.
Username takes the user name that should be used to connect to the database server.
Password is used to specify the password for the Username that you set in the previous field.
LDAP Info
Fig-53: LDAP Info for a Relational Database
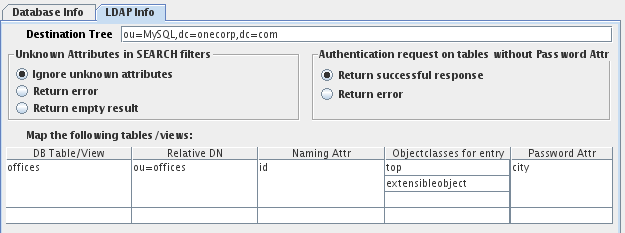
The 'LDAP Info' tab is used to control how data that is stored within tables inside a relational database should be presented in an LDAP framework.
The Destination Tree field defines the node in the LDAP tree where all of your RDBMS data is made visible. Each table / view will be mapped into its own contained entry using its own RDN. This should be the name of an entry that does not yet exist in your directory servers, but whose parent entry exists. For example, if your directory server contains the tree dc=onecorp,dc=com you could enter ou=db,dc=onecorp,dc=com here. It is very important that the actual DN that you specify here is not already used in the tree, or access to data stored within this branch may not be accessible.
The Unknown Attributes in SEARCH filter setting will simply define how VDS will behave when a SEARCH filter of a request contains attributes that are not defined in the mapping table below. VDS can be configured to ignore search filters containing unknown attributes, or it can return an error, or alternatively it can return an empty result.
The Authentication request on tables without Password Attr settings are responsible for handling how BIND requests should be handled in case the Password Attr is not provided in the table configuration. The options are to return a successful response or to return an error.
The VDS is not able to route anonymous request to a table. As a result, anonymous requests will be presented with a "Server is unwilling to perform" error message. To avoid this, the Add Credentials plugin, bundled with the product, can be used to force anonymous requests to authenticate as a designated user. Also, it is always possible to define a custom script in a manual processing stage that will take care of these anonymous requests.
Table / View Mapping
Last, but not least you will need to enter the tables that should be mapped from the RDBMS into the virtual DataSource. Every table and view will be exposed as a virtual entry in the previously defined destination tree. Every row in the table will then be visible as a sub-entry to that virtual entry.
Notably, the Password Attr field provides you with the option to define a password attribute that can be used to map BIND requests. Thus, if a field in the database is used to store passwords, this field can be entered here so that attempts to BIND can be authenticated against this field.
We will illustrate RDBMS connectivity with the following example. Assume that you have a table or view called "users" in your relational database. This table contains a column called LAST_NAME that is unique and not NULL (it could even be the primary key for that table, but the latter is not really a requirement for VDS). You can map this table into your RDBMS DataSource by having the DataSource expose this table / view within the virtual entry ou=people in the previously defined Destination Tree. Therefore, every row in the table would be visible as DNs such as:
LAST_NAME=lastname,ou=people,ou=db,dc=onecorp,dc=com
To make this happen, you would configure your destination tree field to have the value ou=db,dc=onecorp,dc=com and configure the following mapping information:
Table 1:Simple Database mapping example
| Mapping field | Mapping Value |
|---|---|
| DB Table / View | users |
| Relative DN | ou=users |
| Naming Attr | LAST_NAME |
| Objectclasses for entry | person |
| Password Attr | PASSWORD |
In the above table, we also assume that the 'users' table contains a PASSWORD field that we can use to authenticate BIND requests against. Thus, if a user attempts to BIND with the DN
LAST_NAME=bloggs,ou=people,ou=db,dc=onecorp,dc=com
the password used in the BIND request will be tested against the password stored in the PASSWORD field for the entry in the database table where the LAST_NAME is 'bloggs'. If the password matches, the BIND request will be authenticated.
ODBC DataSource Sample
VDS includes a sample configuration that can be used to demonstrate how the product can be configured to make use of an ODBC driver to access a relational database as a backend repository. In order to make use of the sample configuration, you will need to set up a demonstration environment capable of working with the sample configuration. Please see the Samples section in the Plugins and Samples chapter of the User Manual.
It is obviously fairly important that you have a database that you intend to connect through via the ODBC connection in this sample. In our configuration, we expect the following conditions to be met:
  * An ODBC connection with the DSN: MySQL-test
  * The username for the ODBC connection should be: odbcuser
  * The password for the ODBC connection should be: odbcpwd
  * The database should contain a table named: offices
  * The ~offices~ table in the database should contain a field: name
As long as these conditions are met, the sample configuration should start without any trouble, and you will be able to browse data from the offices table within the LDAP branch: ou=db,dc=onecorp,dc=com
Location
The sample configuration will be accessible within DSGUI in the Open Config dialog, by clicking on the drop-down selector at the top of the dialog window, and changing the value from 'confs' to 'samples'. The sample configuration is named:
sample.odbc
If you wish to view the actual LDIF file that makes up this configuration it is located in the samples folder at the root of your installation.
samples/sample.odbc
Objective
This sample shows how to aggregate data in a relational database with data from a directory. The access to the DataSource is through an ODBC driver.
Configuration
You will need to create a database and add a node to your directory. The sample uses a MySQL database but other databases can equally be used as long as there is a recent ODBC driver for it. In unix you can use unixODBC (note: iODBC has not been tested yet but it should also work). Use the provided sql file in the samples/data directory to create and populate a table 'offices' in your MySQL test database. Then you need to create a DSN (DataSource Name) in your ODBC directory (/etc/odbc.ini in linux; use the ODBC DataSources administrative tool interface in windows) that points to the created database. The DSN (connection string) as well as the username and password should match the values in the odbc DataSource configuration. The sample uses MySQL-test, odbcuser and odbcpwd respectively. To be able to see the data in the relational database as a node under your directory tree, add the node (Organizational Unit, ou) db under the onecorp root object (so that it matches the destination tree used in the sample: ou=db,dc=onecorp,dc=com).
Test
Expand the ou=db,dc=onecorp,dc=com node. You should see a list of records corresponding to the rows in table of your database. You can make changes to the records and check that they are propagated to the rows of the table.
PROCESSING
The Processing section of the configuration contains all of the processing directives that should be implemented as network traffic traverses the proxy engine. This means that you are able to define particular processing functionality that should be applied to different operations as they move through the system, implementing transformations to the data contained within a PDU, routing a PDU to a particular location, or simply logging the transaction.
The Processing Configuration makes use of a 'stage model' whereby different processing functions can be grouped together to create discrete processing modules that can be re-used and ordered in a particular way within a processing pipeline. Stages may either be 'Automatic' or 'Manual'. Automatic processing stages allow you to make use of bundled plugins and extensions that are included with VDS. Manual stages require you to define custom configuration rules and to script your own custom solution.
All processing stages include particular conditional rules that allow you to define exactly when a particular piece of functionality should be triggered.
Although all processing configuration is grouped together in the Processing part of the configuration, actual implementation is handled by the Input Listenerand requires that you attach Processing Stages to a Listener configuration. This allows you to re-use stages within your processing pipelines and to order the stages in different ways depending on the Listener that is being used to handle a connection. In this way, you may have different listeners that have different processing functionality defined for them.