To obtain an overview of the system configuration
- Start the Designer or the Manager and select the Help | Info menu item.
The System information tab provides an overview of your current system administration and the installed modules with their versions.
IMPORTANT: You will need to provide this information if you contact the Support Team.
NOTE: If you have enabled vendor notification, this report is sent once a month to One Identity.
During a schema installation or schema update using the Configuration Wizard, the migration date and migration version are recorded in the database transport history.
When you import a transport package with the Database Transporter, the import date and description, the database version, and the transport package name are recorded in the transport history of the target database.
To display transport history
- Start the Designer and select the Help | Transport history menu item.
The One Identity Manager tools offer various possible ways to display error messages.
Detailed information about this topic
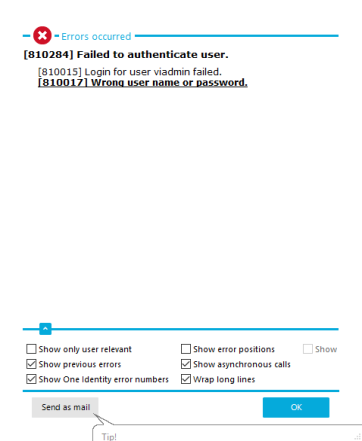
Error messages for the One Identity Manager tools are shown in a separate window. In addition, a more detailed description of the error is displayed.
Figure 3: Error message window

-
To send the messages, click on the Send as mail button.
This creates a new email message in the default mail program and copies over the error text.
-
To copy the messages to the clipboard, open the context menu for the Send as mail button and click on Copy to clipboard.
-
To record the steps taken that gave the error, start the Windows Steps Recorder.
You can now start recording the individual steps. Detailed information about recording the steps taken to reproduce a problem using the Windows Steps Recorder can be found in the Microsoft documentation.
Configure the amount of information to be displayed using the options in the error message window.
To change options
- Open the configuration view for the error messages window with the
 button and enable or disable the options you want.
Table 8: Options for displaying error messages
|
Show previous errors |
Specifies whether all previous errors that lead to the current error, should also be shown. |
|
Show One Identity error numbers |
Specifies whether internal error numbers are shown. |
|
Show error positions |
Specifies whether error position are also shown in the program code. |
|
Wrap long lines |
Specifies whether long error messages are wrapped. |
|
Show only user relevant |
Specifies whether all error messages are to be displayed or only those error messages that are classified as user-relevant. |
|
Show asynchronous calls |
Specifies whether error messages in asynchronous method calls are shown. |
|
Show crash report |
Specifies whether error messages from the crash recorder are shown. |
Related topics


 button and enable or disable the options you want.