Note: For more details on installing and joining the Safeguard Authentication Services client, please see the Safeguard Authentication Services Administration Guide. Commands prefixed with $ must be run by the SAP instance owner account. Commands prefixed with # must be run by root.
To install the Safeguard Authentication Services client and join the Unix system to Active Directory
- Mount the product media or extract the product archive, and change directory to the base directory. For example:
# mount /mnt/cdrom; cd /mnt/cdrom
- Run the preflight program to check for proper connectivity and patch requirements. If failures are reported, see the Safeguard Authentication Services Administration Guide for requirements and troubleshooting instructions.
# ./preflight example.com
Replace example.com with your Active Directory domain name.
- Install the Safeguard Authentication Services client.
# ./install.sh vasclnt
- Join the system to Active Directory.
# /opt/quest/bin/vastool -u Administrator join --skip-config example.com
Where Administrator is an Active Directory user with rights to join and example.com is your Active Directory domain name.
Note: Ignore any license warnings reported from the join process. These are not relevant to SSO for SAP.
To configure the SAP server on Unix to use Single Sign-on for SAP
- Change the group ownership and permissions of the host.keytab file.
# chgrp sapsys /etc/opt/quest/vas/host.keytab; chmod 550 /etc/opt/quest/vas/host.keytab
- List the keytab and note the Principal name containing a $.
$ /opt/quest/bin/vastool ktutil list
/etc/opt/quest/vas/host.keytab:

Vno  Type                     Principal
  2  aes128-cts-hmac-sha1-96  host/alvlabu22.example.com@EXAMPLE.COM
  2  aes128-cts-hmac-sha1-96  ALVLABU22$@EXAMPLE.COM
  2  aes128-cts-hmac-sha1-96  cifs/alvlabu22.example.com@EXAMPLE.COM
  2  aes128-cts-hmac-sha1-96  host/ALVLABU22@EXAMPLE.COM
  2  aes256-cts-hmac-sha1-96  host/alvlabu22.example.com@EXAMPLE.COM
  2  aes256-cts-hmac-sha1-96  ALVLABU22$@EXAMPLE.COM
  2  aes256-cts-hmac-sha1-96  cifs/alvlabu22.example.com@EXAMPLE.COM
  2  aes256-cts-hmac-sha1-96  host/ALVLABU22@EXAMPLE.COM
  2  arcfour-hmac-md5         host/alvlabu22.example.com@EXAMPLE.COM
  2  arcfour-hmac-md5         ALVLABU22$@EXAMPLE.COM            <-- Take note of this $ name to use in the next step.
  2  arcfour-hmac-md5         cifs/alvlabu22.example.com@EXAMPLE.COM
  2  arcfour-hmac-md5         host/ALVLABU22@EXAMPLE.COM
- Edit the SAP instance profile by adding the following SNC parameters:
snc/enable = 1
snc/data_protection/min = 1
snc/data_protection/max = 3
snc/data_protection/use = 3
snc/accept_insecure_gui = 1
snc/accept_insecure_cpic = 1
snc/accept_insecure_rfc = 1
snc/accept_insecure_r3int_rfc = 1
snc/r3int_rfc_insecure = 0
snc/r3int_rfc_qop = 3
snc/permit_insecure_start = 1
snc/identity/as = p:ALVLABU22$@EXAMPLE.COM
snc/gssapi_lib = /opt/quest/lib/libvas-gssapi64.so
Note: Set snc/identity/as to the value collected above, prefixed with p:.
Use the following table to determine the proper value for the snc/gssapi_lib setting.
Table 1: SNC library paths
| Any 32-bit (except HP-UX) |
/opt/quest/lib |
libvas-gssapi.so |
| HPUX 32-bit |
/opt/quest/lib |
libvas-gssap.sl |
| AIX 64 |
/opt/quest/lib |
libvas-gssapi64.so |
| Linux-x86_64 |
/opt/quest/lib64 |
libvas-gssapi.so |
| Oracle Solaris-SPARC 64 |
/opt/quest/lib/sparcv9 |
libvas-gssapi.so |
| Oracle Solaris-x86_64 |
/opt/quest/lib/64 |
libvas-gssapi.so |
| HP-UX pa-risc 64 |
/opt/quest/lib/pa20_64 |
libvas-gssapi.sl |
| HP-UX ia64 |
/opt/quest/lib/hpux64 |
libvas-gssapi.so |
- Restart SAP.
$ stopsap
$ startsap
Note: If the SAP services fail to start, check the /usr/sap/<SID>/DVEBMGS00/work/dev_w0 file for errors.
Perform the following tasks as a user with Administrative rights.
- In WindowsExplorer, browse to \add-ons\qas-sso-for-sap on the installation media and run the qas-sso-for-sap-*.msi installer.
- On the Welcome screen, click Next
-
On the License File screen, click Browse to locate the Single Sign-on for SAP license file.
Select the file and click Open.
Back on the License File screen, click Next.
- Read the license agreement, select I accept the terms in the license agreement and click Next.
- On the Destination Folder screen, click Next to use the default installation location.
- On the Setup Type screen, click Next to use the default (Complete) setup type.
- On the Ready to Install the Program screen, click Install.
- When the installer is complete, click Finish.
Configure SAP GUI for use with Single Sign-on for SAP.
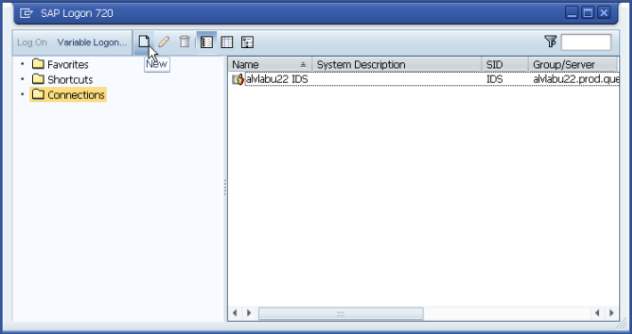
- Open SAP Logon and click New in Connections.
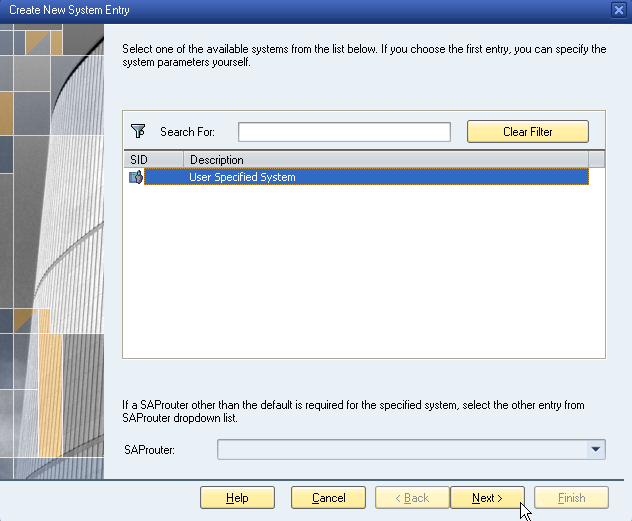
- Click Next.
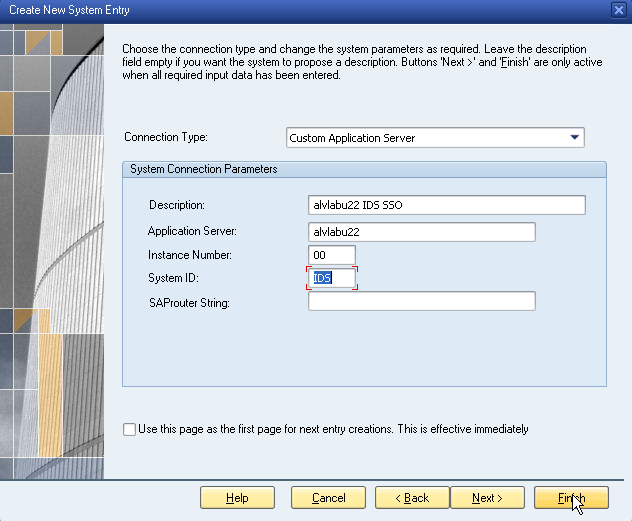
- Enter a Description, Application Server address, Instance Number, and System ID, then click Finish.
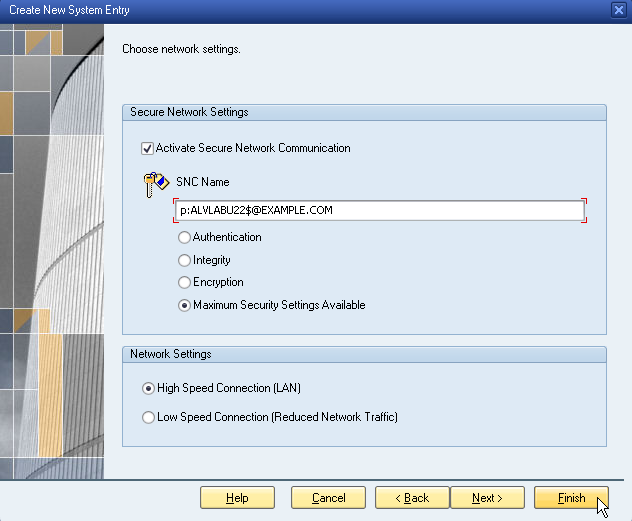
- Select Activate Secure Network Communication and enter the SNC Name derived from the Unix SAP Configuration, then click Finish.