This section describes how to configure Active Directory (AD) servers.
To create a new Active Directory (AD) server
-
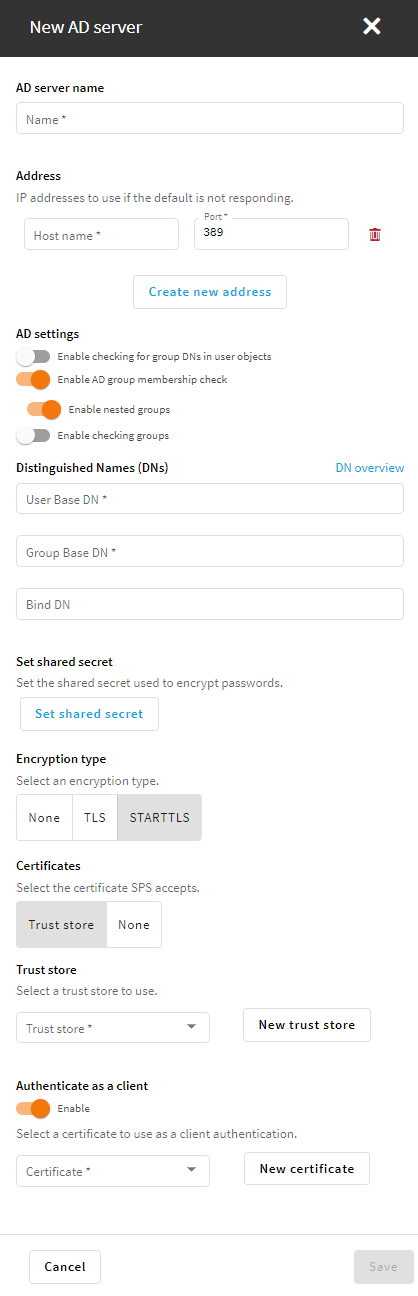
To create a Microsoft Active directory server, navigate to Users & Access Control > Login options > Manage AD/LDAP Servers, click Add new server and select Active directory.
Figure 132: Users & Access Control > Login Options > Manage AD/LDAP Servers — Active Directory
-
In the Name field, enter the server name.
-
Enter the IP address/hostname and the port of the LDAP server in the respective text boxes.
Consider the following when specifying the address information:
-
If you want to encrypt the communication between SPS and the LDAP server, use the following port numbers:
-
For TLS, specify 636 as the port number.
-
For STARTTLS, specify 389 as the port number.
-
-
Use an IPv4 adress or a hostname.
-
To add multiple servers, click
and enter the address of the next server. If a server is unreachable, SPS will try to connect to the next server in the list in failover mode.
-
When you configure the location of the LDAP server, that is, the IP address or hostname and the port number, you can use a Service record (SRV record), which is a type of information record in the DNS that maps the name of a service to the DNS name of the server. SRV records have the following format: _ldap._tcp.<SITE_NAME>._sites.dc._msdcs.<DOMAIN.NAME> in the Address field. SPS looks up the SRV record during committing the configuration change.
For more information on SRV records, see the relevant Microsoft documentation.
-
Caution: If you connect to the LDAP server over a TLS-encrypted connection with certificate verification, you must fill the Address field with a name or IP address, which must be present in the certificate.
-
-
Configure AD settings.
-
To also check group membership based on group Distinguished Names (DNs) in a user attribute, select Enable checking for group DNs in user objects and enter the name of the user attribute, for example, memberOf in the User attribute of group DNs field.
Caution: If you have too many groups, using this option significantly slows down logging in to the SPS web interface.
Use this option only if you have an LDAP schema where the user groups can only be determined from a user attribute that contains the group DNs.
-
To enable nested groups, select Enable AD group membership check, then Enable nested groups.
Caution: Nested groups can slow down the query and cause the connection to timeout if the LDAP tree is very large. In this case, disable the Enable nested groups option.
-
To check for group membership based on user DNs in group attributes, use the Check the user DN in these groups option.
For more information, see Active Directory LDAP backend.
-
-
Configure the options of the Distinguished Names field.
-
In the User Base DN field, enter the name of the DN to be used as the base of queries regarding users (for example: OU=People,DC=demodomain,DC=exampleinc).
NOTE: This field is mandatory. You can use the same value for the User Base DN and the Group Base DN settings.
To speed up LDAP operations, specify a sufficiently narrow base for the LDAP subtrees where users and groups are stored.
-
In the Group Base DN field, enter the name of the DN to be used as the base of queries regarding groups (for example: OU=Groups,DC=demodomain,DC=exampleinc).
NOTE: This field is mandatory. You can use the same value for the User Base DN and the Group Base DN settings.
To speed up LDAP operations, specify a sufficiently narrow base for the LDAP subtrees where users and groups are stored.
-
In the Bind DN field, enter the Distinguished Name that SPS must use to bind to the LDAP directory (for example: CN=Administrator,DC=demodomain,DC=exampleinc).
NOTE: SPS accepts both pre Windows 2000-style and Windows 2003-style account names, or User Principal Names (UPNs). For example, administrator@example.com is also accepted.
-
-
Configure the Set shared secret option.
To configure or change the password to use when binding to the LDAP server, click Set password, enter the password, and click Update.
NOTE: SPS accepts passwords that are not longer than 150 characters and supports the following characters:
-
Letters A-Z, a-z
-
Numbers 0-9
-
The space character
-
Special characters: !"#$%&'()*+,-./:;<>=?@[]\^-`{}_|
-
-
If you want to encrypt the communication between SPS and the LDAP server, in Encryption, select the TLS or the STARTTLS option and verify the certificate of the server.
-
If you want SPS to verify the certificate of the server, under Certificate requirements, select Trust Store.
-
In the Trust Store field, select a trust store.
SPS will use the selected trust store to verify the certificate of the server, and reject the connections if the verification fails.
-
To add a new trust store, click New trust store.
For more information, see Verifying certificates with Certificate Authorities using trust stores.
Caution: SPS checks if the certificate revocation list (CRL) has expired and that the CRL has been signed by the same certificate authority (CA).
Caution: If you connect to the LDAP server over a TLS-encrypted connection with certificate verification, you must fill the Address field with a name or IP address, which must be present in the certificate.
-
-
If the LDAP server requires mutual authentication, that is, it expects a certificate from SPS, enable Authenticate as a client. Generate and sign a certificate for SPS, upload the certificate and its private key, and click Save.
TIP: One Identity recommends using 2048-bit RSA keys (or stronger).
-
-
To save your modifications, click Commit.
NOTE: You must configure the usergroups in SPS, and possibly in your LDAP database. For details on using usergroups, see Using usergroups.