The following describes how to customize the data displayed on the interface.
To customize the data displayed on the interface
-
Navigate to the database you want to browse, for example Users & Access Control > Configuration History.
-
Click Customize Columns. A pop-up window containing the list of visible and available columns is displayed.
Figure 109: Users & Access Control > Configuration History — Customizing columns of the general search interfaces

-
The displayed parameters are enlisted in the Visible columns field. All other available parameters are enlisted in the Available columns field.
-
To add parameters to the Visible columns field, select the desired parameter(s) and click Add.
-
To remove parameters from the Visible columns field, select the desired parameter(s) and click Remove.
-
To freeze columns (to make them permanently visible, even when scrolling horizontally), enable the Freeze option next to the desired parameter.
NOTE: To select multiple parameters, pressCtrlwhile clicking the items.
-
Click OK. The selected information is displayed.
Managing One Identity Safeguard for Privileged Sessions (SPS)
The following sections explain the basic management tasks of One Identity Safeguard for Privileged Sessions (SPS.
-
For basic management tasks (reboot and shutdown, disabling traffic), see Controlling One Identity Safeguard for Privileged Sessions (SPS): reboot, shutdown.
- For information on managing a cluster of two or more SPS instances, see Managing One Identity Safeguard for Privileged Sessions (SPS) clusters.
-
For managing a High Availability cluster, see Managing a High Availability One Identity Safeguard for Privileged Sessions (SPS) cluster.
-
For instructions on upgrading SPS, see Upgrading One Identity Safeguard for Privileged Sessions (SPS).
-
For instructions on accessing SPS through console and SSH, see Accessing the One Identity Safeguard for Privileged Sessions (SPS) console.
-
For enabling sealed mode (which disables basic configuration changes from a remote host), see Sealed mode.
-
For information on configuring the out-of-band (IPMI) interface, see Out-of-band management of One Identity Safeguard for Privileged Sessions (SPS).
-
For managing certificates used on SPS, see Managing the certificates used on One Identity Safeguard for Privileged Sessions (SPS).
To reboot or shut down One Identity Safeguard for Privileged Sessions (SPS)
- Navigate to Basic Settings > System > System control > This node.
- Click the respective action button.
The Other node refers to the secondary node of a High Availability SPS cluster. For details on High Availability clusters, see Managing a High Availability One Identity Safeguard for Privileged Sessions (SPS) cluster.
|

|
Caution:
-
When rebooting the nodes of a cluster, reboot the other (secondary) node first to avoid unnecessary takeovers.
-
When shutting down the nodes of a cluster, shut down the other (secondary) node first. When powering on the nodes, start the primary node first to avoid unnecessary takeovers.
-
When both nodes are running, avoid interrupting the connection between the nodes: do not unplug the Ethernet cables, reboot the switch or router between the nodes (if any), or disable the HA interface of SPS. |
Figure 110: Basic Settings > System > System Control — Performing basic management

NOTE: Web sessions to the SPS interface are persistent and remain open after rebooting SPS, so you do not have to relogin after a reboot.
During the reboot process, SPS displays information about the progress of the reboot and any possible problems in the following places:
-
On the web interface of SPS, at any of the Listening addresses configured at Basic settings > Local Services > Web login (admin and user). (After booting, you are directed to the login screen of SPS.)
-
On the console, which you can monitor with IPMI (ILOM) or console access.
The information displayed in the browser and on the console is the same.
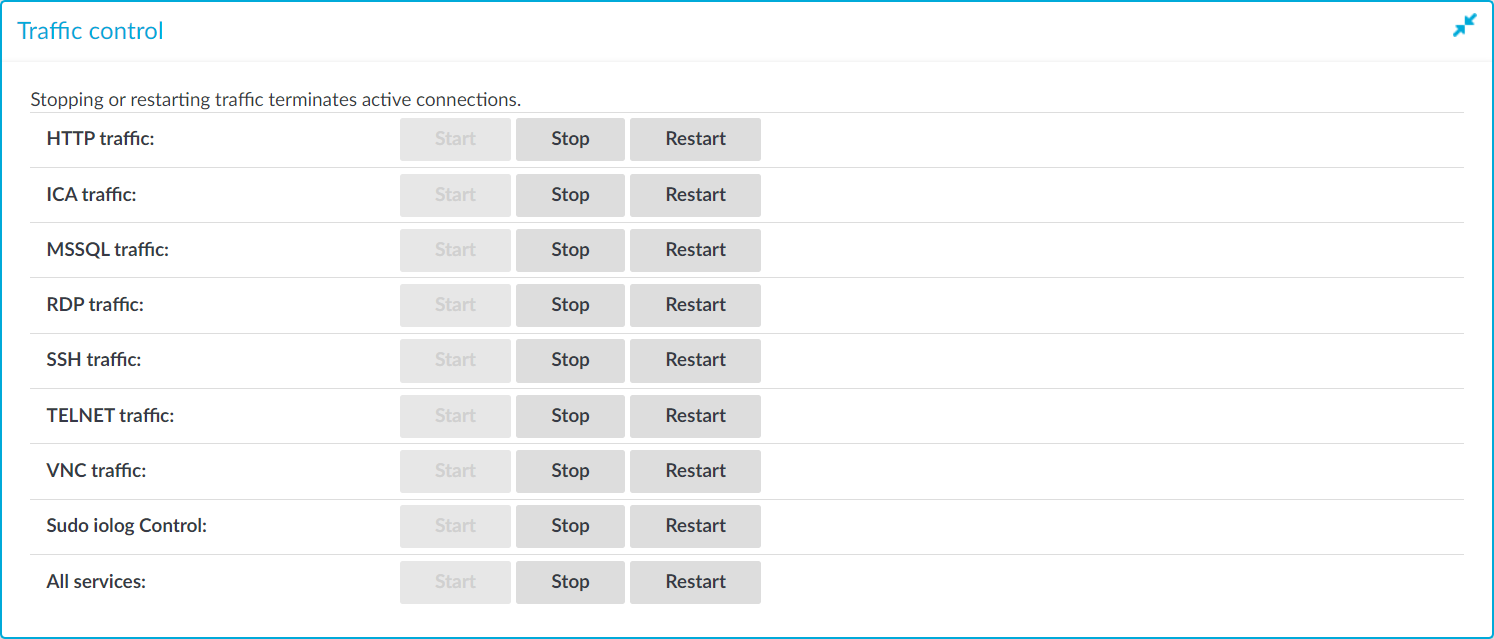
This section describes how to temporarily disable some or all of the controlled traffic to the protected servers.
Figure 111: Basic Settings > System > Traffic control — Disabling the controlled traffic
|
|
Caution:
Using the Stop option of the respective traffic types on Basic Settings > System > Traffic control disables the traffic only temporarily. Committing specific changes on the SPS web interface enables the connections again. For details on how to permanently disable a type of traffic, see Disabling controlled traffic permanently. |
NOTE: Disabling the traffic affects only the traffic configured in the Connection policies. Other network traffic (such as web management, DNS, LDAP, SNMP, SMTP, and so on) can pass SPS even if all traffic is disabled. For details on configuring Connection policies, see General connection settings.
To temporarily disable some or all of the controlled traffic to the protected servers
-
Navigate to Basic Settings > System > Traffic control.
-
To disable any of the supported traffic types, click Stop in the respective traffic field. You can disable the following traffic types on this page:
-
HTTP
-
ICA
-
MSSQL
-
RDP
-
SSH
-
Telnet
-
VNC
-
Sudo iolog
-
All services
NOTE: Disabling SSH traffic also disables all other traffic forwarded in SSH, for example X11.
Disabling Telnet also disables TN3270 traffic.
The Traffic overview under About displays the status of all traffic types.
