The following sections describe configuration settings available only for the Virtual Networking (VNC) protocol. Use the following policies to control who, when, and how can access the VNC connections. For a list of supported client applications, see Supported protocols and client applications.
|

|
Caution:
To monitor VNC connections, enable user authentication on your VNC server. One Identity Safeguard for Privileged Sessions (SPS) automatically terminates unauthenticated connections. |
-
Channel Policy: The VNC protocol has only one channel type with no special configuration options. The available channel policy options are the following: Type, From, Target, Time policy, Four-eyes, Record audit trail, Gateway groups, Remote groups, and Content policy. For details on configuring these options, see Creating and editing channel policies.
-
TLS support: To enable TLS-encryption for your VNC connections, see Enabling TLS-encryption for VNC connections.
-
VNC settings: VNC settings determine the parameters of the connection on the protocol level, including timeout value, and so on. For details, see Creating and editing protocol-level VNC settings.
-
User lists in Channel Policies: User lists affect VNC connections only when they are used together with Gateway Authentication. For details, see Configuring gateway authentication.
-
Content Policy: Content policies allow you to inspect the content of the connections for various text patterns, and perform an action if the pattern is found. For example, SPS can send an e-mail alert if a specific window title appears in RDP and VNC connections. For details, see Creating a new content policy.
-
WebSocket/VNC audit trails: You can replay audit trails of a WebSocket connection in your browser or using the Safeguard Desktop Player application only if it contains Virtual Network Computing (VNC) traffic. For all other WebSocket connections, export the audit trail as a PCAP file and replay it using the Safeguard Desktop Player application.
For more information, see Supported HTTP channel types.
The following steps describe how to enable TLS-encryption in a VNC connection policy.
NOTE:
Some vendors may use custom protocol elements and TLS-encryption that do not have available documentation. As a result, these cannot be audited by One Identity Safeguard for Privileged Sessions (SPS). Regardless of vendors, only the custom features described in the RFC 6143 are supported. As for encryptions, only those completely TLS-encapsulated streams can be processed where the TLS encryption process was started before the VNC protocol handshake.
Prerequisites
Depending on your requirements, one or more of the following might be needed:
-
An X.509 certificate and its private key. SPS can display the same certificate to the peers on both the client and the server side. You can also use different certificates for the client and server sides. Use your own PKI system to generate these certificates, as they cannot be created on SPS. Note that the Common Name of the certificate must contain the domain name or the IP address of SPS, otherwise the clients might reject the certificate.
-
To generate certificates on-the-fly for a connection, a signing certificate authority is required. For details on creating a signing CA, see Signing certificates on-the-fly.
-
To require the peers of SPS to have an X.509 certificate signed by a specific Certificate Authority, a list of the trusted certificate authorities is needed. For details on creating a trusted CA list, see Verifying certificates with Certificate Authorities.
TIP: One Identity recommends using 2048-bit RSA keys (or stronger).
To enable TLS-encryption in a VNC connection policy
-
Navigate to VNC Control > Connections and select the connection policy in which you want to enable TLS.
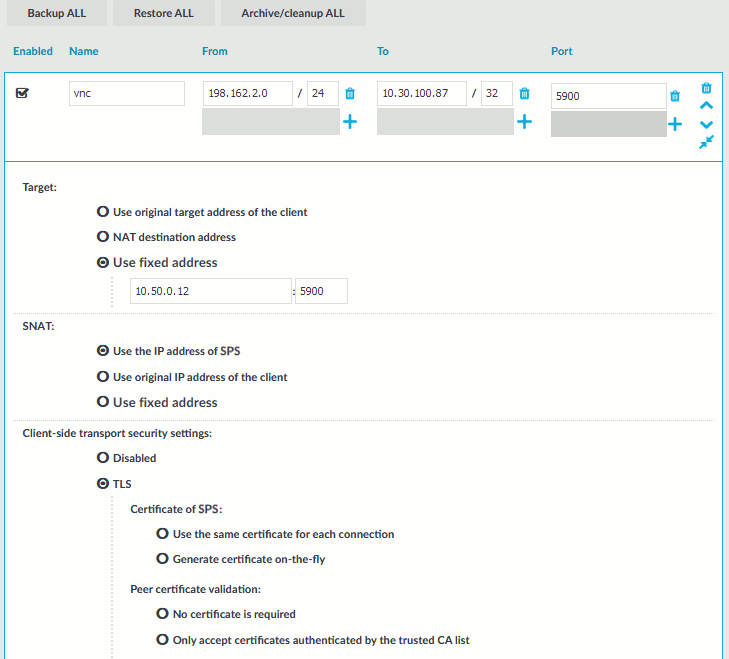
Figure 260: VNC Control > Connections — Enabling TLS-encryption for VNC connections
-
Set the encryption settings used between the client and SPS in the Client-side transport security settings section.
To require encryption, select TLS. When the connection is encrypted, SPS has to show a certificate to the peer.
-
-
Select how SPS should authenticate the peers.
-
To permit connections from peers without requesting a certificate, select No certificate is required.
-
To permit connections only from peers with a valid certificate that was signed by a specific CA, complete the following steps.
-
Create a list of trusted Certificate Authorities that will be used to validate the certificates of the peers. For details on creating a trusted CA list, see Verifying certificates with Certificate Authorities.
-
Select Only accept certificates authenticated by the trusted CA list.
-
Select the certificate authority list to use in the Trusted CA field.
-
Set the encryption settings used between SPS and the server in the Server-side transport security settings section.
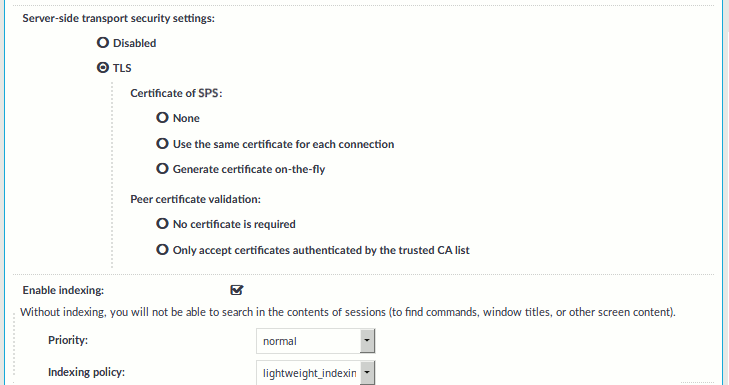
To require encryption, select TLS. When the connection is encrypted, SPS has to show a certificate to the peer.
-
Select the certificate to show to the server.
-
To use the same certificate for every peer, complete the following steps.
-
Generate and sign a certificate for SPS in your PKI system, and export the certificate and its private key.
-
Select Use the same certificate for each connection.
-
Select Private key for host certificate, click  and upload the private key.
-
Select X.509 host certificate, click and upload the certificate.
-
To use a separate certificate for every connection, complete the following steps.
-
Create a certificate authority that will be used to sign the certificates that SPS shows to the peer. For details, see Signing certificates on-the-fly.
-
Select Generate certificate on-the-fly.
-
Select the certificate authority to use in the Signing CA field.
Limitations
NOTE: When using the Use the same certificate for each connection option and the connection policy that allows access to multiple servers using HTTPS, the client applications will display a warning because the certificate used in the connection will be invalid (namely, the Common Name of the certificate will not match the hostname or IP address of the server).
NOTE: Import the certificate of the signing Certificate Authority to your clients. Otherwise, the client applications will display a warning due to the unknown Certificate Authority.
-
Select how SPS should authenticate the peers.
-
To permit connections from peers without requesting a certificate, select No certificate is required.
-
To permit connections only from peers with a valid certificate that was signed by a specific CA, complete the following steps.
-
Create a list of trusted Certificate Authorities that will be used to validate the certificates of the peers. For details on creating a trusted CA list, see Verifying certificates with Certificate Authorities.
-
Select Only accept certificates authenticated by the trusted CA list.
-
Select the certificate authority list to use in the Trusted CA field.
-
Click  .
.
Expected result
The encryption settings are applied to the connection policy.
VNC settings determine the parameters of the connection on the protocol level, including timeout value, and so on.
|
|
Caution:
Modifying the VNC settings is recommended only to advanced users. Do not modify these settings unless you exactly know what you are doing. |
To create a new VNC settings profile or edit an existing one
-
Navigate to VNC Control > Settings and click  to create a VNC setting profile. Enter a name for the profile (for example vnc_special).
-
Click  to display the parameters of the connection.
-
Modify the parameters as needed. The following parameters are available:
-
Network idle timeout: Connection timeout value in seconds. To avoid early timeout, set it to a larger value, for example a week (604800 seconds).
Even if the user is not active, the session can contain activity that must be audited (for example, the output of a script). The idle timeout period will start only after this activity has stopped.
|
|
Caution:
Determining if a connection is idle is based on the network traffic generated by the connection, not the activity of the user. For example, if an application or the taskbar of a graphical desktop displays the time which is updated every minute, it generates network traffic every minute, negating the effects of timeout values greater than one minute and preventing One Identity Safeguard for Privileged Sessions (SPS) from closing the connection. |
-
User idle timeout: If no user activity is detected, terminate the session after the configured time has passed since the last user activity.
This can be useful if only user-generated network traffic is important in a session. By using this option, situations described in the caution of Network idle timeout (such as a taskbar clock keeping the network traffic open indefinitely) can be avoided. To enable user idle timeout, select Enable user idle timeout and enter a value that is greater than or equal to the value of Network idle timeout.
-
Enable pre channel check: Select this option to evaluate the connection and channel policies before establishing the server-side connection. That way if the connection is not permitted at all, SPS does not establish the server-side connection.
-
To configure TLS security settings on both the Client side and the Server side, proceed to TLS security settings.
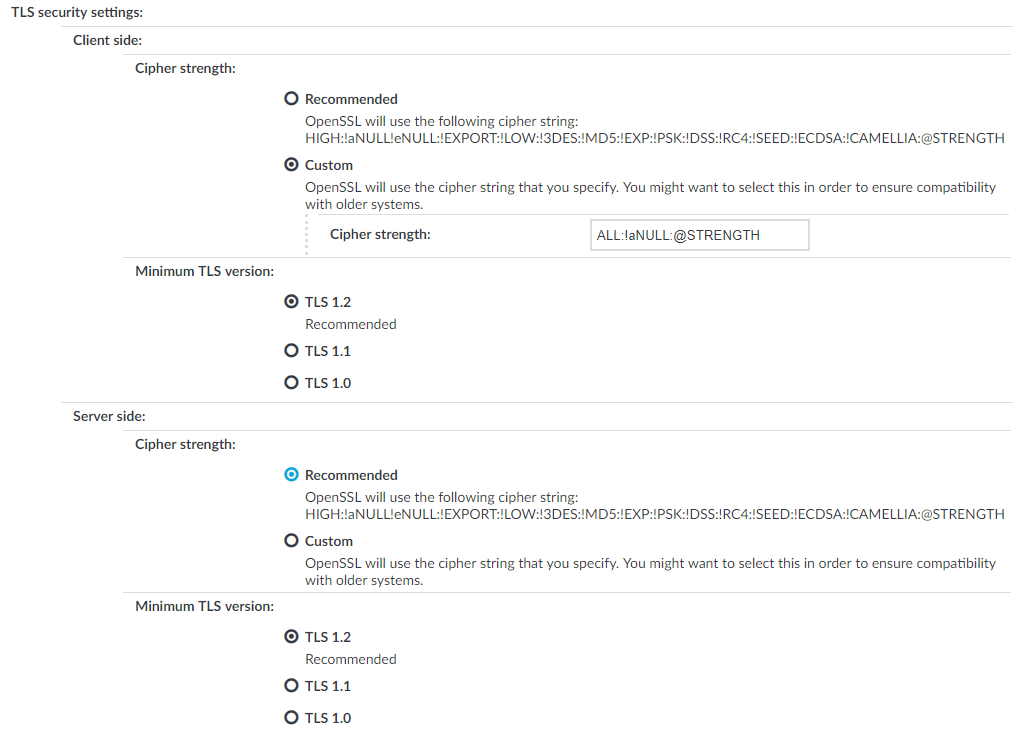
Figure 261: <Protocol> Control > Settings > TLS security settings - configuring TLS security settings
-
Cipher strength specifies the cipher string OpenSSL will use. The following options are possible:
-
Recommended: this setting only uses ciphers with adequate security level.
-
Custom: this setting allows you to specify the list of ciphers you want to permit SPS to use in the connection. This setting is only recommended to ensure compatibility with older systems. For more details on customizing this list, check the 'openssl-ciphers' manual page on your SPS appliance.
For example: ALL:!aNULL:@STRENGTH
-
Minimum TLS version specifies the minimal TLS version SPS will offer during negotiation. The following options are possible:
-
TLS 1.2: this setting only offers TLS version 1.2 during the negotiation. This is the recommended setting.
-
TLS 1.1: this setting offers TLS version 1.1 and later versions during the negotiation.
-
TLS 1.0: this setting offers TLS version 1.0 and later versions during the negotiation.
NOTE: Setting up sessions to legacy systems that do not support at least TLS 1.2 is only possible when the security level of the connection is degraded to 0, which is possible by specifying the TLS ciphers manually and appending the string `:@SECLEVEL=0` to the cipher list. However, this setting also enables the use of known vulnerable algorithms and key sizes, therefore it is absolutely critical to only use such connection settings when it is necessary and when you can fully trust your network between SPS and the legacy system. It is strongly recommended to use different security settings on the server and the client side of the connection, when degrading the security level of a connection is unavoidable.
NOTE: Note that SPS only permits TLS-encrypted connections. SSLv3 is not supported.
-
Click .
-
Select this settings profile in the VNC settings field of your connections.
One Identity Safeguard for Privileged Sessions (SPS) can index the contents of audit trails using its own indexer service or external indexers. Indexing extracts the text from the audit trails and segments it to tokens. A token is a segment of the text that does not contain whitespace: for example words, dates (2009-03-14), MAC or IP addresses, and so on. The indexer returns the extracted tokens to SPS, which builds a comprehensive index from the tokens of the processed audit trails.
Once indexed, the contents of the audit trails can be searched from the web interface. SPS can extract the commands typed and the texts seen by the user in terminal sessions, and text from graphical protocols like RDP, Citrix ICA, and VNC. Window titles are also detected.
SPS has an internal indexer, which runs on the SPS appliance. In addition to the internal indexer, external indexers can run on Linux hosts.
Processing and indexing audit trails requires significant computing resources. If you have to audit lots of connections, or have a large number of custom reports configured, consider using an external indexer to decrease the load on SPS. For sizing recommendations, ask your One Identity partner or contact our Support Team.
-
The internal indexer service runs on the SPS appliance. It supports languages based on the Latin-, Greek- and Cyrillic alphabets, as well as Chinese, Japanese and Korean languages, allowing it to recognize texts from graphical audit trails in 100+ languages. It can also generate screenshots for content search results.
-
The external indexer runs on Linux hosts and instances. It uses the same engine as the indexer service of SPS, and has the same capabilities and limitations.
SPS can work with multiple external indexers to process audit trails.
NOTE: The version of the external indexer must be equal to or greater than the version of One Identity Safeguard for Privileged Sessions (SPS). To make sure you meet this criterion, One Identity recommends that you always upgrade your external indexer when you upgrade SPS. You can check that SPS has established a connection to the external indexer on the Indexer > Worker status page of the SPS web interface.
NOTE: If a text is displayed for less than 1 second, it is not indexed.
If you have indexed trails, the index is archived every 30 days.
|
|
Caution:
Hazard of data loss! Make sure you also back up your data besides archiving it.
For more information, see Data and configuration backups.
If a system crash occurs, you can lose up to 30 days of index, since the index is only archived every 30 days. |
Reindex audit trails
In certain cases, reindexing already indexed audit trails might be necessary, for example, if the audit trails were indexed without full screen content but you still need to search in the screen content. In this case, the audit trails can be reindexed with a different indexer configuration to perform screen content extraction. For more information, contact our Support Team.
