Procedure
MSSQL settings determine the parameters of the connection on the protocol level, including timeout value, and so on. Complete the following procedure to create a new MSSQL settings profile or edit an existing one:
|

|
Caution:
Modifying the MSSQL settings is recommended only to advanced users. Do not modify these settings unless you exactly know what you are doing. |
To create and edit protocol-level MSSQL settings
-
Navigate to the Settings tab of the MSSQL Control menu item and click  to create a MSSQL setting profile. Enter a name for the profile (for example, mssql_special).
-
Click  to display the parameters of the connection.
-
Modify the parameters as needed. The following parameters are available:
-
Idle timeout: Timeout value for the connection in seconds. To avoid early timeout, set it to a larger value, for example, a week (604800 seconds).
|
|
Caution:
Determining if a connection is idle is based on the network traffic generated by the connection, not the activity of the user. For example, if an application or the taskbar of a graphical desktop displays the time which is updated every minute, it generates network traffic every minute, negating the effects of timeout values greater than one minute and preventing One Identity Safeguard for Privileged Sessions (SPS) from closing the connection. |
-
Enable pre channel check: Select this option to evaluate the connection and channel policies before establishing the server-side connection. That way if the connection is not permitted at all, SPS does not establish the server-side connection.
-
To configure TLS security settings on both the Client side and the Server side, proceed to TLS security settings.
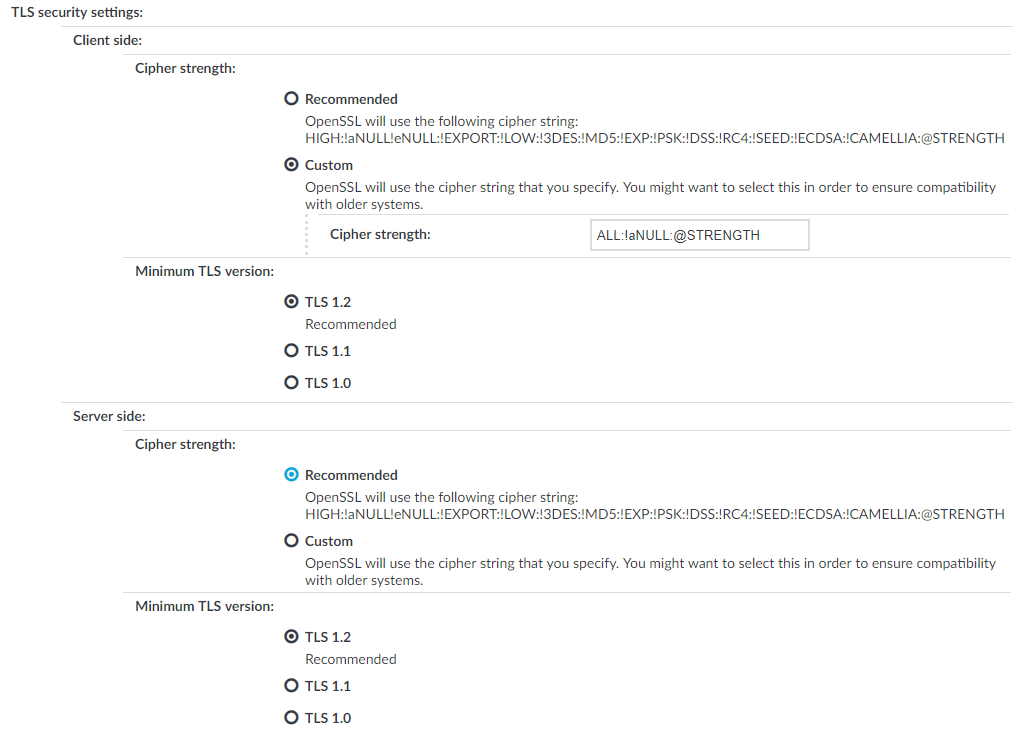
Figure 216: <Protocol> Control > Settings > TLS security settings - configuring TLS security settings
-
Cipher strength specifies the cipher string OpenSSL will use. The following options are possible:
-
Recommended: this setting only uses ciphers with adequate security level.
-
Custom: this setting allows you to specify the list of ciphers you want to permit SPS to use in the connection. This setting is only recommended to ensure compatibility with older systems. For more details on customizing this list, check the 'openssl-ciphers' manual page on your SPS appliance.
For example: ALL:!aNULL:@STRENGTH
-
Minimum TLS version specifies the minimal TLS version SPS will offer during negotiation. The following options are possible:
-
TLS 1.2: this setting only offers TLS version 1.2 during the negotiation. This is the recommended setting.
-
TLS 1.1: this setting offers TLS version 1.1 and later versions during the negotiation.
-
TLS 1.0: this setting offers TLS version 1.0 and later versions during the negotiation.
NOTE: Setting up sessions to legacy systems that do not support at least TLS 1.2 is only possible when the security level of the connection is degraded to 0, which is possible by specifying the TLS ciphers manually and appending the string `:@SECLEVEL=0` to the cipher list. However, this setting also enables the use of known vulnerable algorithms and key sizes, therefore it is absolutely critical to only use such connection settings when it is necessary and when you can fully trust your network between SPS and the legacy system. It is strongly recommended to use different security settings on the server and the client side of the connection, when degrading the security level of a connection is unavoidable.
NOTE: Note that SPS only permits TLS-encrypted connections. SSLv3 is not supported.
-
Click  .
.
-
Select this settings profile in the MSSQL settings field of your connections.
The following steps describe how to enable TLS-encryption in a MSSQL connection policy. Note that when using encryption, One Identity Safeguard for Privileged Sessions (SPS) automatically changes the port number of the connection policy to 992.
Prerequisites
Depending on your requirements, one or more of the following might be needed:
-
An X.509 certificate and its private key. SPS can display the same certificate to the peers on both the client and the server side. You can also use different certificates for the client and server sides. Use your own PKI system to generate these certificates, as they cannot be created on SPS. Note that the Common Name of the certificate must contain the domain name or the IP address of SPS, otherwise the clients might reject the certificate.
-
To generate certificates on-the-fly for a connection, a signing certificate authority is required. For details on creating a signing CA, see Signing certificates on-the-fly.
-
To require the peers of SPS to have an X.509 certificate signed by a specific Certificate Authority, a list of the trusted certificate authorities is needed. For details on creating a trusted CA list, see Verifying certificates with Certificate Authorities.
TIP: One Identity recommends using 2048-bit RSA keys (or stronger).
To enable TLS-encryption in a MSSQL connection policy
-
Navigate to MSSQL Control > Connections and select the connection policy in which you want to enable TLS.
Figure 217: MSSQL Control > Connections — Enabling TLS-encryption for MSSQL connections

-
Set the encryption settings in the Transport security settings section.
-
Select the certificate to show to the peers.
-
To use the same certificate for every peer, complete the following steps.
-
Generate and sign a certificate for SPS in your PKI system, and export the certificate and its private key.
-
Select Use the same certificate for each connection.
-
Select Private key for host certificate, click  and upload the private key.
-
Select X.509 host certificate, click and upload the certificate.
-
To use a separate certificate for every connection, complete the following steps.
-
Create a certificate authority that will be used to sign the certificates that SPS shows to the peer. For details, see Signing certificates on-the-fly.
-
Select Generate certificate on-the-fly.
-
In the Signing CA field, select the certificate authority to use.
-
Select which certificatie validation method SPS should use in the Server certificate validation section.
-
To permit connections from peers without requesting a certificate, select No validation.
-
To permit connections only from peers with a valid certificate that was signed by a specific CA, complete the following steps.
-
Create a list of trusted Certificate Authorities that will be used to validate the certificates of the peers. For details on creating a trusted CA list, see Verifying certificates with Certificate Authorities.
-
Select Only accept certificates authenticated by the trusted CA list.
-
Select the certificate authority list to use in the Trusted CA field.
-
Click .
Expected result
The encryption settings are applied to the connection policy.
The following sections describe configuration settings available only for the RDP protocol. Use the following policies to control who, when, and how can access the RDP connection.
-
Channel Policy: The channel policy determines which RDP channels (for example clipboard, file-sharing, and so on) can be used in the connection, and whether they are audited or not. The different channels may be available only under certain restrictions, as set in the channel policy. For details, see Creating and editing channel policies.
-
RDP settings: RDP settings determine the parameters of the connection on the protocol level, including timeout value, display parameters, and the version of RDP permitted. For details, see Creating and editing protocol-level RDP settings.
-
Domain membership: When using Network Level Authentication (CredSSP) One Identity Safeguard for Privileged Sessions (SPS) must be a member of the domain. For details, see Network Level Authentication (NLA) with domain membership.
-
TLS-encrypted connections: For details on how to setup TLS-encrypted RDP connections, see Enabling TLS-encryption for RDP connections and Verifying the certificate of the RDP server in encrypted connections.
-
SPS as a Remote Desktop Gateway: For details on how to configure SPS to accept connections using the Remote Desktop Gateway Server Protocol, see Using One Identity Safeguard for Privileged Sessions (SPS) as a Remote Desktop Gateway.
-
Content Policy: Content policies allow you to inspect the content of the connections for various text patterns, and perform an action if the pattern is found. For example, SPS can send an e-mail alert if a specific window title appears in RDP and VNC connections. For details, see Creating a new content policy.
-
Authentication and Authorization plugin:
One Identity Safeguard for Privileged Sessions (SPS) provides a plugin framework to integrate SPS to external systems to authenticate or authorize the user before authenticating on the target server. Such plugins can also be used to request additional information from the users, for example, to perform multi-factor authentication.
For details, see Integrating external authentication and authorization systems.
Using multiple monitors (Multimon) is supported. To enable Multimon, use one of the following three methods:
-
enable Display > Use all my monitors for the remote session option in the Remote Desktop Client (mstsc.exe) window of the client machine
-
use the /multimon switch on the mstsc.exe command line
-
add the use multimon:i:1 row to the RDP file
NOTE: The Maximum display width and Maximum display height options should be high enough to cover the combined resolution of the client monitor setup. Connections that exceed these limits will automatically fail. Make sure to adjust these settings if your clients use multiple monitors. For example, if your clients use two monitors that have a resolution of 1920x1080 pixels each, set Maximum display width to 4000, and Maximum display height to 2200.
Limitations
The RDP connection fails due to the following Windows-side settings:
NOTE: Due to the way RDP handles device redirection, these channels work only if the Sound channel type is also enabled. Make sure that you enable the Sound channel if you enable one of the specific redirection types, for example, Serial, Parallel, Printer,Disk, SCard, or Custom redirect.
The available RDP channel types and their functionalities are described below. For details on configuring Channel Policies, see Creating and editing channel policies. For a list of supported client applications, see Supported protocols and client applications.
-
Drawing: Enables access to the server's graphical desktop (screen). This channel must be enabled for RDP to work.
NOTE: In case the Drawing channel is disabled and the load of One Identity Safeguard for Privileged Sessions (SPS) is high, or the connection requires four-eyes authorization and the Authorizer is slow to accept the connection, the client might receive the following error message:
The Remote Desktop Gateway server administrator has ended the connection.
Try reconnecting later or contact your network administrator for assistance
-
Clipboard: Enables access to the server's clipboard: the clipboard of the remote desktop can be pasted into local applications (and vice-versa). Note that SPS can audit the clipboard channel, and that files transferred via the clipboard can be audited Configuring SPS to enable exporting files from audit trails after RDP file transfer through clipboard or disk redirection.
If the Clipboard channel is enabled, it implicitly enables copying files as well, as the user can simply copy-paste the file. Copy-pasted files will not be visible in the logs or the File operations column of the Search page. To ensure that SPS records file transfer events, you must disable the Clipboard channel.
-
Redirects: Enables access to every device redirection available in RDP, like file-sharing, printer sharing, device (for example, CD-ROM) sharing, and so on.
-
To make the list of file operations available in the File operations column of the Search page, navigate to the Channel Policies page of the protocol, and enable the Log file transfers to database option. This option is disabled by default.
-
To send the file operations into the system log, enable the Log file transfers to syslog option. This option is disabled by default.
NOTE: Turning logging on might result in a slight performance penalty. If traffic load slows processes down, disable the option.
To enable only specific types of redirections, use the following channels:
NOTE: Due to the way RDP handles device redirection, these channels work only if the Sound channel type is also enabled. Make sure that you enable the Sound channel if you enable one of the specific redirection types, for example, Serial, Parallel, Printer,Disk, SCard, or Custom redirect.
-
Serial redirect: Enables access to serial-port redirections.
-
Parallel redirect: Enables access to parallel-port redirections.
-
Printer redirect: Enables access to shared printers.
When enabling printer redirection, you may need to use TSVCTKT and XPSRD channels — these enable XPS printing.
Note that these channels are dynamic virtual channels and you have to be enable them using the Custom channel type.
For more information on TSVCTKT and XPSRD channels, see section 2.1 Transport in Microsoft Technical Document [MS-RDPEXPS].
Before consulting the cited Microsoft Technical Document, it is recommended to start by reading [MS-RDSOD]: Remote Desktop Services Protocols Overview.
-
Disk redirect: Enables access to shared disk drives.
-
To make the list of file operations available in the File operations column of the Search page, navigate to the Channel Policies page of the protocol, and enable the Log file transfers to database option. This option is disabled by default.
-
To send the file operations into the system log, enable the Log file transfers to syslog option. This option is disabled by default.
NOTE: Turning logging on might result in a slight performance penalty. If traffic load slows processes down, disable the option.
If the Clipboard channel is enabled, it implicitly enables copying files as well, as the user can simply copy-paste the file. Copy-pasted files will not be visible in the logs or the File operations column of the Search page. To ensure that SPS records file transfer events, you must disable the Clipboard channel.
-
SCard redirect: Enables access to shared SCard devices.
To permit only specific redirections, enter the unique name of the redirection into the Details field. For example, if you want to enable access only to the shared disk drive C:, enable the Disk redirect channel and enter C: into the Permitted devices field. Note that the name of the device comes from the device itself, so it is case sensitive, and may not always be reliable from a security point of view.
-
Sound: Enables access to the sound that is played on the server.
NOTE: Due to the way RDP handles device redirection, these channels work only if the Sound channel type is also enabled. Make sure that you enable the Sound channel if you enable one of the specific redirection types, for example, Serial, Parallel, Printer,Disk, SCard, or Custom redirect.
To enable auditing the sound that is transferred between an RDP client and the server, make sure that the Record audit trail checkbox is selected for the Sound and the Dynamic virtual channel.
NOTE: If the Record audit trail checkbox is selected only for the Sound channel, only the output sound (the one that is received by the audited user) is recorded in the audit trail.
If the Record audit trail checkbox is selected for the Dynamic virtual channel, both the input sound (the one that comes from the audited user) and output sound (the one that is received by the audited user) are recorded.
-
Custom: Applications can open custom channels to the clients connecting remotely to the server. Enabling the Custom channel allows the clients to access all of these custom channels. To permit only specific channels, enter the unique names of the channel into the Permitted devices field.
For example, to monitor RemoteApp connections, you need to configure custom channels. For more information, see Configuring RemoteApps.
-
Seamless: Enables seamless channels that run a single application on the RDP server, instead of accessing the entire desktop.
-
Dynamic virtual channel: Enables the server to open channels back to the client dynamically. To restrict which dynamic channels are permitted, select Channel details, click and enter the name of the permitted channel.
Additionally, you may need to use one or more of the following:
Before consulting any of the listed Microsoft Technical Documents, it is recommended to start by reading [MS-RDSOD]: Remote Desktop Services Protocols Overview.
To enable auditing the sound that is transferred between an RDP client and the server, make sure that the Record audit trail checkbox is selected for the Sound and the Dynamic virtual channel.
NOTE: If the Record audit trail checkbox is selected only for the Sound channel, only the output sound (the one that is received by the audited user) is recorded in the audit trail.
If the Record audit trail checkbox is selected for the Dynamic virtual channel, both the input sound (the one that comes from the audited user) and output sound (the one that is received by the audited user) are recorded.
NOTE: When the channel opens, there are certain cases when the remote group is not known yet. For example, in case of an RDP or ICA login screen, the drawing channel has to be opened first to properly display the logon screen. Only those channel rules will apply, where the Remote group field is empty. In case of network level authentication, all required information is present already so this limitation does not apply.
