Chat now with support
Chat with Support

Active Roles 8.1.4 - Administration Guide

Introduction Getting started with Active Roles Configuring rule-based administrative views Configuring role-based administration Rule-based autoprovisioning and deprovisioning
Provisioning Policy Objects Deprovisioning Policy Objects How Policy Objects work Policy Object management tasks Policy configuration tasks
Property Generation and Validation User Logon Name Generation Group Membership AutoProvisioning Exchange Mailbox AutoProvisioning AutoProvisioning in SaaS products OneDrive Provisioning Home Folder AutoProvisioning Script Execution Microsoft 365 and Azure Tenant Selection E-mail Alias Generation User Account Deprovisioning Office 365 Licenses Retention Group Membership Removal Exchange Mailbox Deprovisioning Home Folder Deprovisioning User Account Relocation User Account Permanent Deletion Group Object Deprovisioning Group Object Relocation Group Object Permanent Deletion Notification Distribution Report Distribution
Deployment considerations Checking for policy compliance Deprovisioning users or groups Restoring deprovisioned users or groups Container Deletion Prevention policy Picture management rules Policy extensions
Using rule-based and role-based tools for granular administration Workflows
Key workflow features and definitions About workflow processes Workflow processing overview Workflow activities overview Configuring a workflow
Creating a workflow definition for a workflow Configuring workflow start conditions Configuring workflow parameters Adding activities to a workflow Configuring an Approval activity Configuring a Notification activity Configuring a Script activity Configuring an If-Else activity Configuring a Stop/Break activity Configuring an Add Report Section activity Configuring a Search activity Configuring CRUD activities Configuring a Save Object Properties activity Configuring a Modify Requested Changes activity Enabling or disabling an activity Enabling or disabling a workflow Using the initialization script
Approval workflow Email-based approval Automation workflow Activity extensions
Temporal Group Memberships Group Family Dynamic groups Active Roles Reporting Management History Entitlement profile Recycle Bin AD LDS data management One Identity Starling Join and configuration through Active Roles Managing One Identity Starling Connect Configuring linked mailboxes with Exchange Resource Forest Management Configuring remote mailboxes for on-premises users Migrating Active Roles configuration with the Configuration Transfer Wizard Managing Skype for Business Server with Active Roles
About Skype for Business Server User Management Active Directory topologies supported by Skype for Business Server User Management User Management policy for Skype for Business Server User Management Master Account Management policy for Skype for Business Server User Management Access Templates for Skype for Business Server Configuring the Skype for Business Server User Management feature Managing Skype for Business Server users
Exchanging provisioning information with Active Roles SPML Provider Monitoring Active Roles with Management Pack for SCOM Configuring Active Roles for AWS Managed Microsoft AD Azure AD, Microsoft 365, and Exchange Online Management
Configuring Active Roles to manage Hybrid AD objects Unified provisioning policy for Azure M365 Tenant Selection, Microsoft 365 License Selection, Microsoft 365 Roles Selection, and OneDrive provisioning Changes to Active Roles policies for cloud-only Azure objects
Managing the configuration of Active Roles
Connecting to the Administration Service Managed domains Using unmanaged domains Evaluating product usage Creating and using virtual attributes Examining client sessions Monitoring performance Customizing the Console Using Configuration Center Changing the Active Roles Admin account Enabling or disabling diagnostic logs Active Roles Log Viewer
SQL Server replication Using regular expressions Administrative Template Configuring federated authentication Communication ports Active Roles and supported Azure environments Integrating Active Roles with other products and services Active Roles Language Pack Active Roles Diagnostic Tools Active Roles Add-on Manager

Configuring a User Logon Name Generation policy

You can configure a new User Logon Name Generation policy with the New Provisioning Policy Object Wizard of the Active Roles Console.

To configure a User Logon Name Generation policy

  1. On the Policy to Configure page, select User Logon Name Generation, then click Next.

    Figure 41: New Provisioning Policy Object Wizard

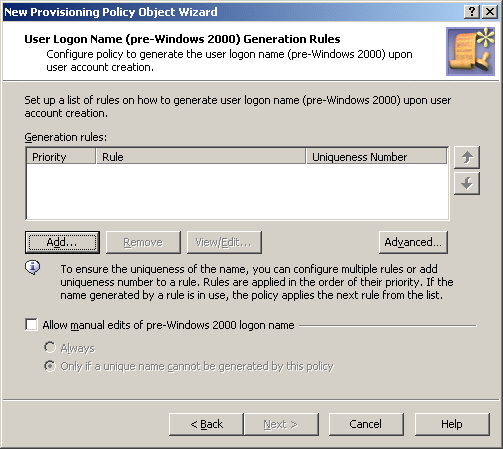
  2. On the User Logon Name (pre-Windows 2000) Generation Rules page, you can set up a list of generation rules. Each entry in the list includes the following information:

    • Priority: The policy applies generation rules in the order of their priority, as they stand in the list: first read, first applied.

    • Rule: Syntax that defines the rule.

    • Uniqueness Number: Displays Yes or No, indicating whether the rule includes a uniqueness number entry.

    You can use these buttons manage the list of rules:

    • Add: Opens the Configure Value dialog, discussed in Configuring a Property Generation and Validation policy. Use that dialog to configure a value for the ‘Logon Name (pre-Windows 2000)’ must be condition, in the same way as you do when configuring a Property Generation and Validation policy. For more information, see Configuring a logon name generation rule.

    • Remove: Deletes the rules you select from the list.

    • View/Edit: Opens the Configure Value dialog for the rule you select from the list. Modify the selected rule by managing the list of entries in that dialog.

    • Up and Down: Change the order of rules in the list. Click Up or Down to move a selected rule higher or lower in the list to give the rule a higher or lower priority, respectively.

    • Advanced: Set certain options that apply to all rules in the list, such as the maximum length of the generated name, whether to format the name as the uppercase or lowercase string, the scope where you want the generated name to be unique, and the characters to be excluded from the generated names. Complete the Advanced dialog by using the procedure outlined later in this topic.

      • If you want the logon name to be allowed for manual edit, select the Allow manual edits of pre-Windows 2000 logon name check box. Then, do one of the following:

        • Click Always to authorize the operator who creates or updates the user account to modify the pre-Windows 2000 logon name.

        • Click Only if a unique name cannot be generated by this policy to allow manual changes only in the situation where a policy-generated name is already assigned to a different user account.

  3. Click Next.

  4. On the Enforce Policy page, specify the objects to which this Policy Object will be applied. To do so, click Add, and use the Select Objects dialog to locate and select the objects you want.

  5. Click Next, then click Finish.

To complete the Configure Value dialog

  1. Click Add.

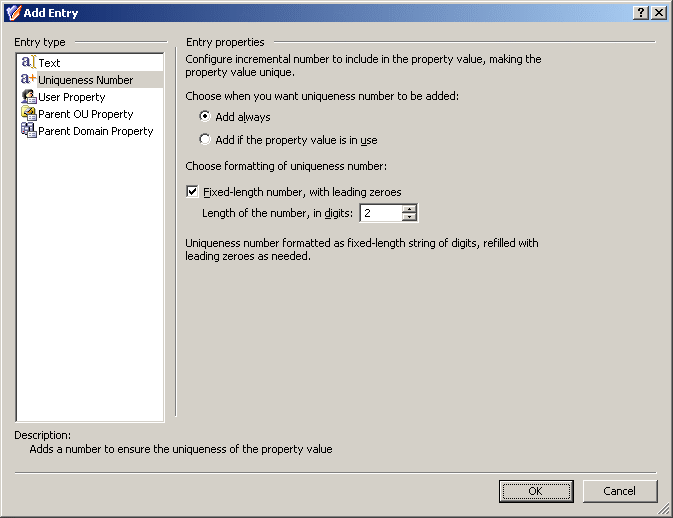
  2. Configure an entry to include in the value. For more information, see Configuring entries.

  3. In the Configure Value dialog, add more entries, delete or edit existing ones, then click OK.

To complete the Advanced dialog

  1. In Maximum length, in characters, set the maximum length of the generated name.

  2. Optionally, select Adjust the case of characters to configure case formatting:

    • Click All UPPERCASE to format the name as the uppercase string.

    • Click All lowercase to format the name as the lowercase string.

  3. Specify the scope in which you want the generated name to be unique:

    • Click Domain to make the name unique within the domain.

    • Click Forest to make the name unique within the forest.

    • Click All managed domains to make the name unique across all managed domains.

  4. (Optional) In the Restricted characters area, specify the characters you want the policy to remove from the generated name.

    The policy always removes the following characters: " @ * + | = \ : ; ? [ ] , < > /

    To specify additional characters, type them one by one, without any separator character, in the provided text box.

Configuring a logon name generation rule

To configure a generation rule, click Add beneath the Generation rules list. This displays the Configure Value dialog, prompting you to set up a value for the ‘Logon Name’ must be condition.

To start configuring a value, click Add in the Configure Value dialog. This displays the Add Entry window.

A value is a concatenation of one or more entries. In the Add Entry window, you can select the type of the entry to add, then configure the entry. The following table summarizes the available types of entries.

Table 7: Types of entries

Type of entry

Description

Text

Adds a text string to the value.

Uniqueness Number

Adds a numeric value the policy will increment in the event of a naming conflict.

User Property

Adds a selected property (or a part of a property) of the user account to which the policy will assign the logon name.

Parent OU Property

Adds a selected property (or a part of a property) of an Organizational Unit in the hierarchy of containers above the user account to which the policy will assign the logon name.

Parent Domain Property

Adds a selected property (or a part of a property) of the domain of the user account to which the policy will assign the logon name.

Instructions on how to configure an entry depend on the type of the entry. You can use the instructions outlined in Configuring a Property Generation and Validation policy to configure an entry of any of these types:

The following subsection elaborates on the Uniqueness Number entry.

Entry type: Uniqueness Number

When you select Uniqueness Number under Entry type in the Add Entry window, the Entry properties area looks as follows.

Figure 42: Entry Type: Uniqueness Number

Using this entry type, you can add an entry that represents a number the policy will increment in the event of a naming conflict.

First, you need to choose when you want the policy to employ this entry. You have the following options:

  • Add always: The value includes this entry regardless of whether or not the policy encounters a naming conflict when applying the generation rule.

  • Add if the property value is in use: The policy adds this entry to the value in the event of a naming conflict; otherwise the value does not include this entry.

Next, you can specify how you want the entry to be formatted:

  • To have the entry formatted as a variable-length string of digits, clear the Fixed-length number, with leading zeroes check box. In most cases, this will result in a single-digit entry.

  • To have the entry formatted as a fixed-length string of digits, select the Fixed-length number, with leading zeroes check box, and then specify the number of digits you want the string to include. This will result in an entry prefixed with the appropriate number of zeroes, such as 001, 002, 003, and so on.

When you are done configuring an entry, click OK to close the Add Entry window. The entry is added to the Configure Value dialog.

Scenario 1: Using uniqueness number

The policy described in this scenario generates the pre-Windows 2000 user logon name in accordance with this rule: the first character of the user first name, optionally followed by a uniqueness number, followed by the user last name. The length of the policy-generated name is at most eight characters. If the name is longer, trailing characters are truncated as needed. Examples of names generated by this policy are as follows:

  • JSmitson

  • J1Smitso

  • J2Smitso

The policy generates the name J1Smitso for the user John Smitson if the name JSmitson is in use. If both JSmitson and J1Smitso are in use, the policy generates the name J2Smitso, and so on.

To implement this scenario, you must perform the following actions:

  1. Create and configure the Policy Object that defines the appropriate policy.

  2. Apply the Policy Object to a domain, OU, or Managed Unit.

As a result, when assigning a pre-Windows 2000 user logon name to a user account in the container you selected in Step 2, the Active Roles user interfaces provide a Generate button to create a name in accordance with the policy rule. In the event of a naming conflict, clicking Generate causes the policy to add a uniqueness number to the name.

The following two sections elaborate on the steps to implement this scenario.

Related Documents

The document was helpful.

Select Rating

I easily found the information I needed.

Select Rating