You can modify the settings of a Managed Unit with the Properties window of the Active Roles Console.
To modify properties of a Managed Unit
-
In the Active Roles Console, on the Console tree, navigate to Configuration > Managed Units.
-
Under Managed Units, locate the Managed Unit you want to modify, right-click it, and click Properties.
-
Use the tabs in the Properties dialog to view or modify properties of the Managed Unit.
-
When finished, click OK.
NOTE: Consider the following when modifying Managed Unit properties:
-
The Membership Rules tab displays a list of membership rules for a given Managed Unit. You can add, remove, or modify membership rules as needed. For more information, see later in this document.
-
On the Administration tab, you can use Policy to add and remove Policy Object links that determine which administrative policies are enforced on the Managed Unit. For more information, see Modifying policy settings on a Managed Unit.
-
On the Administration tab, you can use Security to add and remove Access Template links that define Trustees and their permissions for the Managed Unit. For more information, see Modifying permission settings on a Managed Unit.
You can modify the permission settings of a Managed Unit with the Delegate Control window of the Active Roles Console.
To modify permission settings on a Managed Unit
-
In the Active Roles Console, on the Console tree, navigate to Configuration > Managed Units.
-
Under Managed Units, locate the Managed Unit you want to modify, right-click it, and click Delegate Control.
-
In the Active Roles Security dialog, do the following:
-
To add permissions to the Managed Unit, click Add and follow the instructions in the Delegation of Control wizard to create an Access Template link. For information on how to use the Delegation of Control wizard, see Applying Access Templates.
-
To remove permissions from the Managed Unit, select Access Template links from the list, and click Remove. Alternatively, you can revoke permissions by disabling Access Template links. To do so, select or more links, and then click Disable.
-
To view or modify properties of an Access Template link on the Managed Unit, select the link from the list and click View/Edit.
-
To modify an Access Template link so that the permissions defined by the link are also added to Active Directory, select the link from the list and click Sync to AD.
-
Click OK to close the Active Roles Security dialog.
NOTE: Consider the following when modifying permission settings on a Managed Unit:
-
The Active Roles Security dialog displays a list of Access Template links, with each list item indicating a Trustee and the Access Template that is used to specify the Trustee’s permissions.
-
By default, the list of Access Template links displays all the links that determine the permission settings on the Managed Unit, regardless of whether a link was created on the Managed Unit itself or on a container that holds the Managed Unit. To change the display of the list, clear the Show inherited check box.
-
An Access Template link can be removed from a Managed Unit if the link was created on that Managed Unit. Only the links that meet this condition are displayed when you clear the Show inherited check box, so you can remove them by clicking Remove.
-
You can also use the advanced details pane to view, add, remove, or modify Access Template links on a Managed Unit. To do so, select the Managed Unit, then on the Active Roles Security tab in the advanced details pane, right-click an Access Template link or a blank area and use the commands on the shortcut menu. For information about the advanced details pane, see Advanced pane in the Active Roles Feature Guide.
You can modify the policy settings of a Managed Unit with the Enforce Policy dialog of the Active Roles Console.
To modify policy settings on a Managed Unit
-
In the Active Roles Console, on the Console tree, navigate to Configuration > Managed Units.
-
Under Managed Units, locate the Managed Unit you want to modify, right-click it, and click Enforce Policy.
-
In the Active Roles Policy dialog, do the following:
-
To add policies to the Managed Unit, click Add and select the Policy Object that defines the policies. You can select multiple Policy Objects at a time.
-
To remove policies from the Managed Unit, select the Policy Object that defines the policies, and click Remove. Alternatively, you can remove the effect of a Policy Object on the Managed Unit by selecting the Blocked check box next to the name of the Policy Object.
-
To modify policies, select the Policy Object that defines the policies, and click View/Edit.
-
To close the Active Roles Policy dialog, click OK.
NOTE: The Active Roles Policy dialog box lists all the Policy Objects that define the policy settings on the Managed Unit, regardless of whether a Policy Object was added on the Managed Unit itself or on a container that holds the Managed Unit. You can view a list of Policy Objects that were added directly on the Managed Unit: Click Advanced and then clear the Show inherited check box.
Only the Policy Objects that were added directly on the Managed Unit can be removed. However, even if the Remove button is unavailable, you can select the Blocked check box. In this way, you remove the effect of the Policy Object on the Managed Unit. At any time, you can restore the effect of the Policy Object on the Managed Unit by clearing the Blocked check box.
You can also use the advanced details pane to add, remove, block, or modify Policy Objects that define the policy settings on a Managed Unit: Select the Managed Unit, and then, on the Active Roles Policy tab in the advanced details pane, right-click a Policy Object or a blank area, and use commands on the shortcut menu. For information about the advanced details pane, see Advanced pane in the Active Roles Feature Guide.
Members of a Managed Unit are objects that match the criteria specified in the membership rules for the Managed Unit. You can display and customize the list of members in the Active Roles Console.
To display the members of a Managed Unit
-
In the Active Roles Console, on the Console tree, navigate to Configuration > Managed Units.
-
Under Managed Units, locate and select the Managed Unit.
The members of the Managed Unit are listed in the details pane.
To customize the list of Managed Unit members in the details pane
-
Right-click the Managed Unit, and click Properties.
-
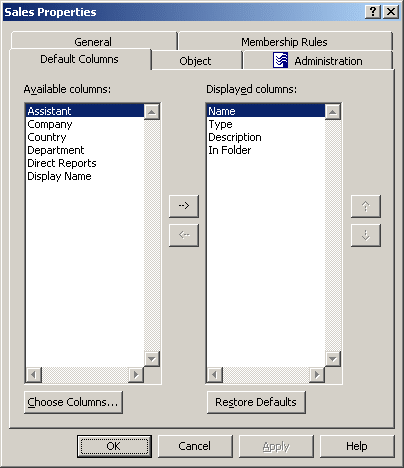
In the Properties dialog, click the Default Columns tab.
-
On the Default Columns tab, add or remove column names from the Displayed Columns list.
-
Click OK.
NOTE: Consider the following when displaying members of a Managed Unit:
-
For each Managed Unit, you can configure an individual list of the default columns to display in the details pane, so you can perform the customization on a per-Managed Unit basis.
-
You can populate the Displayed columns list by double-clicking column names in the Available columns list on the Default Columns tab. You can remove columns by double-clicking column names in the Displayed columns list.
-
To add column items to the Available Columns list, click Choose Columns. In the Choose Columns dialog, you can select columns and, if necessary, modify column names.
-
For your changes to the Displayed columns list to take effect, the details pane must be refreshed. To do so, right-click Managed Units in the Console tree and click Refresh.
Figure 6: Managed Unit - Preset columns