Chat now with support
Chat mit Support

Active Roles 7.5.3 - User Guide

Introduction Getting Started One Identity Starling Two-factor Authentication for Active Roles User or Service Account Management Group Management Computer Account Management Organizational Unit Management Management of Contacts Management of Exchange Recipients

Creating a group

You can create a group as follows: in the console tree, right-click the container where you want to add the group, select New | Group, and then follow the instructions in the wizard.

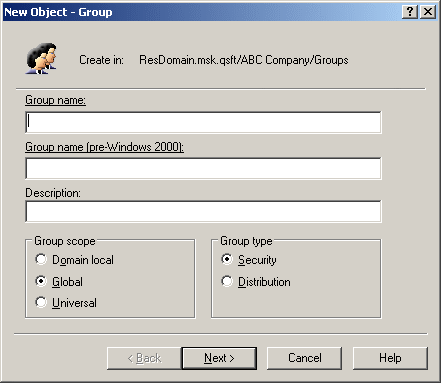
In the wizard, some property labels may be displayed as hyperlinks. In the following figure, these are Group name and Group name (pre-Windows 2000). The hyperlink indicates that Active Roles enforces certain policy restrictions on the property. To examine policy details, click the hyperlink: the policy information is displayed (see Getting policy-related information earlier in this document).

Figure 10: Creating a group

The policy information is also displayed whenever you supply a property value that violates a policy restriction. The wizard cannot proceed until you enter an acceptable value.

Steps for creating a group

To create a group

  1. In the console tree, locate and select the folder in which you want to add the group.
  2. Right-click the folder, point to New and click Group to start the New Object - Group wizard.
  3. Follow the wizard pages to specify properties of the new group, such as the group name, pre-Windows 2000 group name, description, scope, type, membership list, and Exchange address settings.
  4. If you want to set values for additional properties (those for which the wizard pages do not provide data entries), click Edit Attributes on the completion page of the wizard.
  5. After setting any additional properties for the new group, click Finish on the completion page of the wizard.

NOTE:

  • The behavior of the wizard pages may vary depending on the configuration of Active Roles policies. To determine whether a given item on a page is under the control of a certain policy, observe the text label next to the item: the underlined text label indicates that some policy restrictions are in effect. Click underlined text labels to examine the policies that govern the behavior of the wizard pages.
  • You can also start the New Object - Group wizard by clicking on the toolbar.
  • To create a group, you can also copy a previously created group. For more information, see Copying a group later in this document.
  • A new user account with the same name as a previously deleted user account does not automatically assume the permissions and group memberships of the previously deleted account because the security ID (SID) for each account is unique. To duplicate a deleted user account, all permissions and memberships must be manually recreated.

Finding a group

To find a group, right-click the container you want to search, and click Find. In the Find window, select Groups from the Find list, specify your search criteria, and start the search. In the search results list, you can right-click groups and use commands on the shortcut menu to perform management tasks. For more information, see Finding objects earlier in this document.

Steps for finding a group

To find a group

  1. On the Action menu, click Find to display the Find window.
  2. In the Find box, click Groups.
  3. In the In box, select the domain, container or Managed Unit you want to search, or click Browse to locate a domain, container or Managed Unit.
  4. Type in a name, a description, or both:
    • In the Name box, type the name (or a part of the name) of the group you want to find.
    • In the Description box, type the description (or a part of the description) of the group you want to find.
  5. Click Find Now to start your search.

NOTE:
  • You can manage found groups directly from the list in the Find window: right-click a list item, and then use commands on the shortcut menu to perform management tasks.
  • In the Find window, You can use the Group Type tab in order to limit your search to groups of certain categories. Select the Show only groups check box, select the check boxes specific to the categories of the groups you want to find, and then click Find Now. For instance, you can select the Distribution check box tosearch for groups that have the group type set to Distribution, or you can select both the Global and Universal check boxes to search for groups that have the group scope set to either Global or Universal.
  • For more information on how to search for groups, see Steps for searching for a user, contact, or group earlier in this document.
  • You can use the Advanced tab for more powerful search options. For details, see Steps for using advanced search options earlier in this document.
Verwandte Dokumente

The document was helpful.

Bewertung auswählen

I easily found the information I needed.

Bewertung auswählen