Active Roles can provision linked mailboxes automatically for users only if the ERFM - Mailbox Management built-in policy is applied to the Organizational Unit (OU) of the users in the Active Roles Console.
Prerequisites
Before applying the ERFM - Mailbox Management policy to an OU in the Active Roles Console, make sure that the account forest(s) and the resource forest are already registered in Active Roles as managed domains.
For more information, see Registering the resource and account forests in Active Roles.
To apply the ERFM - Mailbox Management policy to an OU
-
In the Active Roles Console, in the Active Directory (AD) tree, navigate to Configuration > Policies > Administration > Builtin.
-
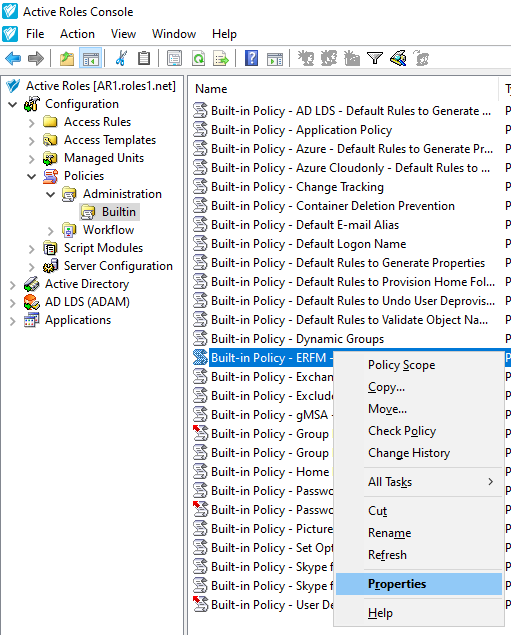
To open the Scope tab of the ERFM - Mailbox Management policy, right-click Built-in Policy - ERFM - Mailbox Management, then in the context menu, click Policy Scope.
Figure 123: Active Roles Console – Opening the Policy Scope settings of the ERFM - Mailbox Management built-in policy

-
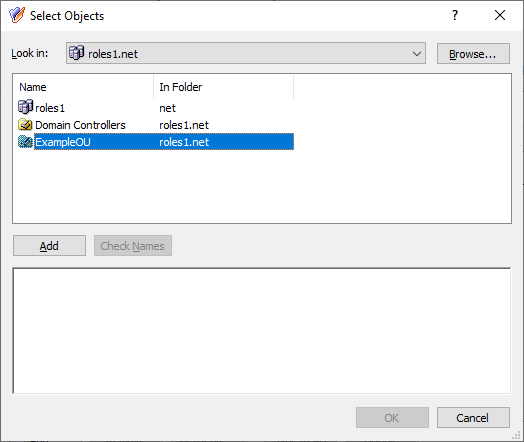
To enable linked mailboxes for an OU, in the Active Roles Policy Scope for Built-in Policy window, select the OU to which you want to apply the policy. Click Add, select the OU in the Select Objects window, click Add, then click OK.
TIP: If the Select Objects window lists no objects, use the Click here to display objects link.
Figure 124: Active Roles Console– Selecting the OU for the ERFM - Mailbox Management policy
-
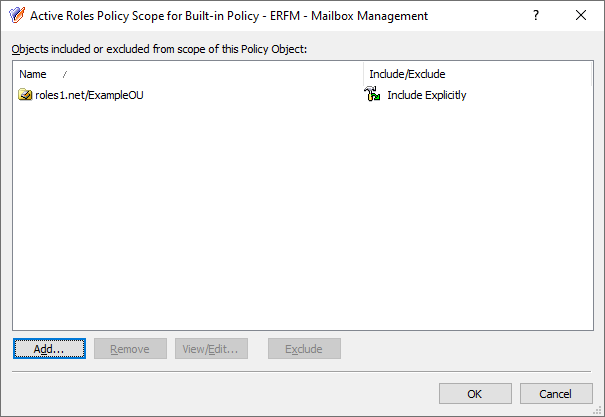
To apply your changes, click OK.
Figure 125: Active Roles Console– Applying the OU to the scope of the ERFM - Mailbox Management policy
After the policy is applied, creating a new on-premises user in the OU with the Create an Exchange Mailbox setting enabled will automatically result in the following provisioning steps:
-
Active Roles creates the master user account of the user on the account forest.
-
Active Roles then creates the linked mailbox of the user in the Exchange server of the resource forest, and a shadow user account connected to the master user account.
NOTE: Consider the following when using the ERFM - Mailbox Management policy:
-
If you registered the forest root domain of the resource forest to Active Roles as a managed domain, then Active Roles will create shadow accounts in that domain. Otherwise, Active Roles creates shadow accounts in the domain that is listed first in the ordered list of the resource forest managed domains.
-
After the policy is configured, linked mailboxes will only be available for users in the OU who were created after applying the policy, and for existing users with no mailboxes. For more information on configuring a linked mailbox for existing users, see Creating a linked mailbox for an existing user with no mailbox.
Once the ERFM - Mailbox Management built-in policy is configured for an OU, Active Roles synchronizes the properties of every managed master user account to the corresponding shadow account with the ERFM - Mailbox Management built-in scheduled task.
By default, the scheduled task runs on a daily basis, and normally you do not need to modify its settings. However, it can happen that you need to:
-
Change the default ERFM scheduling, for example, because of organizational reasons.
-
Run the scheduled task manually to make Active Roles immediately identify the existing master accounts of your Organizational Unit (OU), without waiting for its scheduled run to complete.
NOTE: The ERFM - Mailbox Management scheduled task affects only user accounts whose OU is in the scope of the ERFM - Mailbox Management built-in policy, or a copy of that policy.
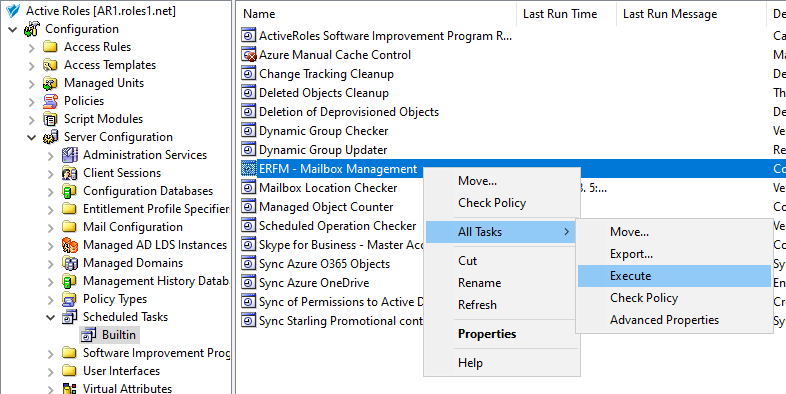
To run the ERFM - Mailbox Management built-in schedule manually
-
In the Active Roles Console, in the Active Directory (AD) tree, navigate to Configuration > Server Configuration > Scheduled Task > Builtin.
-
Right click the scheduled task ERFM - Mailbox Management, then click All Tasks > Execute.
Figure 126: Active Roles Console– Running the ERFM Mailbox Management scheduled task
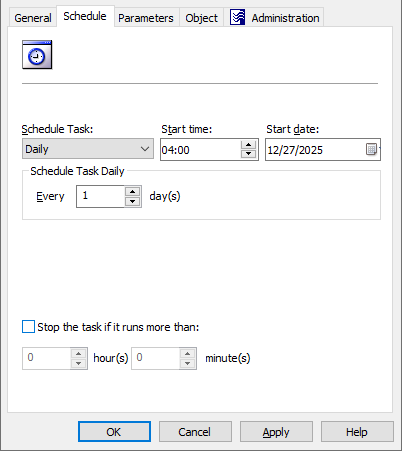
To modify the settings of the ERFM - Mailbox Management built-in schedule
-
In the Active Roles Console, in the Active Directory (AD) tree, navigate to Configuration > Server Configuration > Scheduled Task > Builtin.
-
Open the scheduling properties of the ERFM - Mailbox Management built-in scheduled task. To do so, either:
-
Double-click ERFM - Mailbox Management, then in the Properties window, open the Schedule tab.
-
Right-click ERFM - Mailbox Management, then click Properties > Schedule.
Figure 127: Active Roles Console– Scheduling properties of the scheduled task
-
To change the default scheduling settings of the task for your needs, modify the options of the Schedule tab accordingly:
-
Schedule Task: Specifies how frequently Active Roles runs the task (each hour, every day, or on a weekly/monthly basis). By default, tasks are run on a daily basis.
-
Start time and Start date: These settings specify the time and date of the first scheduled task run. These settings are not available if Schedule Task is set to Once or When Service starts.
-
Schedule Task Hourly / Daily / Weekly / Monthly: These settings specify the time interval of repeating the configured task.
For example, setting Schedule Task to Hourly lets you specify the time interval between two task runs in hours and minutes, while setting it to Weekly lets you specify not just the number of weeks between two task runs, but also the days of the week on which Active Roles must run the task.
NOTE: This setting is not available if Schedule Task is set to Once or When Service starts.
-
Stop the task if it runs more than: When selected, this setting sets a timeout (in hours and minutes) after which the task stops if it runs longer than the specified interval.
-
To save your settings, click Apply, then OK.
By default, the ERFM - Mailbox Management built-in policy saves shadow accounts in the Users container of the resource forest. If your organization stores other users as well in the Users container, then One Identity recommends changing the container for storing the shadow accounts for clarity.
To configure the location of the shadow accounts
-
In the Active Roles Console, in the Active Directory (AD) tree, navigate to Configuration > Policies > Administration > Builtin.
-
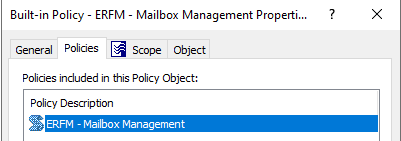
To open the Properties of the ERFM - Mailbox Management policy, in the list of policies, double-click Built-in Policy - ERFM - Mailbox Management. Alternatively, right-click the policy, then click Properties in the context menu.
Figure 128: Active Roles Console– Opening the Properties of the ERFM - Mailbox Management built-in policy
-
To open the policy settings, in the Policies tab, click Policy Description > ERFM - Mailbox Management.
Figure 129: Active Roles Console– Opening the policy settings of the ERFM - Mailbox Management built-in policy
-
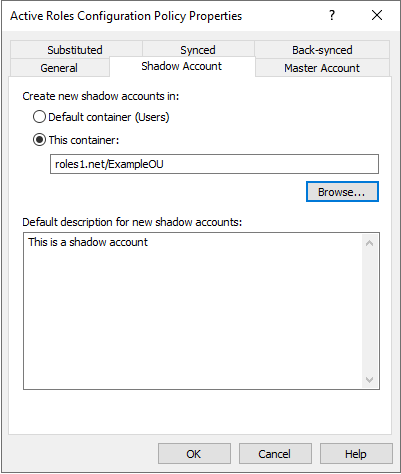
Under Shadow Account, select This container, then Browse for the container in the resource forest where you want to store the shadow accounts of the linked mailboxes.
TIP: You can also modify the default shadow account description (This is a shadow account).
Figure 130: Active Roles Console– Specifying the container for the shadow accounts
-
To apply your changes, click OK.
By default, ERFM synchronizes a pre-defined set of user and mailbox properties between the master accounts and shadow accounts. If you need to modify and/or expand the default set of synchronized properties (for example, because of organizational reasons), open and update the applicable ERFM - Mailbox Management policy settings.
ERFM synchronizes three types of properties:
-
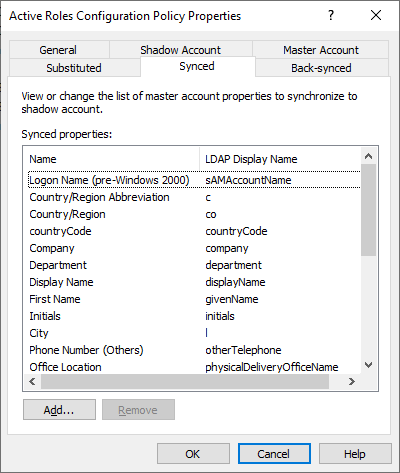
Synchronized properties: Active Roles updates these properties of the master account in both the master account and its shadow account whenever they are modified. Such properties include, for example, the personal (First Name, Last Name, and so on), geographical (Office Location, City), organizational (Company, Department, and so on) or contact (Home Phone, Mobile Number) information of the user.
-
Substituted properties: Active Roles updates these properties in the shadow account in the resource forest, even if you modify them in the master account in the account forest. Substituted properties include all Exchange recipient properties of the mail-enabled user.
-
Back synchronized properties: Active Roles copies these properties from the shadow account to the master account. By default, this category includes a single property, E-Mail Address (mail).
To view or modify the synchronized, back synchronized or substituted properties of linked mailboxes
-
In the Active Roles Console, in the Active Directory (AD) tree, navigate to Configuration > Policies > Administration > Builtin.
-
To open the Properties of the ERFM - Mailbox Management policy, in the list of policies, double-click Built-in Policy - ERFM - Mailbox Management. Alternatively, right-click the policy, then click Properties in the context menu.
Figure 131: Active Roles Console– Opening the Properties of the ERFM - Mailbox Management built-in policy
-
To open the policy settings, in the Policies tab, click Policy Description > ERFM - Mailbox Management.
Figure 132: Active Roles Console– Opening the policy settings of the ERFM - Mailbox Management built-in policy
-
(Optional) To view or modify the list of properties synchronized by the ERFM - Mailbox Management policy, click Synced.
Figure 133: Active Roles Console– Viewing or modifying the synchronized properties of linked mailboxes
-
To add a new property to the list, click Add. Then, in the Select Object Property window, select the property (or properties) you wish to add, and click OK.
Figure 134: Active Roles Console– Adding or removing synchronized properties for linked mailboxes
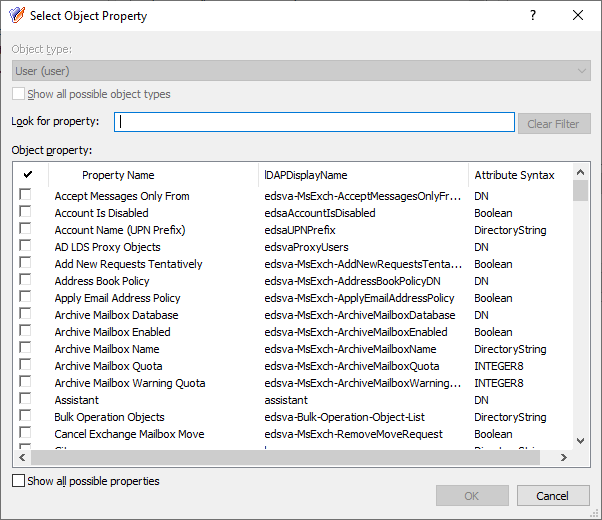
TIP: If you cannot find the property you are looking for, select Show all possible properties to list all available properties.
-
To remove a property (or properties) from the list, select the property (or properties), click Remove, and confirm the removal.
-
To apply your changes, click OK.
-
(Optional) To view or modify the list of back synchronized properties, click Back-synced.
-
To add a new property to the list, click Add. Then, in the Select Object Property window, select the property (or properties) you wish to add, and click OK.
TIP: If you cannot find the property you are looking for, select Show all possible properties to list all available properties.
-
To remove a property (or properties) from the list, select the property (or properties), click Remove, and confirm the removal.
-
To apply your changes, click OK.
-
(Optional) To view or modify the list of substituted properties, click Substituted.
-
To add a new property to the list, click Add. Then, in the Select Object Property window, select the property (or properties) you wish to add, and click OK.
TIP: If you cannot find the property you are looking for, select Show all possible properties to list all available properties.
-
To remove a property (or properties) from the list, select the property (or properties), click Remove, and confirm the removal.
-
To apply your changes, click OK.
