With this entry type, you can configure a value to include a property of the initiator, that is, the user who initiated the deprovisioning process.
To configure an Initiator Property entry type
-
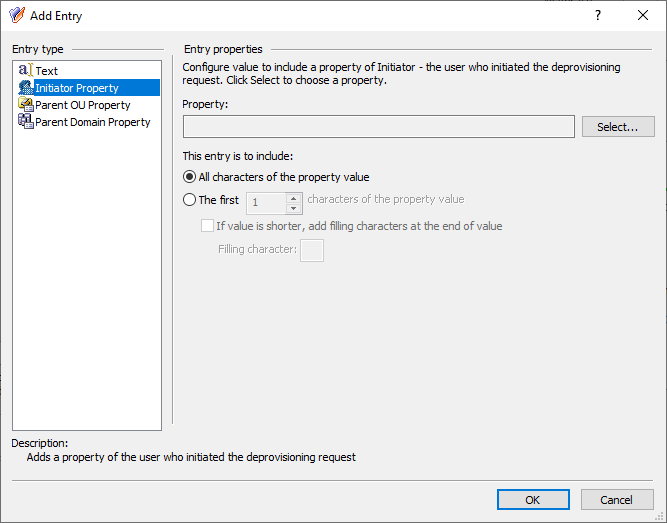
In the Add Entry window, under Entry type, click Initiator Property.
Figure 66: Add Entry: Parent Domain Property
-
Click Select.
-
To search for the object property, either enter it in the Look for Property search field, or browse for it in the Object Property list.
TIP: If you do not see the Object property that you need, to expand the Object property list, select Show all possible properties.
-
Click the property to include in the value, then click OK.
-
Decide whether you want the entry to include the entire or a part of the property.
-
If you want the entry to include the entire property, select All characters of the property value.
-
If you want the entry to include a part of the property, select The first, and enter the number of characters to include in the entry.
(Optional) To fill the missing characters in the value of the property with a predetermined character if the value is shorter than specified, select If value is shorter, add filling characters at the end of value, and enter a character in Filling character.
-
Click OK.
If you select and delete a container object that has child objects (for example, an Organizational Unit), you perform a bulk deletion.
While bulk deletions are rare, they can be still disruptive operations. To prevent accidental bulk deletion of your directory objects, Active Roles has a Container Deletion Prevention policy that you can configure in your organization.
For more details about this policy, see Concept: Container Deletion Prevention in the Active Roles Feature Guide.
To configure a Container Deletion Prevention policy
-
In the Console tree, select Configuration > Policies > Administration > Builtin.
-
In the details pane, double-click Built-in Policy - Container Deletion Prevention.
-
On the Policies tab, select the policy from the list and then click View/Edit.
-
On the Types of Containers tab, click Add and use the Select Object Type dialog to select the type (or types) of container you want to protect, and then click OK.
For example, you can select the Organizational Unit object type to prevent deletion of non-empty Organizational Units.
-
Click OK to close the dialogs you opened.
NOTE: You can also set up the Container Deletion Prevention policy in a more granular manner to add exceptions to the default policy settings (for example, to allow deleting containers in specific domains, Organizational Units, or Managed Units), but deny deleting containers elsewhere.
To configure such a granular policy:
-
Create the policy as described in the procedure.
-
Copy the policy that you created.
-
In the copied policy, block the deletion restriction by opening the Policies tab, then selecting the Disable all policies included in this Policy Object option.
Alternatively, you can also specify exceptions for this policy on the affected non-empty containers. For example, if you want to allow the deletion of an Organizational Unit within a certain Managed Unit:
-
Right-click on the Managed Unit and select Enforce Policy.
-
In the row of the Container Deletion Prevention policy that you configured, select the Blocked check box.
You can use the Active Roles Console or Web Interface to add a picture for a user, group, or contact object.
For more details about picture management rules, see Concept: Picture management rules in the Active Roles Feature Guide.
To view or modify the picture management policy options
-
Open the Active Roles Console.
-
In the Console tree, select Configuration > Policies > Administration > Builtin.
-
In the details pane, double-click Built-in Policy - Picture Management Rules.
-
In the Properties > Policies tab in the Properties dialog that appears, click the policy in the list, then click View/Edit.
-
In the Properties dialog that appears, do the following:
-
In the Controlled Property tab, view or change the object class and attribute to which the policy applies. The policy will request to save the supplied picture in the specified attribute of an object of the specified object class.
TIP: By default, the policy controls the thumbnailPhoto attribute of the user, contact, or group object class. However, you can choose a different attribute for each object class separately.
For example, you can configure the policy to control the thumbnailLogo or jpegPhoto user attribute, while retaining control of the thumbnailPhoto attribute for groups and contacts.
-
On the Picture Sizing tab, view or change the following policy settings:
-
Maximum allowed size, in pixels: Specifies the maximum allowed dimensions of the picture. If the width or height of a picture is greater than specified with this option, then the policy prevents applying the picture.
-
Minimum allowed size, in pixels: Specifies the minimum allowed dimensions of the picture. If the width or height of a picture is less than specified with this option, then the policy prevents applying the picture.
-
Enable automatic picture resizing: Enables Active Roles to resample pictures whose dimensions exceed the maximum allowed dimensions. If this setting is not selected, Active Roles rejects pictures that exceed the maximum dimensions.
NOTE: By default, the Built-in Policy - Picture Management Rules policy is applied to the Active Directory node in the Active Roles namespace, so the policy settings affect all users, groups and contacts in the managed domains.
To configure different policy options for different domains or containers, create a copy of the Built-in Policy - Picture Management Rules policy, then configure and apply the copy as you need.
You can view or modify Policy Objects, add Policy Objects to directory objects and configure policy links and policy scopes using Active Roles Console.
