
Dell™ One Identity Cloud Access Manager 8.1.1 - How to Configure for SSO to SAP NetWeaver using SAML 2.0
Prerequisites and requirements
User mappings
NetWeaver configuration (Service Provider Role)
Dell™ One Identity Cloud Access Manager configuration - (Identity Provider Role)
NetWeaver configuration
Dell™ One Identity Cloud Access Manager as an Identity Provider (IDP)
Enabling SSO to SAP NetWeaver® applications
Legal notices
User mappings
In the following example Cloud Access Manager is deployed using Active Directory® as the user store, and the logon ID of NetWeaver internal users matches the sAMAccountName of Cloud Access Manager users.
NetWeaver configuration (Service Provider Role)
|
1 |
In the SAP NetWeaver® admin interface, navigate to Configuration|Security|Authentication and Single Sign-On. Select the SAML 2.0 tab. 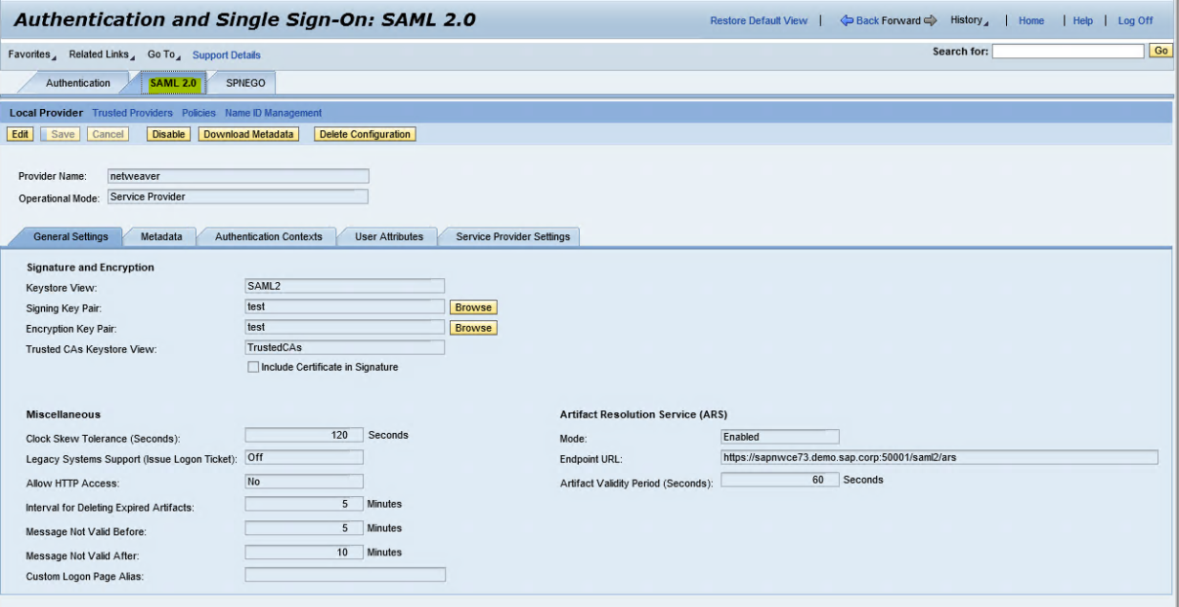 |
|
2 |
Click Enable SAML 2.0 support. |
|
3 |
|
4 |
Click Browse, located next to the Signing Key Pair field. In the Select Keystore Entry box, click Create. In the Entry Settings window under Entry Name, type test and click Next. |
|
5 |
In the Subject Properties window, in the Common Name field type test. Click Finish, and then click OK. |
|
6 |
|
7 |
|
8 |
Click Finish. |
|
9 |
|
10 |
Click Add in the Relay State Mappings section and insert the following entry to facilitate IDP-initiated SSO later: |
|
11 |
Dell™ One Identity Cloud Access Manager configuration - (Identity Provider Role)
|
1 |
Log in to the Administration Console using the desktop shortcut Cloud Access Manager Application Portal and select Add New from the Applications section on the home page. |
|
2 |
|
3 |
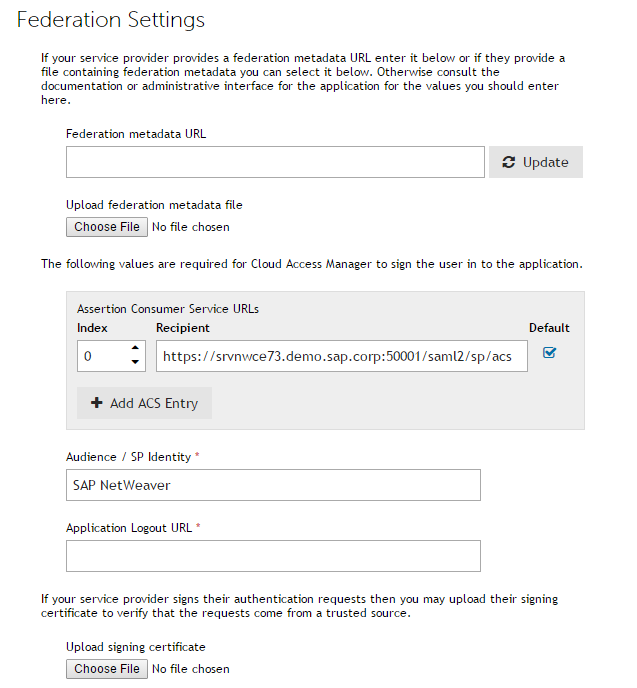
Where <NetWeaver_server_fqdn> is the fully-qualified domain name of your SAP NetWeaver® server, and <port> is the port number used by the NetWeaver server to listen on, for example https://srvnwce73.demo.sap.corp:50001.
|
4 |
|
5 |
On the Subject Mapping page, select Derive the username from an attribute, and enter sAMAccountName in the attribute name. Do not add extra claim mappings. Click Next. |
|
6 |
Choose whether to proxy the application. Select Proxy this application if you want to expose your NetWeaver application to users on the Internet. If you choose this option, then you must: |
|
a. |
Set the value of the application URL to https://<NetWeaver_server_fqdn>:<port> for example https://srvnwce73.demo.sap.corp:50001. Click Next. |
|
8 |
|
9 |
|
10 |
|
11 |
Click Finish. On the Application Created page, click Download Metadata and then Download Certificate. Save both files to a location that can be accessed by the NetWeaver admin browser. Click Close. |
NetWeaver configuration
|
1 |
In NetWeaver administration on the Configuration|Security|Authentication and Single Sign-On|SAML 2.0 page, click the Trusted Providers link. Click Add, and choose by uploading metadata file. |
|
2 |
In the Select Metadata step, choose the CloudAccessManagerMetadata.xml document downloaded in step 11 of Cloud Access Manager configuration (Identity Provider Role) and click Next. |
|
3 |
In the Metadata Verification step, choose the certificate (PEM file) downloaded in step 11 of Cloud Access Manager configuration (Identity Provider Role) and click Next. |
|
4 |
|
5 |
In the Signature and Encryption step, change the Single Sign-On Authorization Request Sign parameter to Never and click Next. |
|
6 |
|
7 |
|
8 |
|
9 |
|
10 |
Click Enable. |