- In the console tree, locate and select the folder in which you want to add the contact.
- Right-click the folder, point to New and click Contact to start the New Object - Contact wizard.
- Follow the wizard pages to specify properties of the new contact, such as the contact’s first name, last name, full name, display name, and Exchange e-mail address settings.
- If you want to set values for additional properties (those for which the wizard pages do not provide data entries), click Edit Attributes on the completion page of the wizard.
- After setting any additional properties for the new contact, click Finish on the completion page of the wizard.
Introduction
Getting Started
Starting the Active Roles console
User Interface overview
View mode
Using Managed Units
Setting up filter
Finding objects
One Identity Starling Two-factor Authentication for Active Roles
Steps for searching for a user, contact, or group
Steps for searching for a computer
Steps for searching for an Organizational Unit
Steps for using advanced search options
Steps for building a custom search
LDAP syntax
Getting policy-related information
Pre-requisites to configure One Identity Starling
Logging in to MMC interface through 2FA authentication
User or Service Account Management
About user accounts
User account management tasks
Group Management
Creating a user account
Finding a user account
Copying a user account
Modifying user account properties
Renaming a user account
Disabling and enabling a user account
Resetting user password
Adding user accounts to groups
Removing a user account from groups
Changing a user’s primary group
Performing Exchange tasks on a user account
Moving user accounts
Exporting and importing user accounts
Deleting user accounts
Deprovisioning a user account
Restoring a deprovisioned user account
Managing user certificates
Management of group Managed Service Accounts
About groups
Group management tasks
Computer Account Management
Creating a group
Finding a group
Copying a group
Modifying group properties
Changing group type and group scope
Renaming a group
Assigning a manager over a group
Adding members to a group
Removing members from a group
Performing Exchange tasks on a group
Moving groups
Exporting and importing groups
Deleting groups
Deprovisioning groups
Restoring deprovisioned groups
Administering query-based distribution groups
Administering dynamic (rule-based) groups
Using temporal group memberships
About computer accounts
Computer account management tasks
Organizational Unit Management
Creating a computer account
Finding a computer account
Modifying computer account properties
Disabling and enabling a computer account
Resetting a computer account
Adding computer accounts to groups
Removing a computer account from groups
Moving computer accounts
Exporting and importing computer accounts
Deleting computer accounts
Managing a remote computer
Using Remote Desktop Connection
Viewing BitLocker recovery passwords
About Organizational Units
Organizational Unit management tasks
Management of Contacts
Management of Exchange Recipients
Creating an Exchange mailbox
Steps for creating a user mailbox
Steps for creating a room or equipment Mailbox
Steps for creating a linked mailbox
Steps for creating a shared mailbox
Performing Exchange tasks
Managing Exchange-related properties
Exchange General tab
Exchange Advanced tab
E-mail Addresses tab
Mail Flow Settings tab
Mailbox Settings tab
Mailbox Features tab
Calendar Settings tab
Resource Information tab
Master Account tab
Mailbox Sharing tab
Managing Unified Messaging users
Steps for creating a contact
Finding a contact
To find a contact, right-click the container you want to search and click Find. In the Find window, select Contacts from the Find list, specify your search criteria, and start the search. In the search results list, you can right-click contacts and use commands on the shortcut menu to perform management activities.
For step-by-step instructions on how to search for contacts, see Steps for searching for a user, contact, or group earlier in this document.
Modifying contact properties
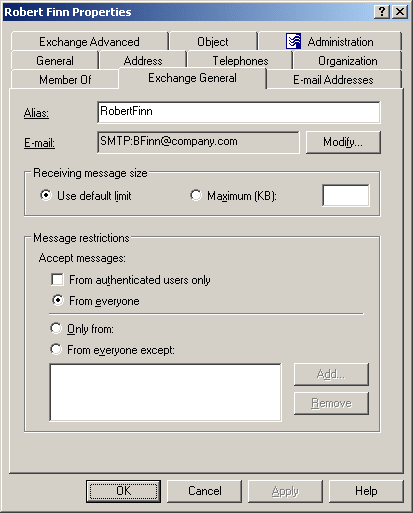
To modify contact properties, right-click the contact, and then click Properties. You can make changes to contact properties in the Properties dialog box, shown in the following figure.
Figure 23: Modifying contact properties
In the Properties dialog box, some property labels may be displayed as hyperlinks. The hyperlink indicates that Active Roles enforces certain policy restrictions on the property. To examine policy details, click the hyperlink: the policy information is displayed (see Getting policy-related information earlier in this document).
The policy information is also displayed whenever you supply a property value that violates a policy restriction. Property changes cannot be applied until you enter an acceptable value.
You can use the Properties dialog box to view or modify any property of the contact: go to the Object tab and click Advanced Properties. In the Advanced Properties window you can manage all properties, including those that cannot be accessed via the Properties dialog box itself.
You can also display the Advanced Properties window as follows: right-click the contact and select All Tasks | Advanced Properties.

The instructions on how to manage contact properties are similar to those for user accounts, see Steps for modifying user account properties earlier in this document.